
Get started with Give Lively’s Zapier integration
Get going with our Zapier integration and connect Give Lively to 6,000+ other web services with automated actions when new donations come in.
Use Zapier for third-party integrations
Before you get started
Before you can begin using Zapier with Give Lively, you must set up a Zapier account.
Video Overview
Walkthrough
Zapier is a software company that automates connections between apps, turning everyday tasks into effortless workflows. In our case, Zapier allows you to connect Give Lively to 6,000+ other web services. The automated connections you create are called Zaps, which consist of a trigger and one or more actions; the trigger automatically initiates the action(s) through Zapier. Zaps can be set up in minutes with no coding.
Get started with Zapier
Before you can begin using Zapier with Give Lively, you must set up a Zapier account.
Set up Zaps
You have a choice between using or adapting pre-established Zaps and creating your own with the Zap Editor. No coding knowledge is needed to create a Zap; just follow the step-by-step setup instructions.
Make your first Zap trigger
This process will complete only one half of a Zap. It tells Zapier what trigger to look for. Later you will have to tell Zapier what action(s) will ensue as a result of the trigger.
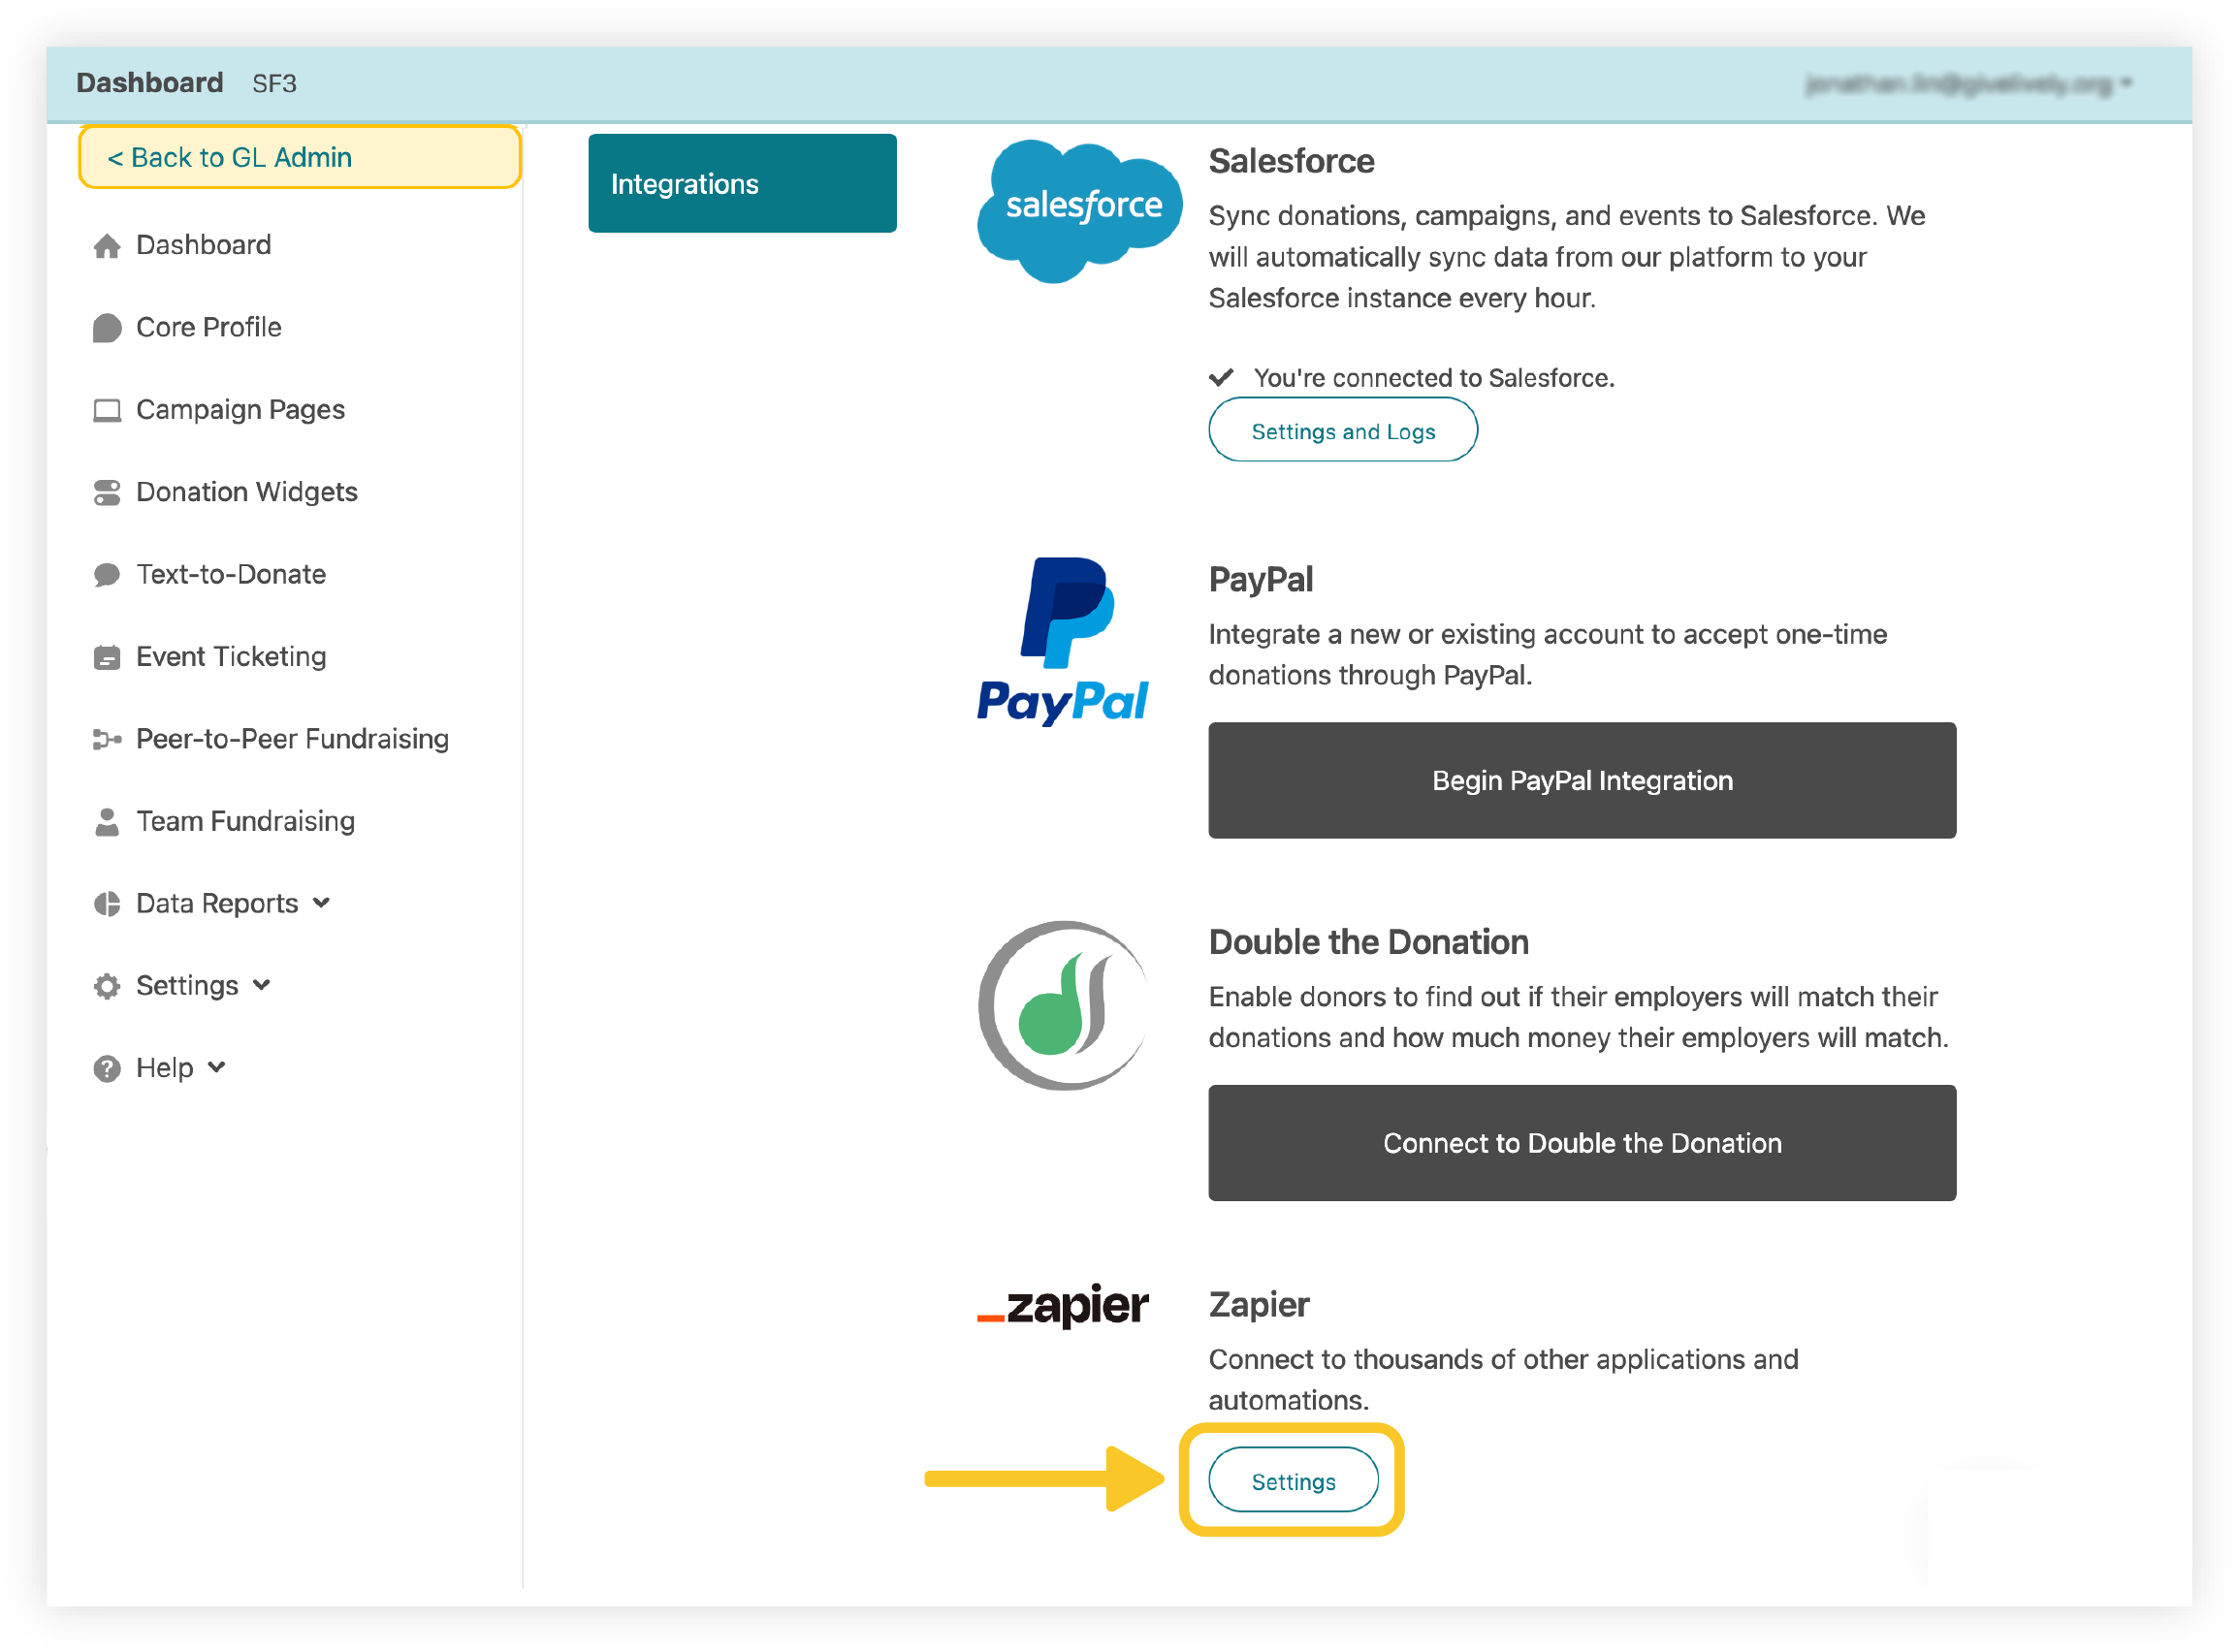
- Log in to the Give Lively Nonprofit Admin Portal.
- In the left-hand navigation menu, go to “Settings” and then “Organization Settings”.
- Select “Integrations”.
- Scroll down to the Zapier section and click “Settings”.
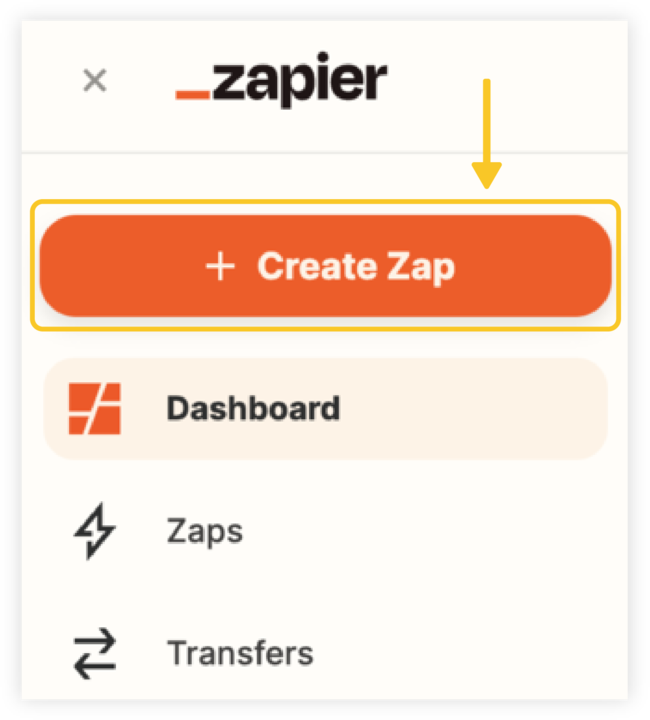
- In a new tab or window, log in to your Zapier account.
- Click the orange “+ Create Zap” button in the sidebar.
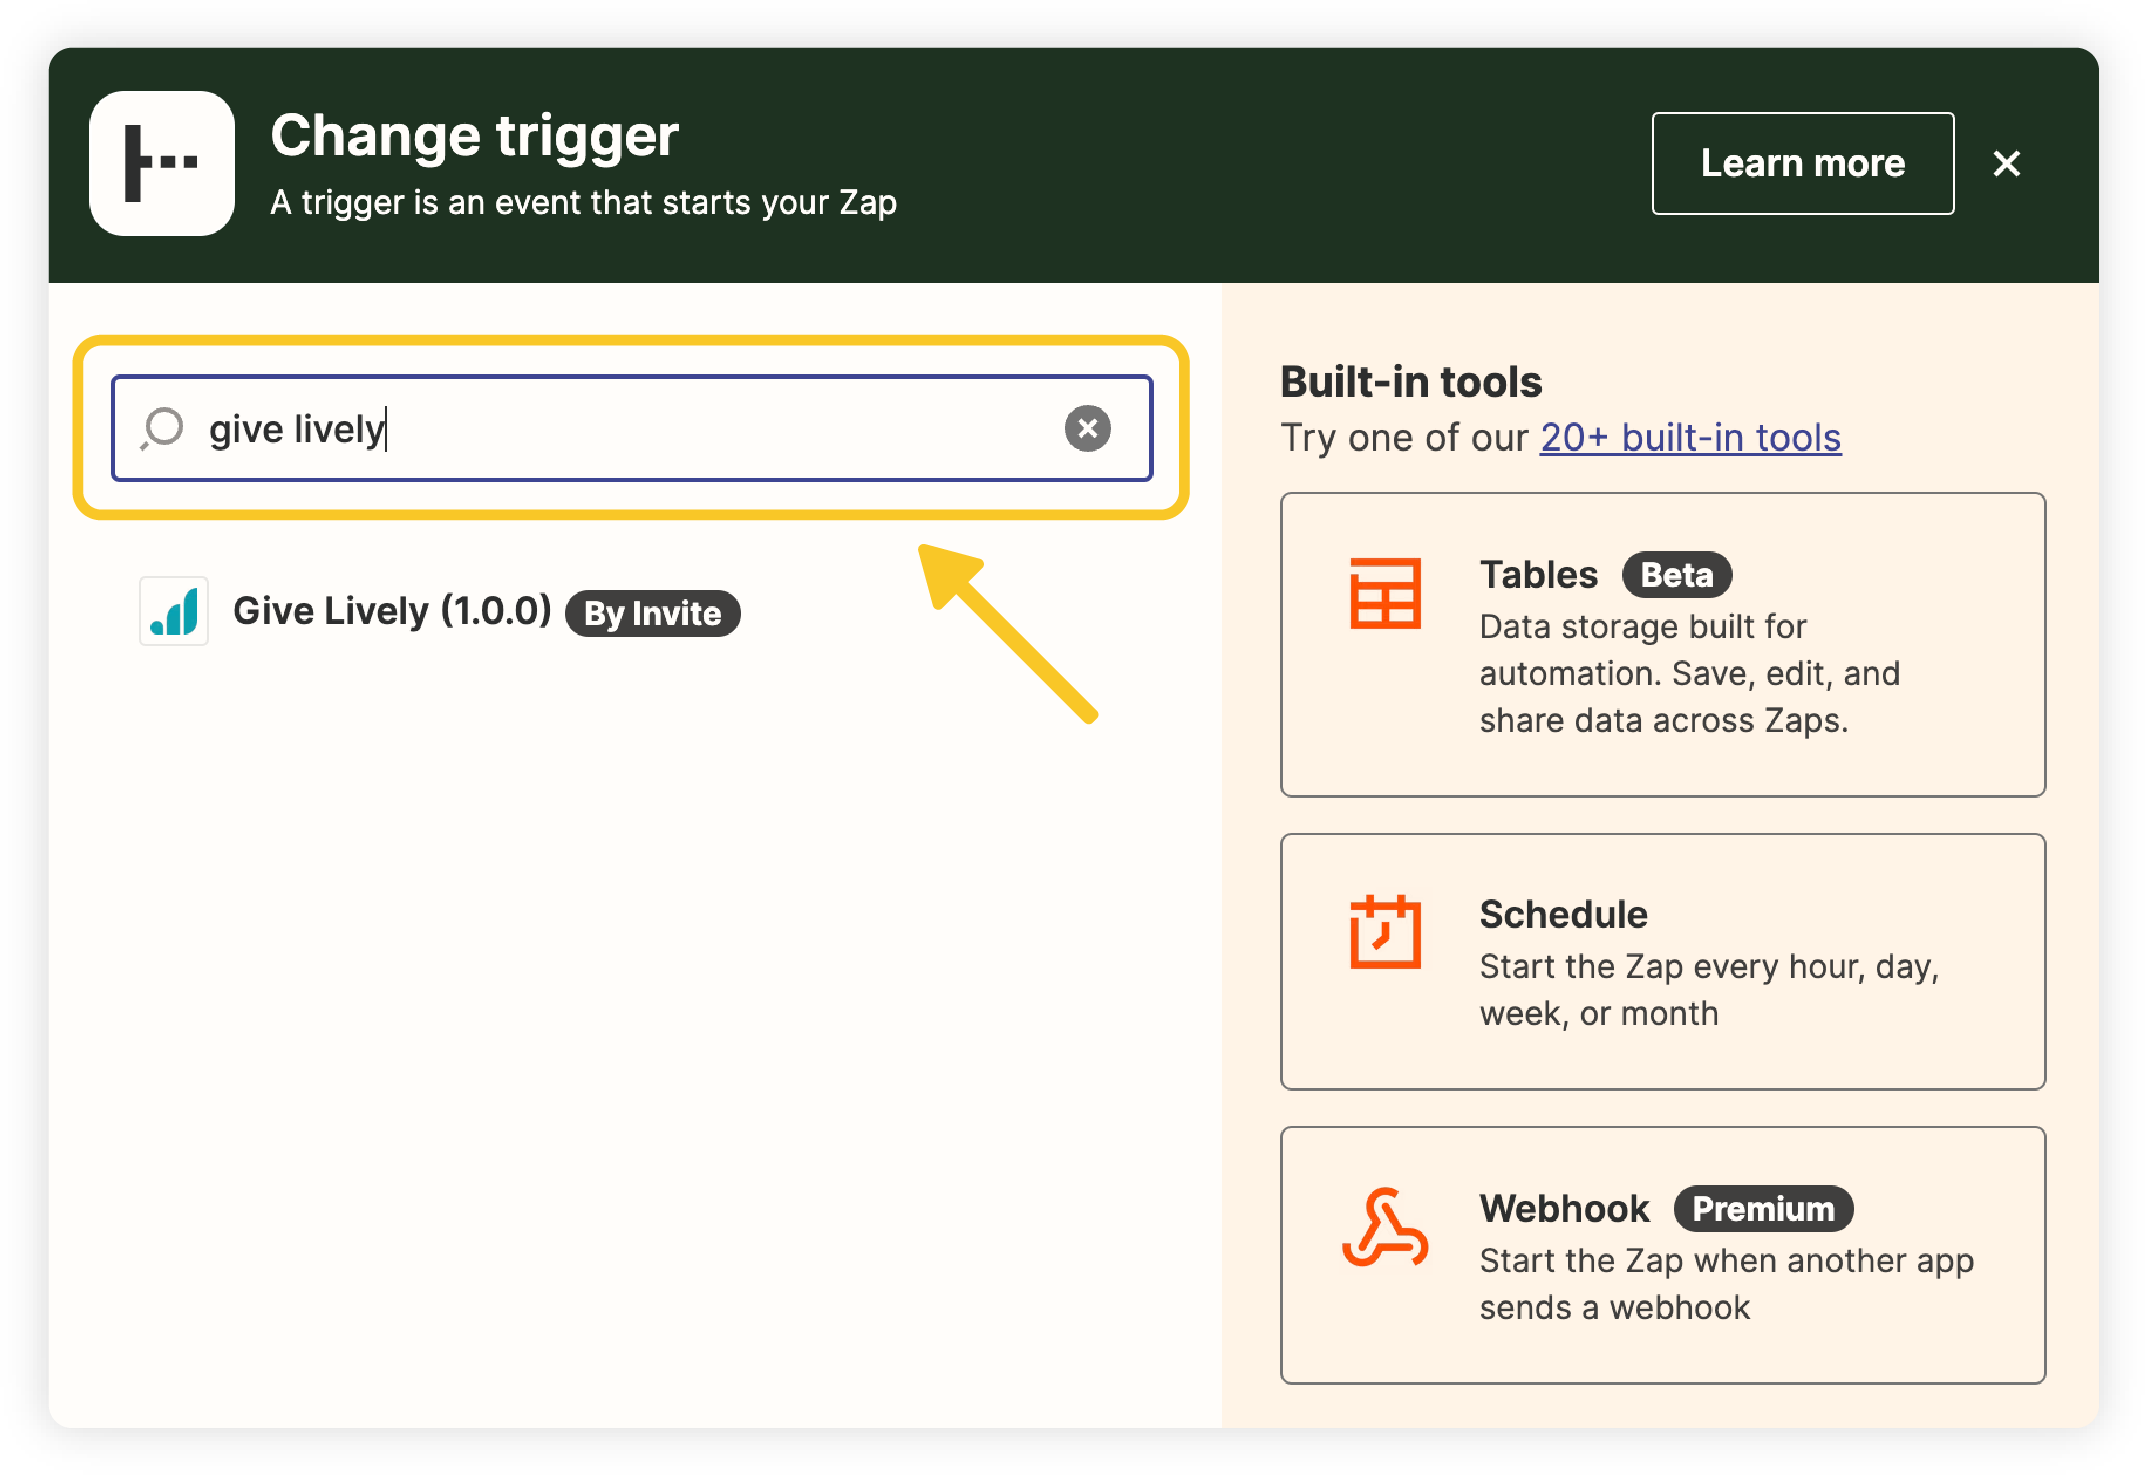
- Click the “1. Trigger” button.

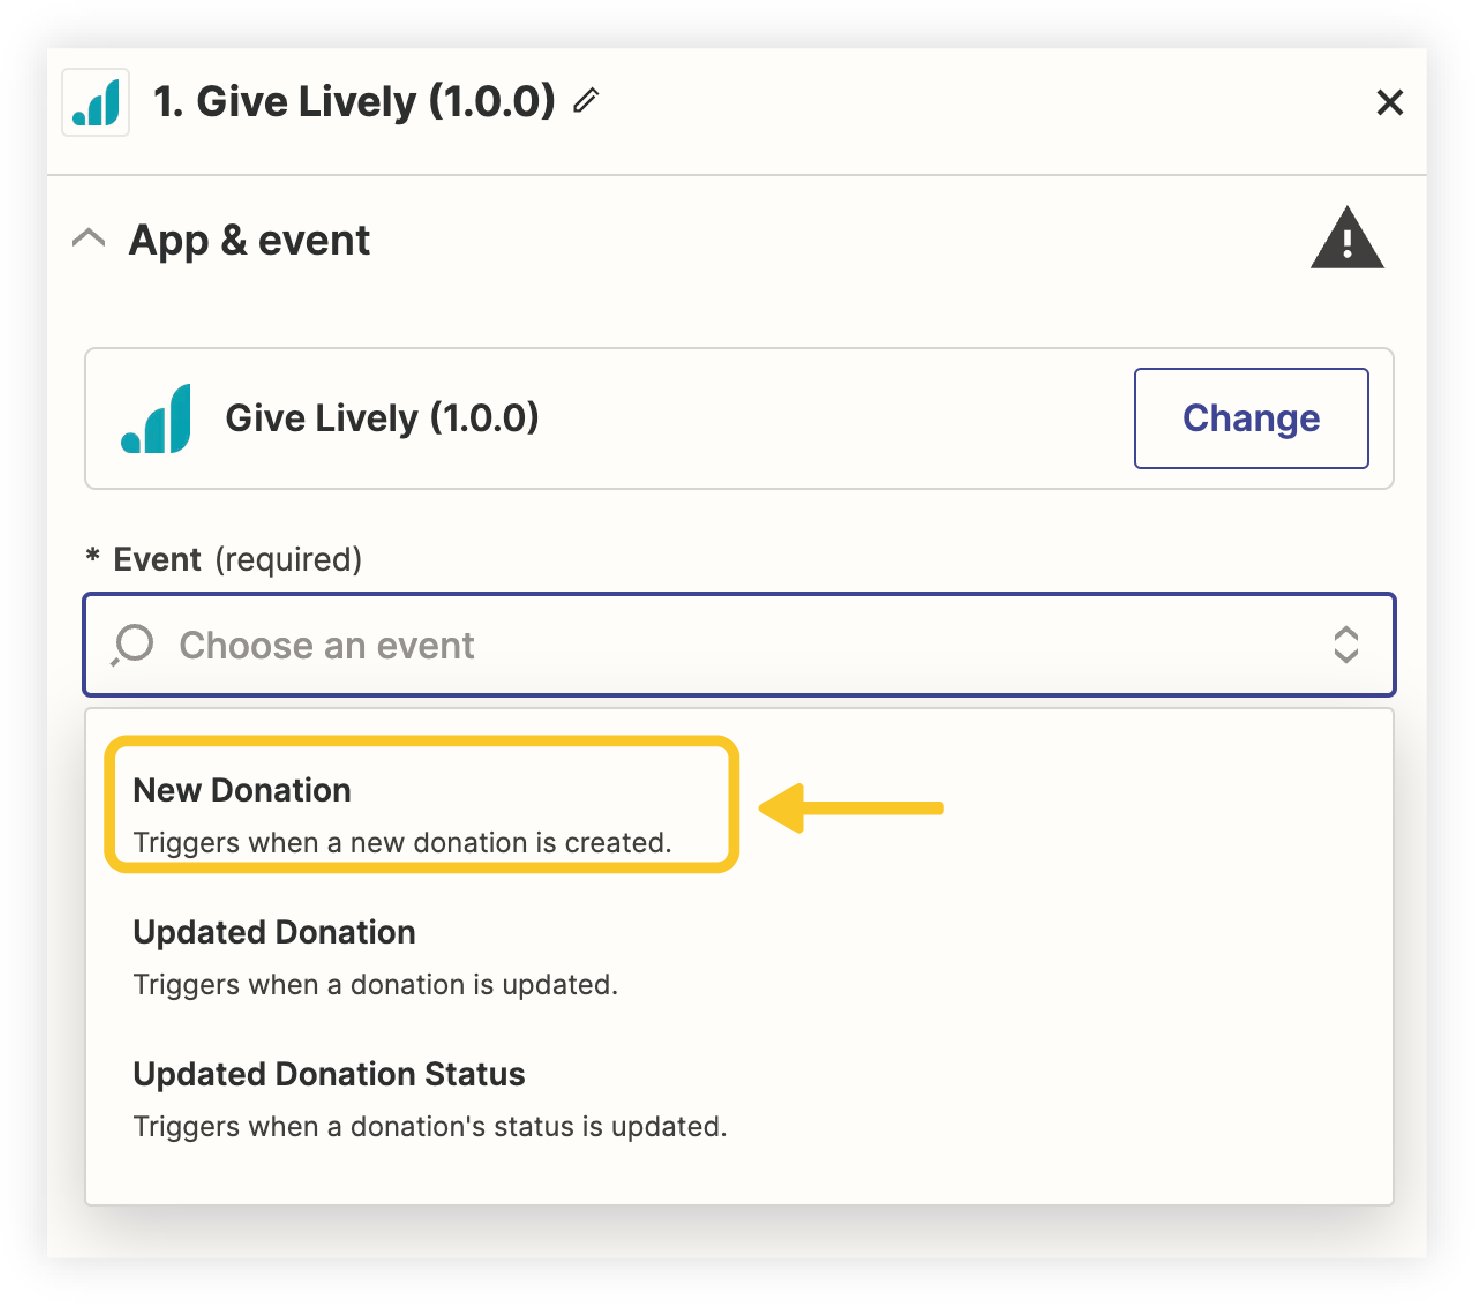
- Type "Give Lively" in the search bar and select it from the results.
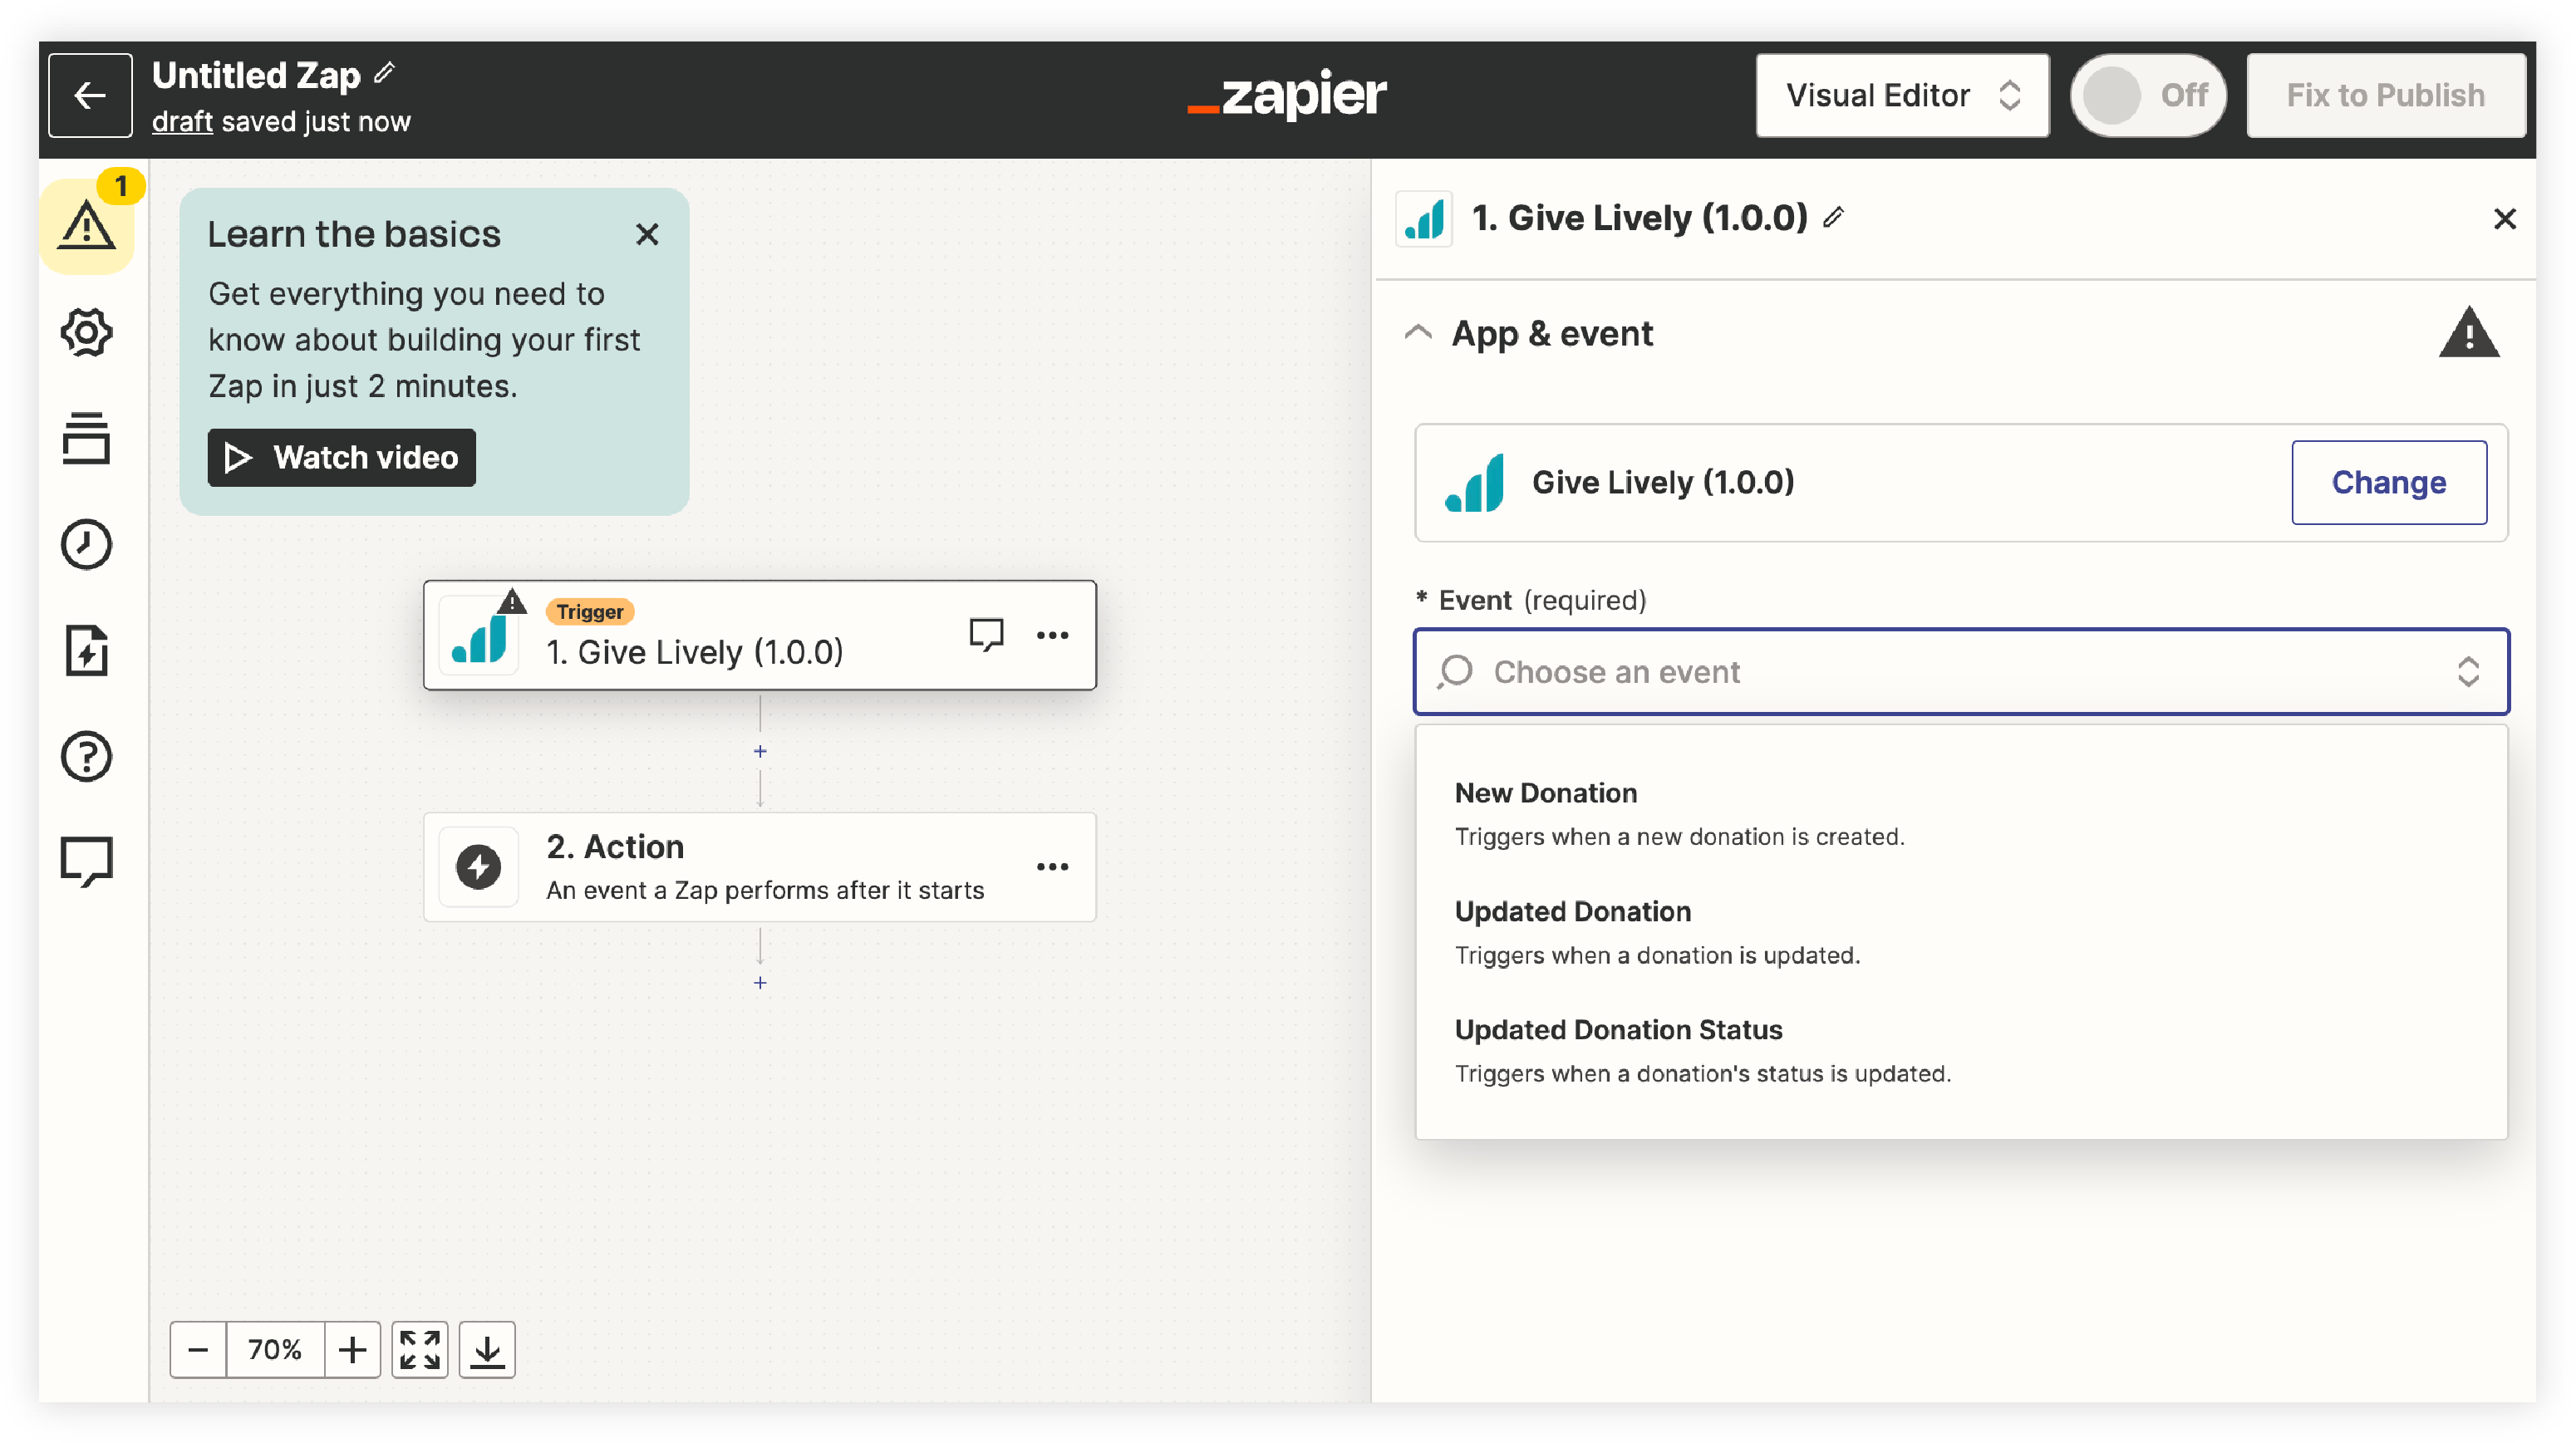
- Use the “Event” dropdown in the right-hand workspace to choose the triggering event. (We recommend “New Donation” to start.) Click “Continue”.
- Click “Sign In” next to “Connect Give Lively”.
- An "Allow Zapier to access your Give Lively Account?" pop-up window will appear.
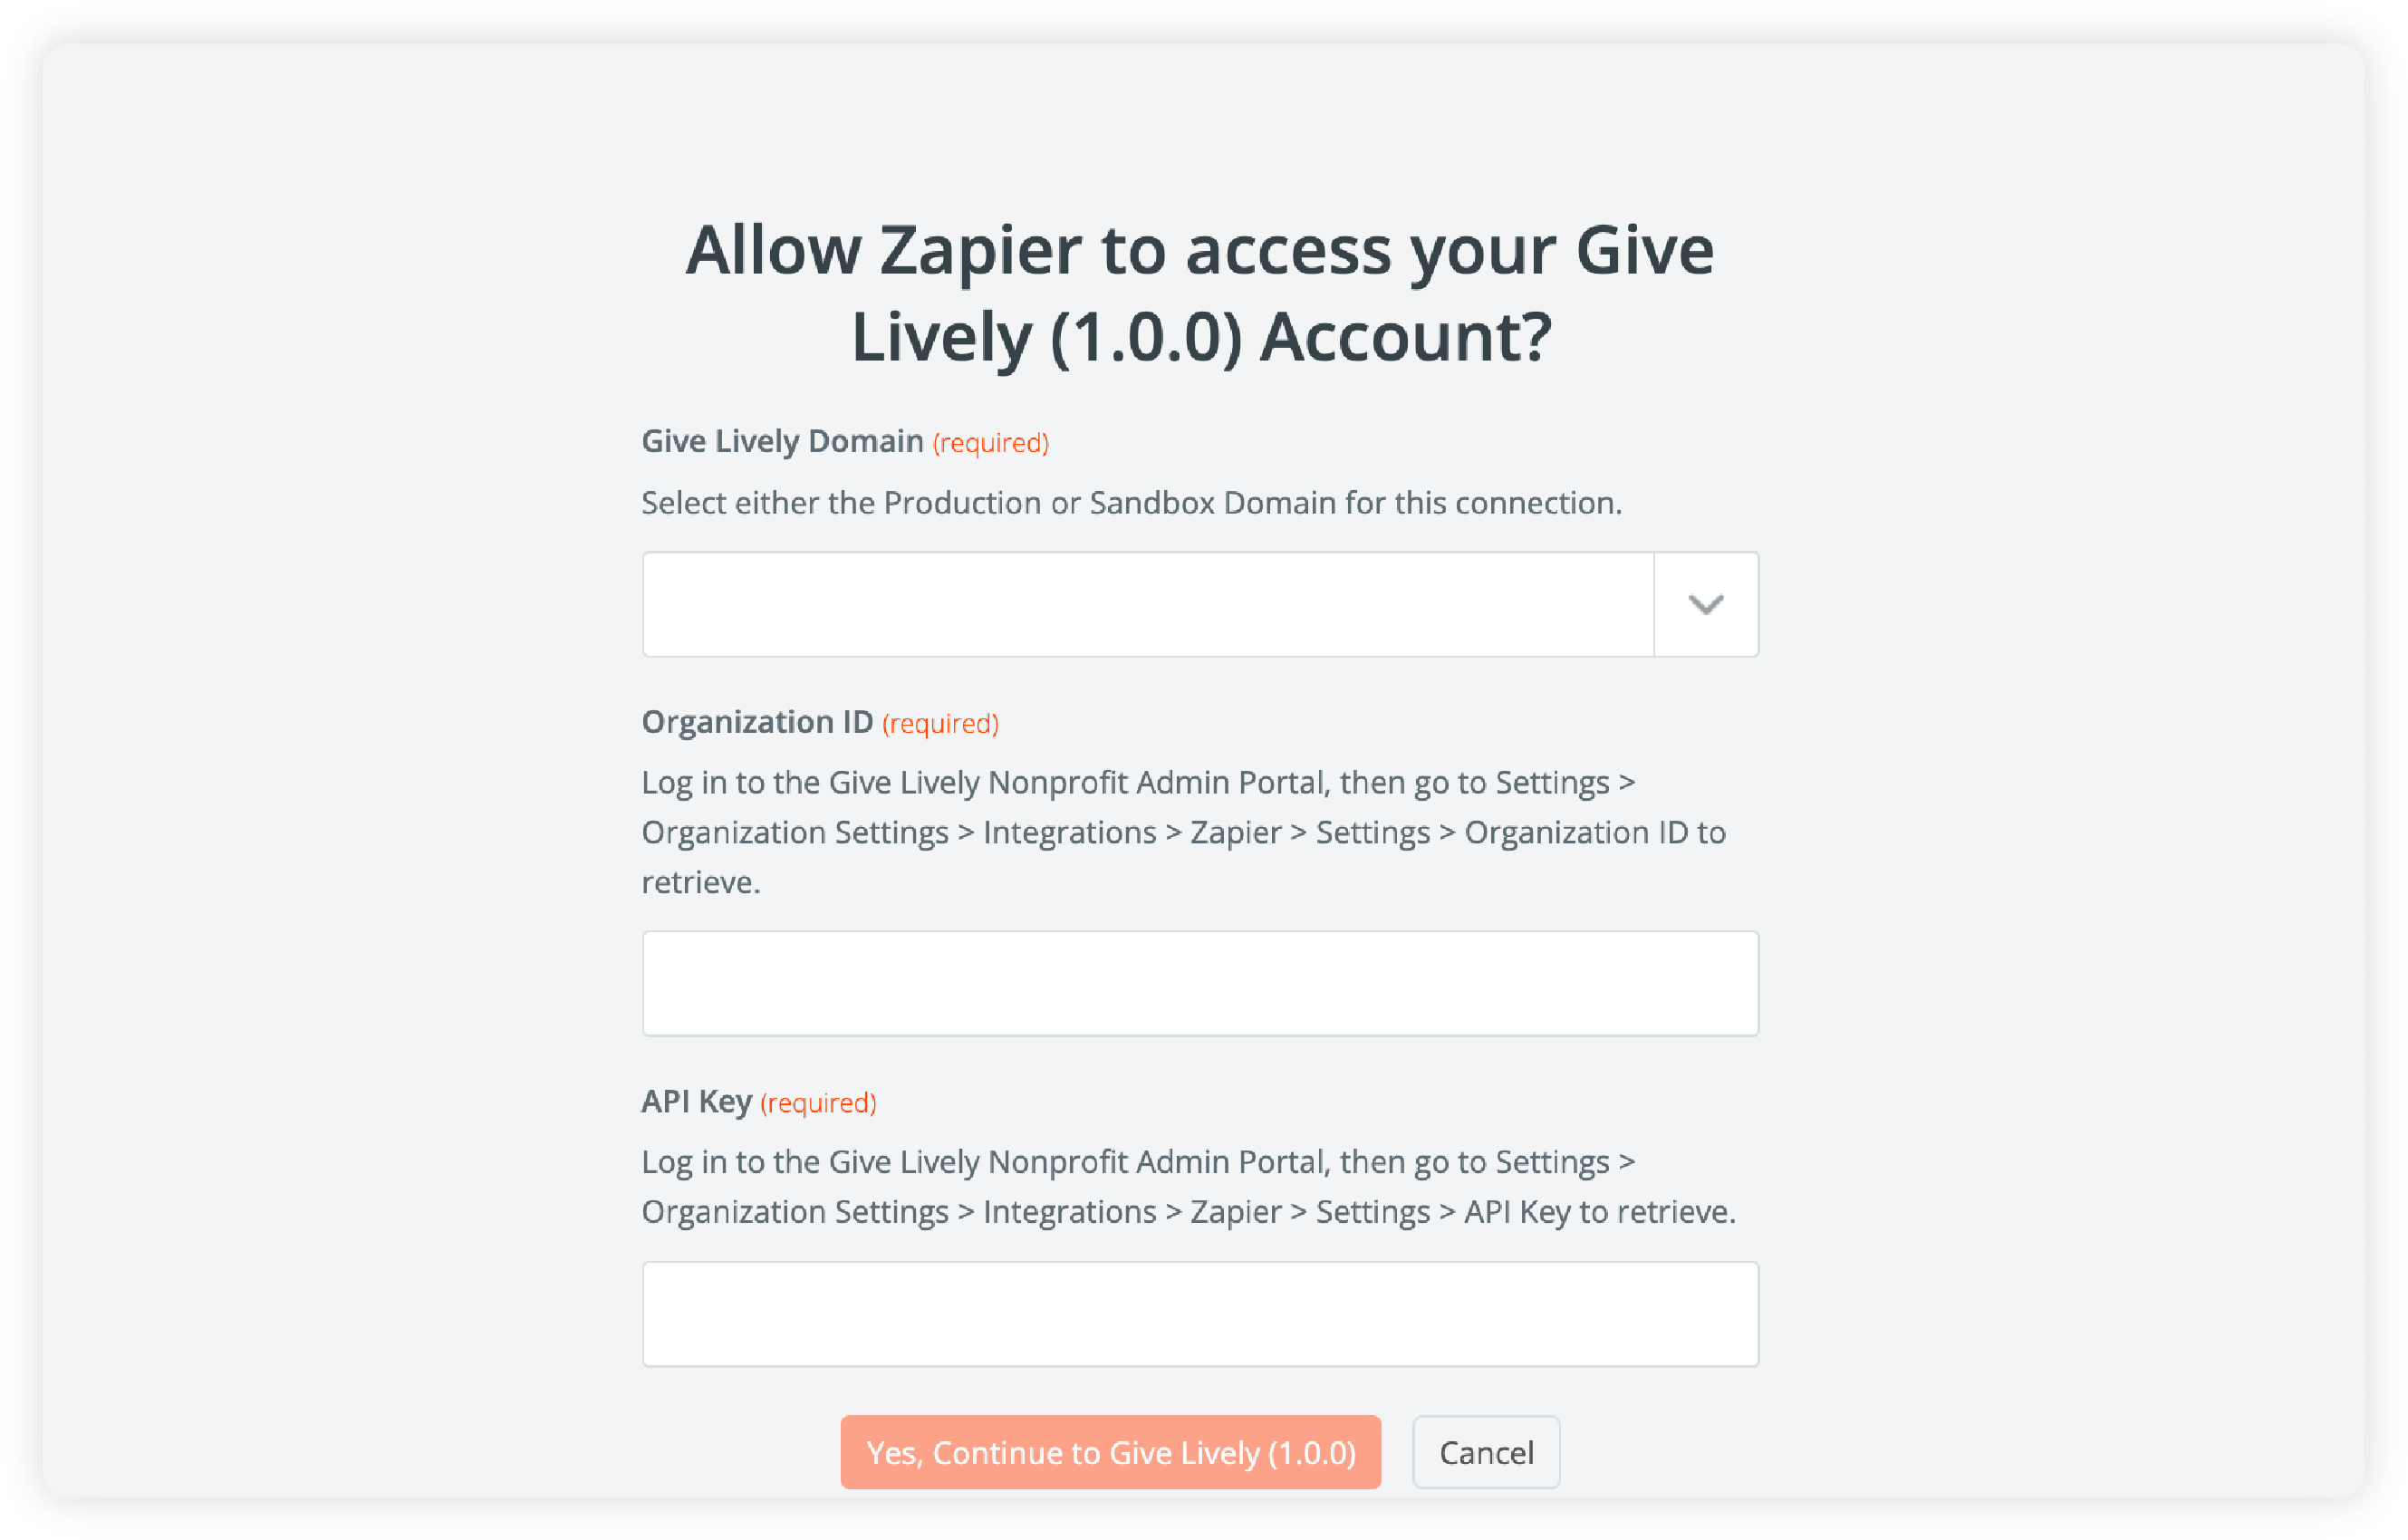
- Choose either “Production” or “Sandbox” from the “Give Lively Domain” dropdown.
- Copy your Organization ID from the previous tab/window (where you were managing Zapier settings in the Nonprofit Admin Portal).

- Paste the Organization ID into the corresponding Zapier field in the Zapier pop-up window.
- Repeat the above steps for the API key. Use the “Generate” button if none is present.
- Click “Yes, Continue to Give Lively” in the Zapier pop-up window.
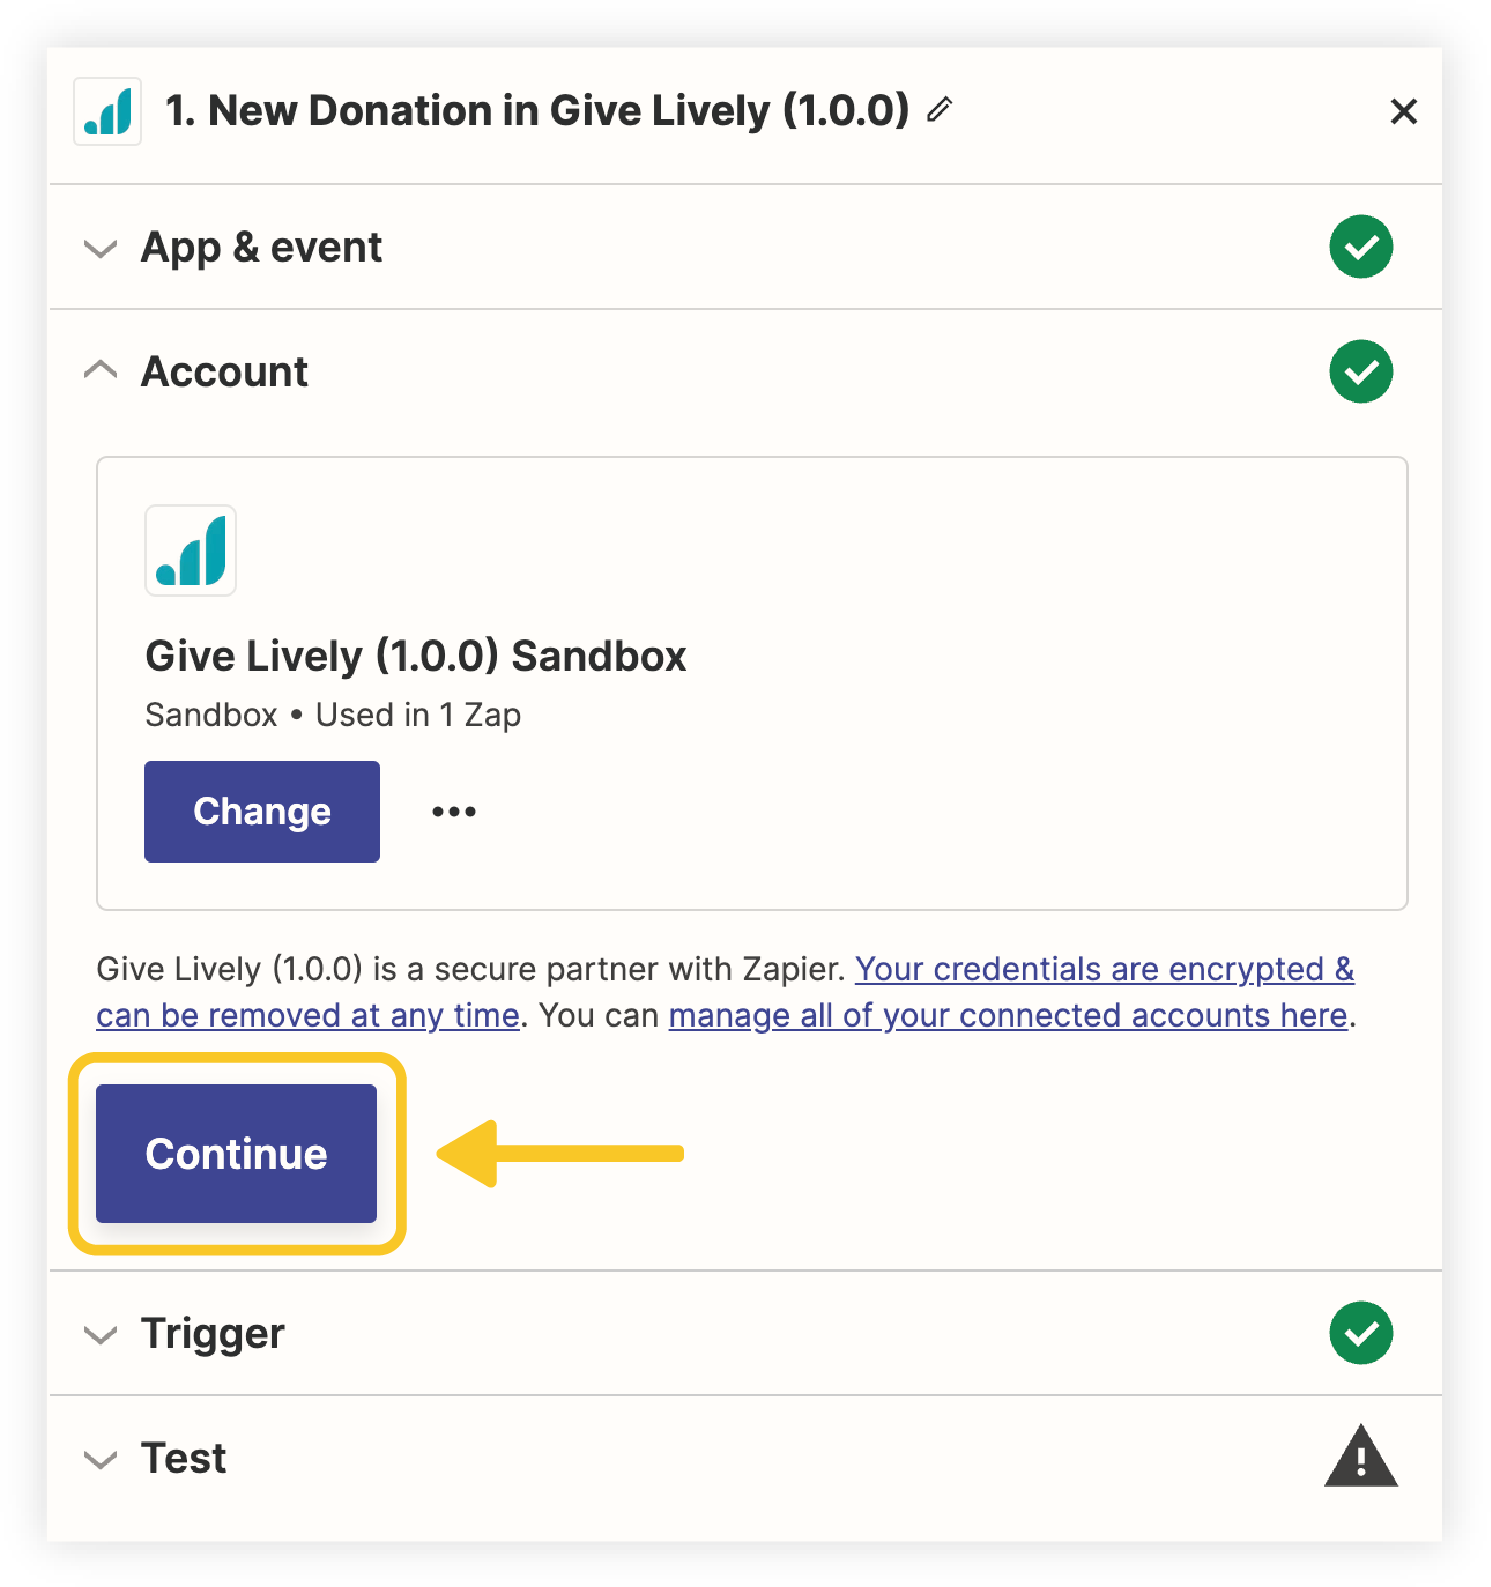
- Click “Continue” in the Zapier right-hand workspace.
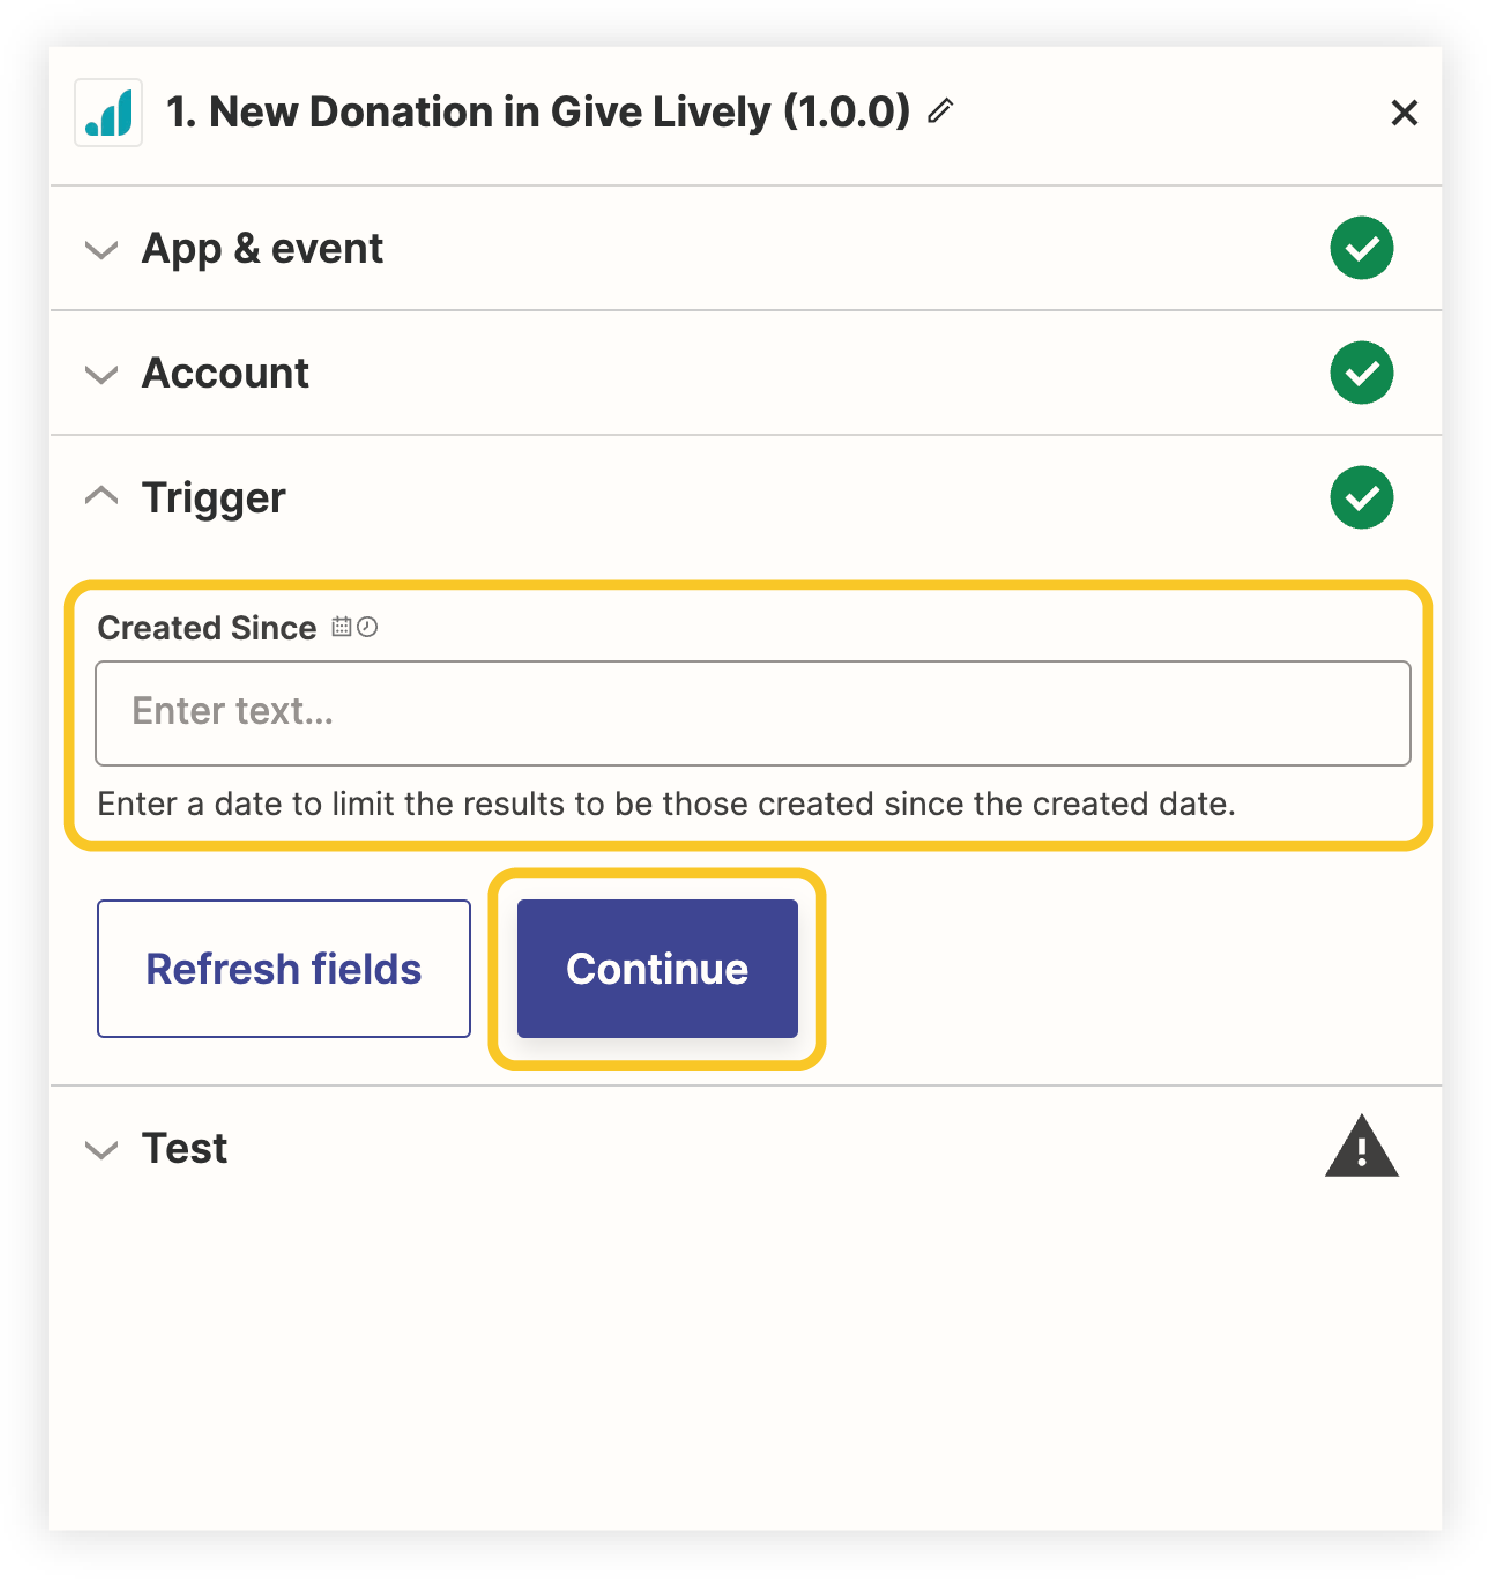
- In the "Created Since" field, choose a start date from which records should be synced, e.g. “5/15/2022 8PM EST” or leave blank to include donations from all time.
- Click “Continue”.
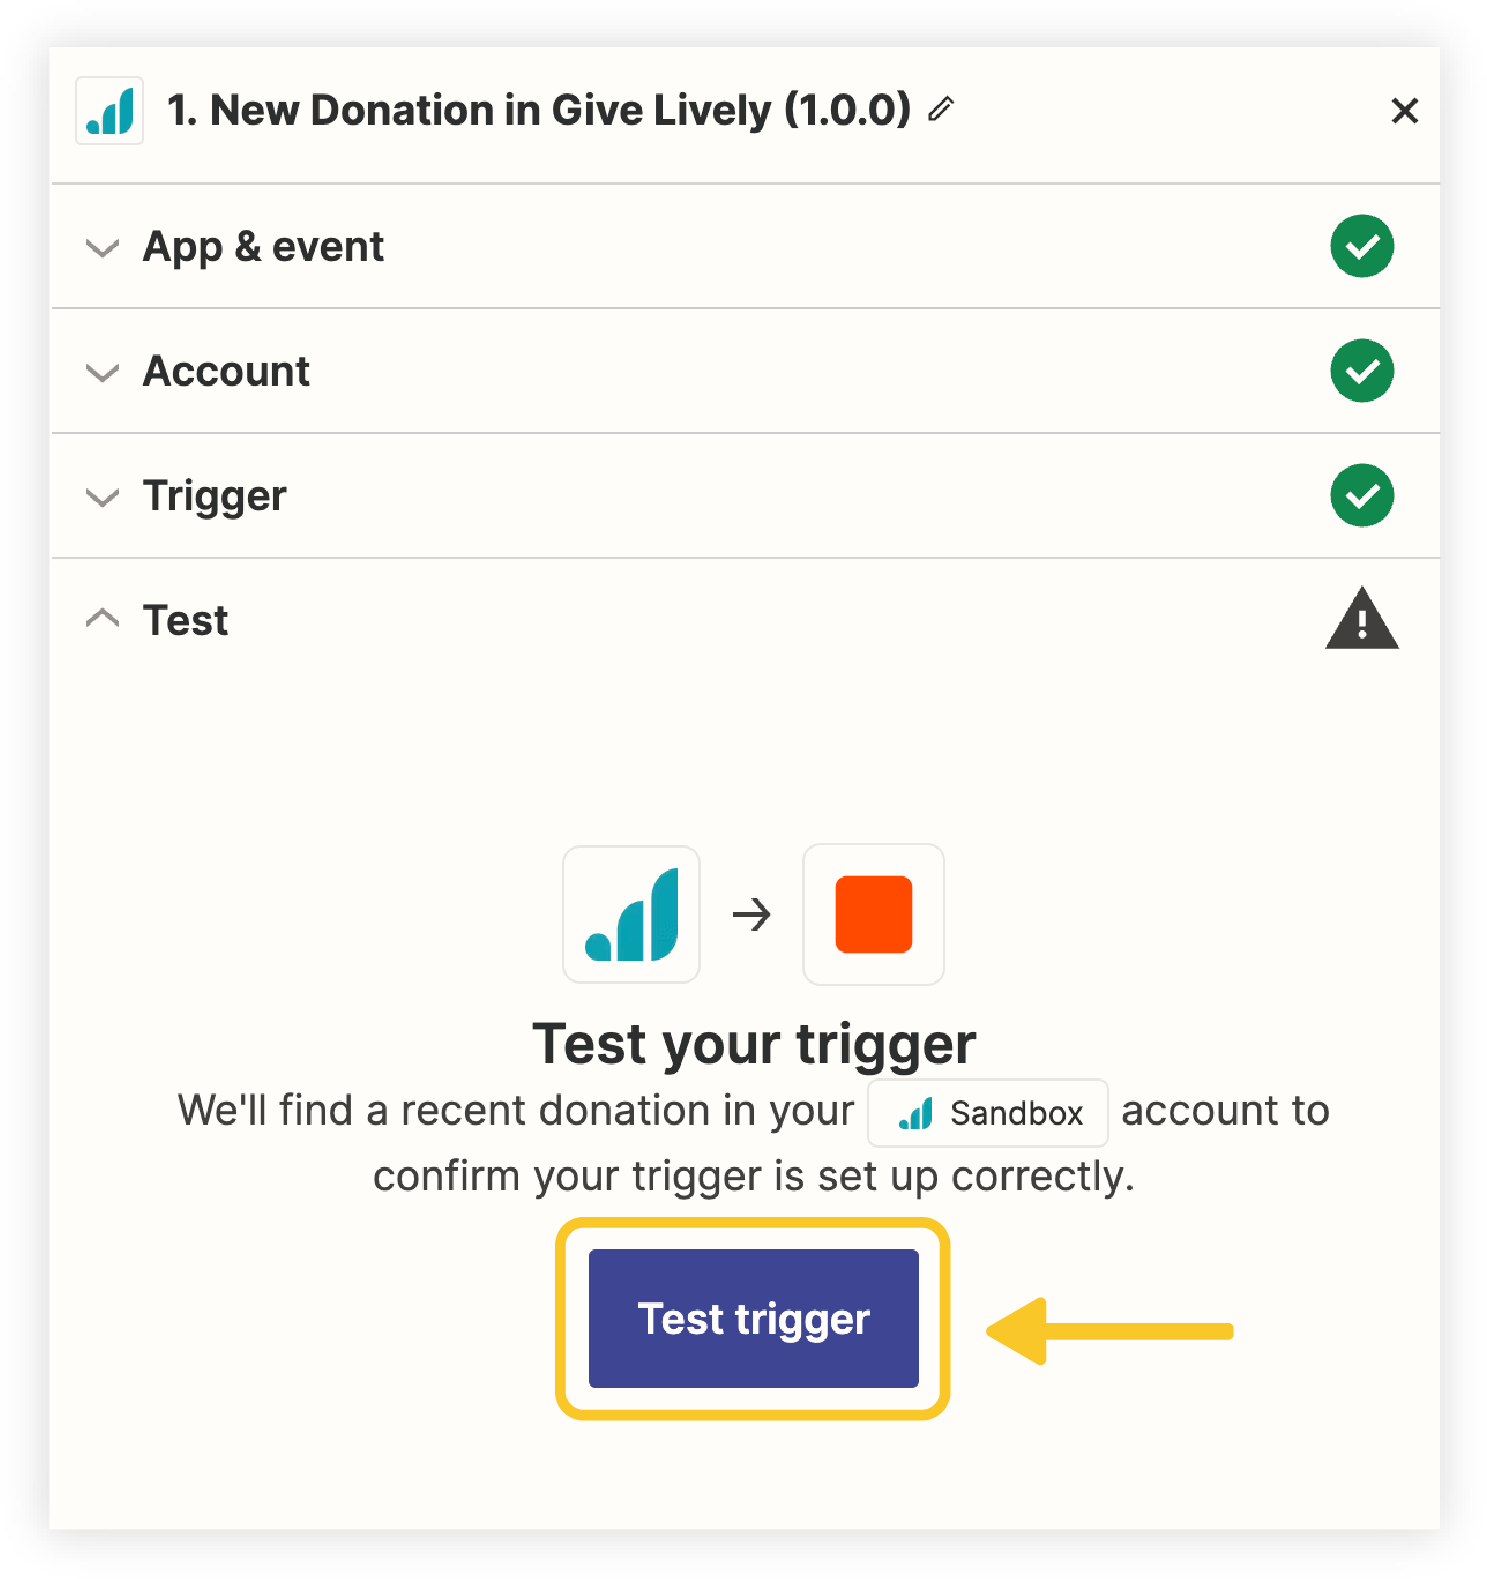
- Click “Test trigger”. Zapier will test the connection and attempt to retrieve sample records from Give Lively.
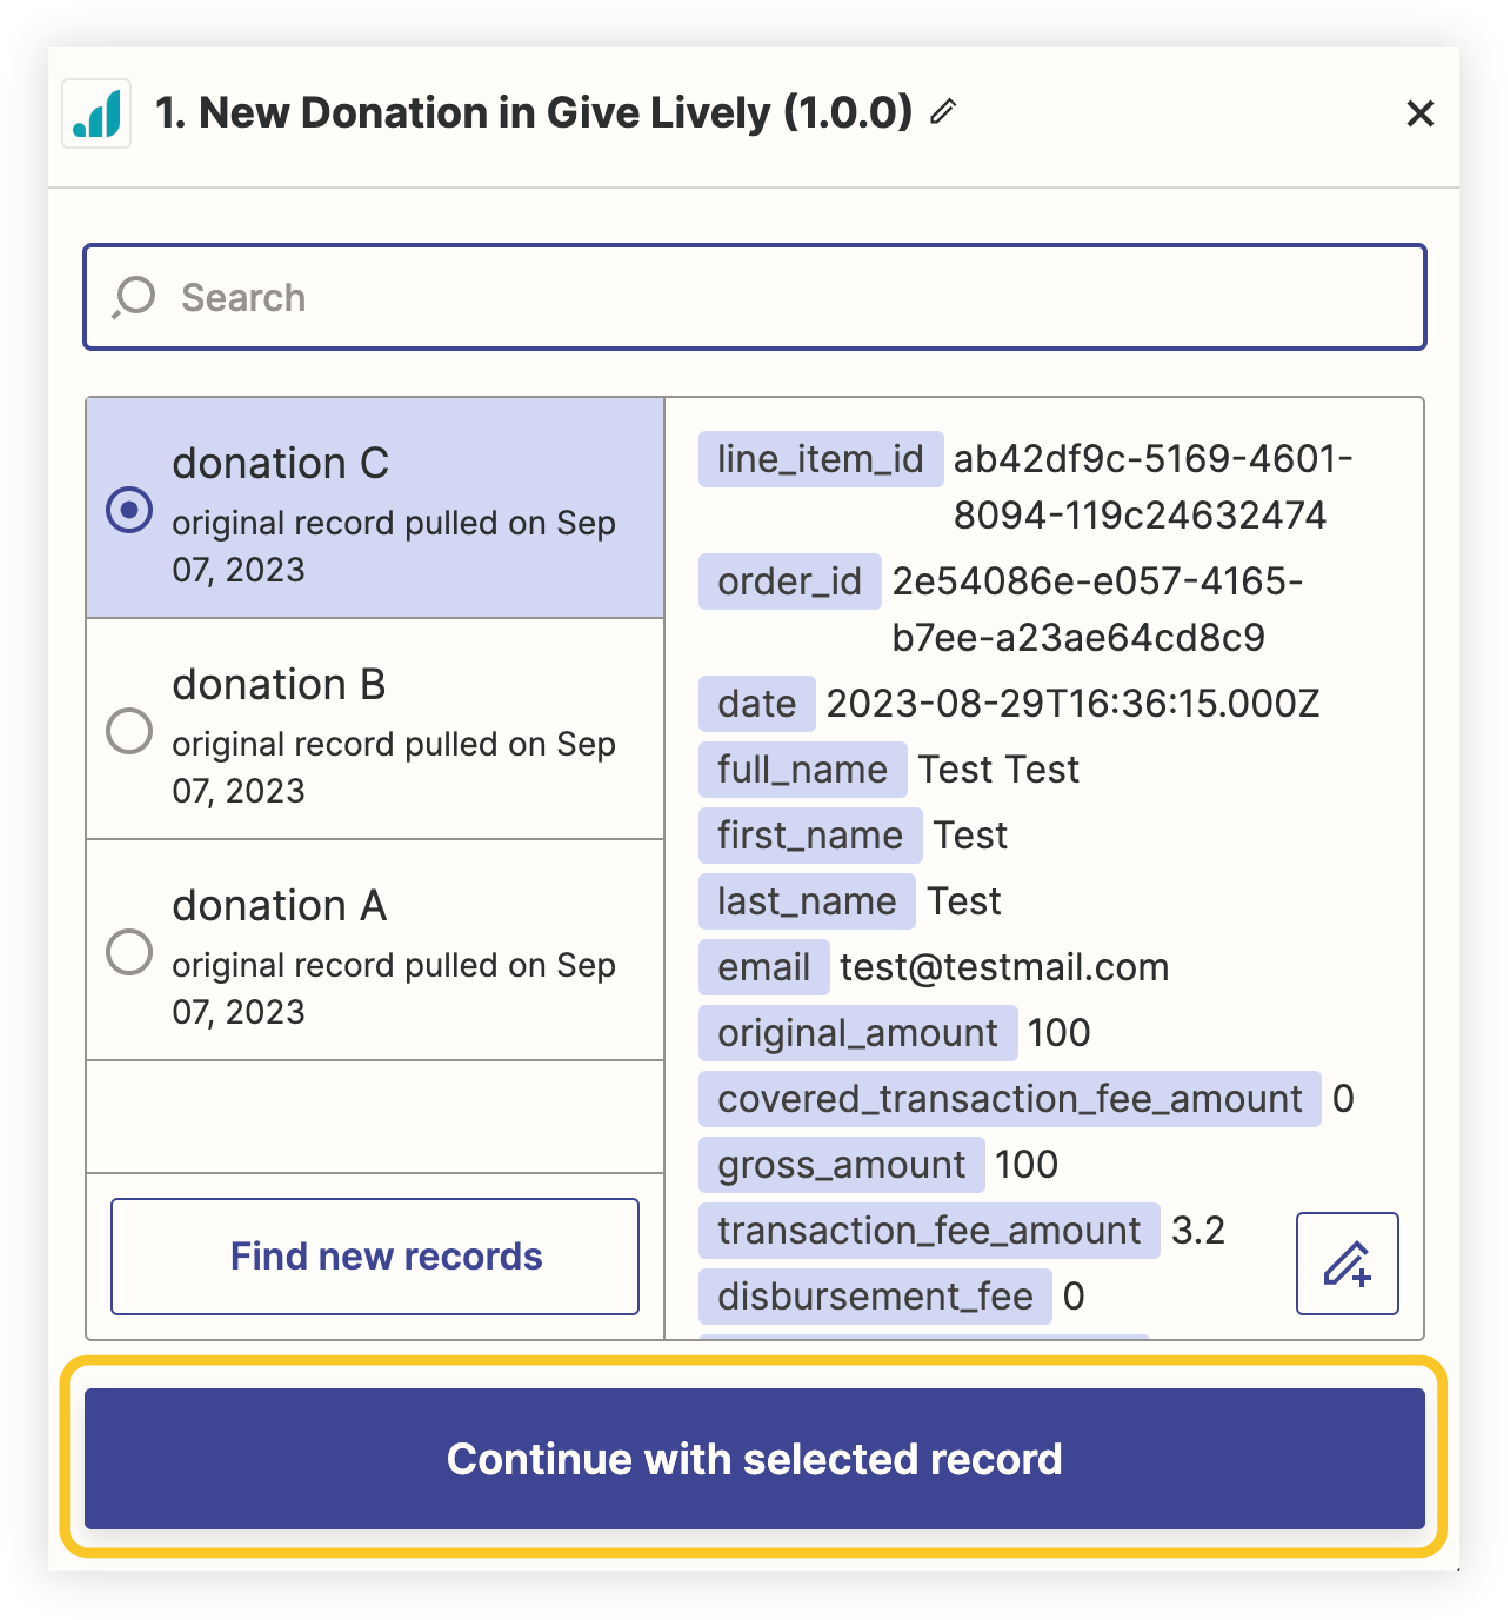
- Scroll to the bottom of the right-hand workspace and click “Continue with selected record”.
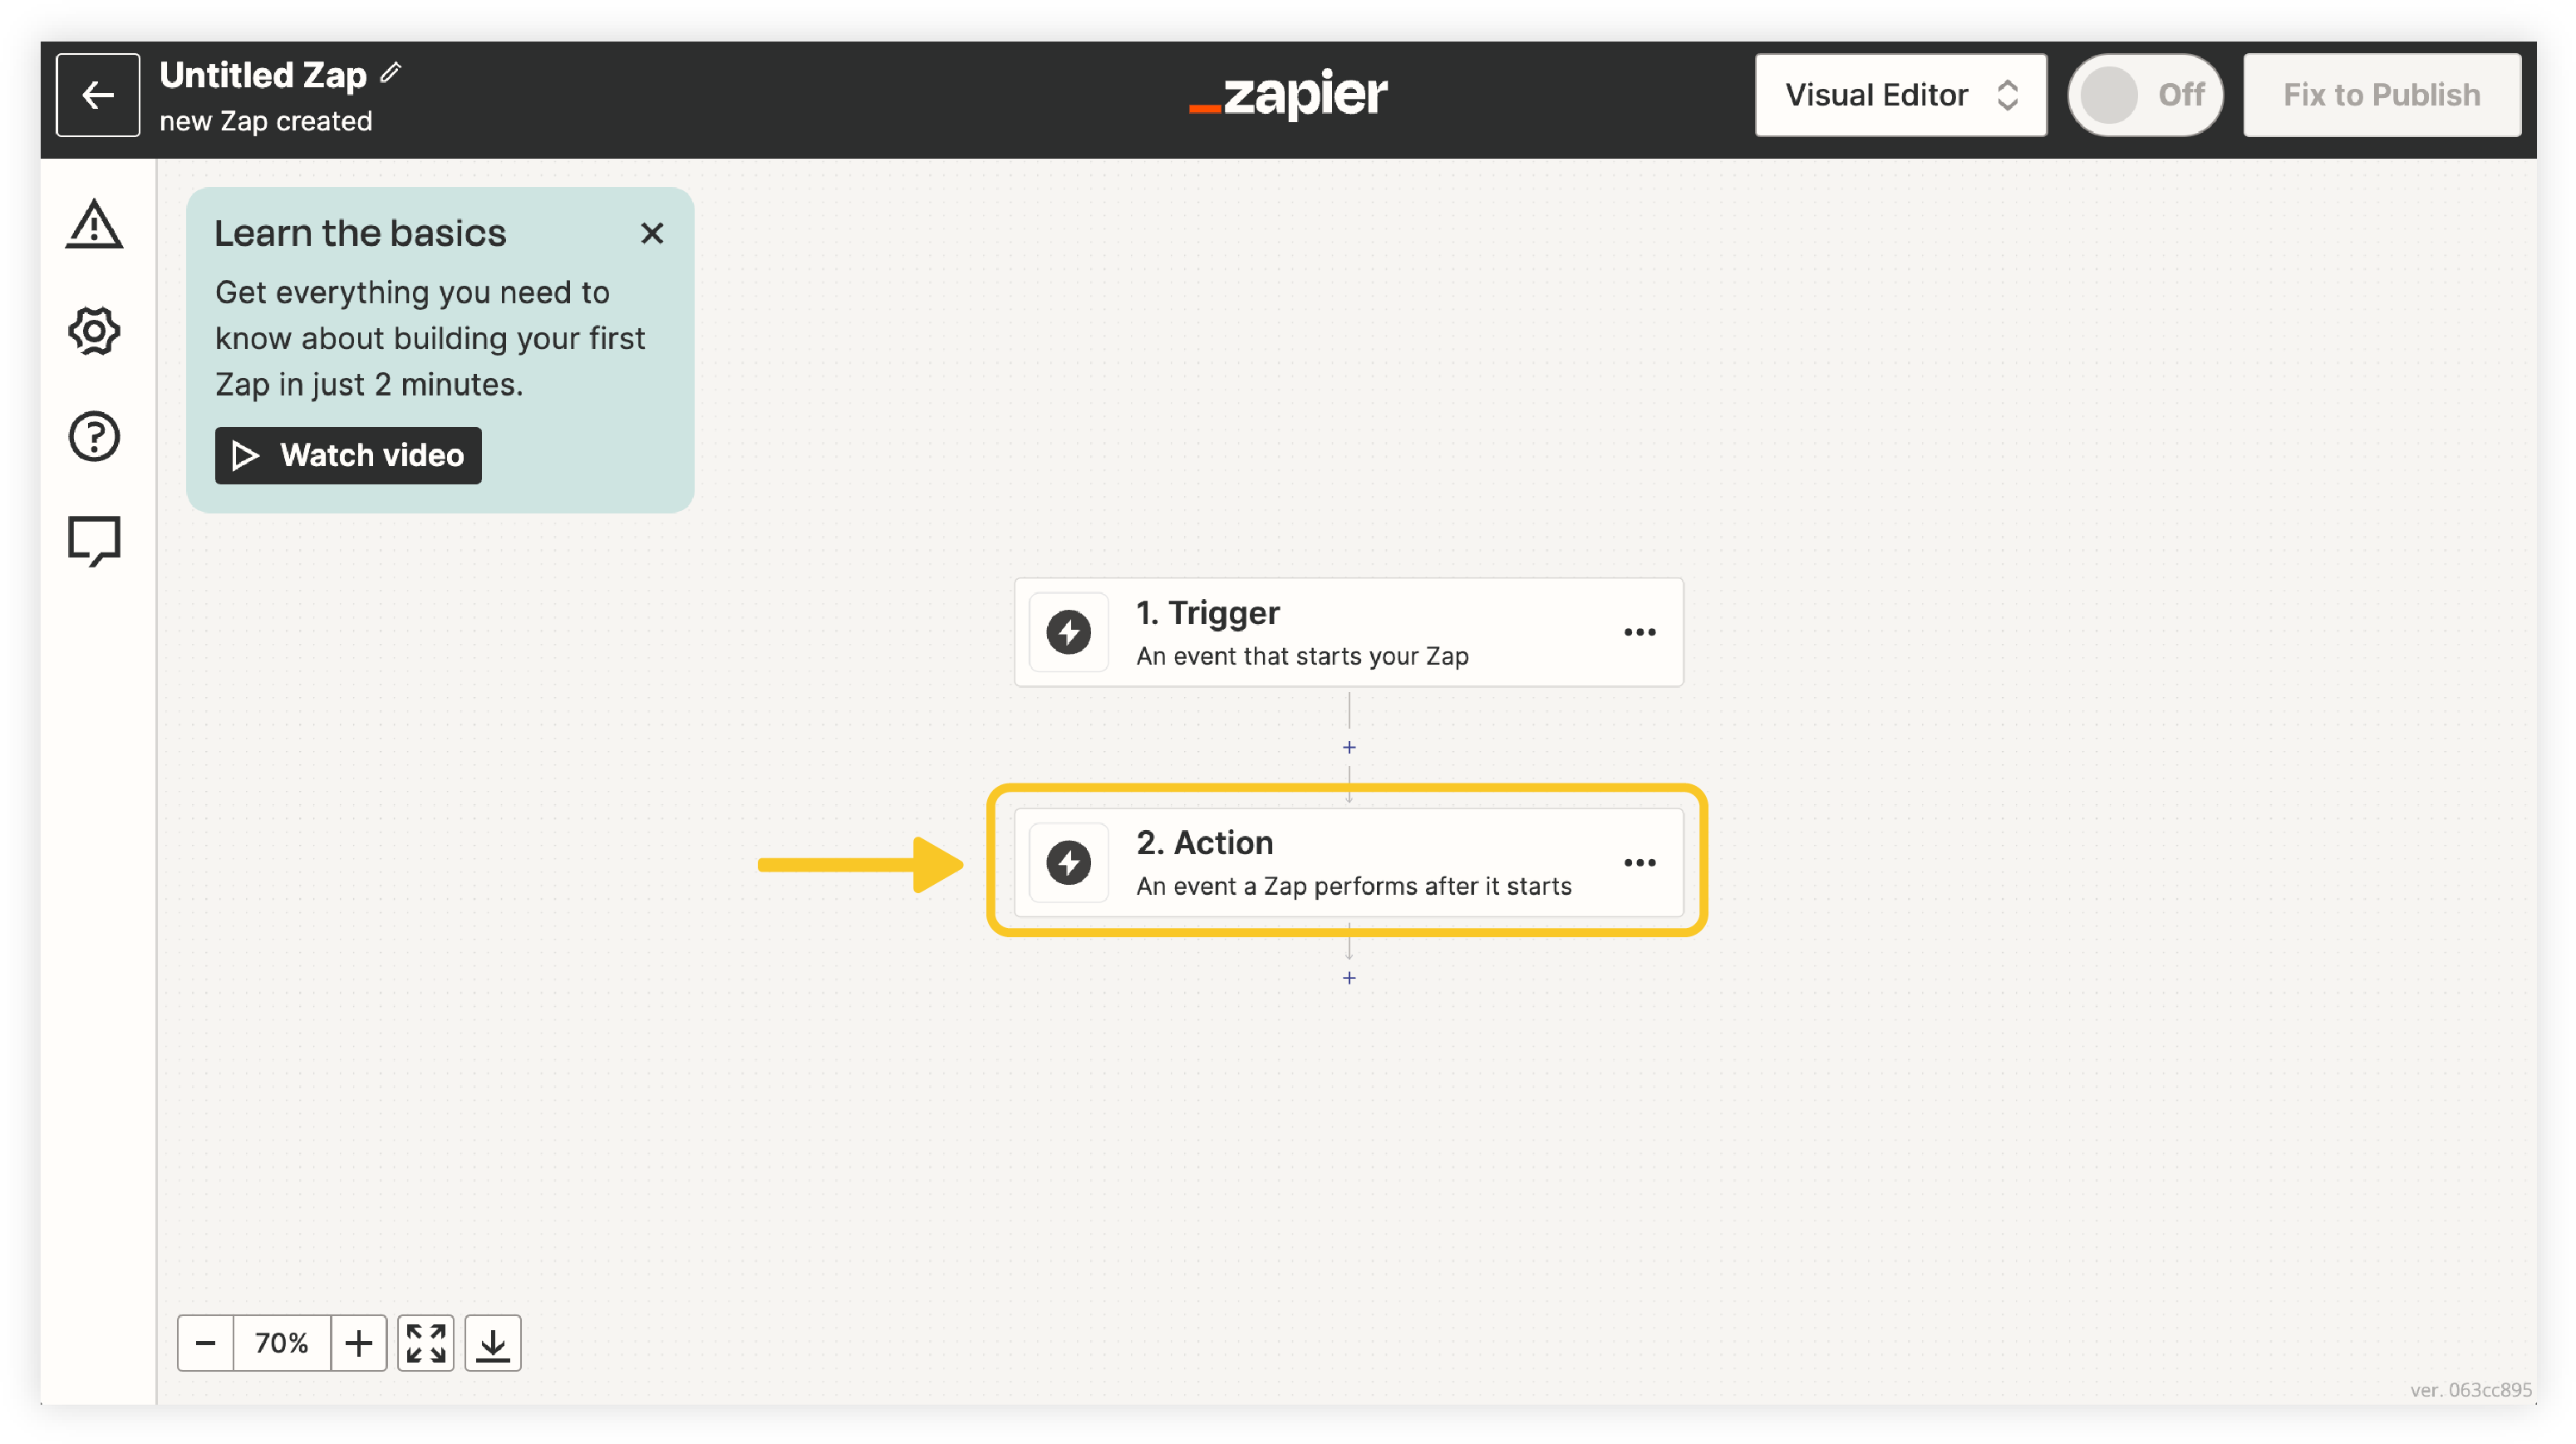
Make your first Zap action
This process identifies the action(s) you wish to see completed when a trigger fires. Adding a Zap action to a Zap trigger completes a Zap.
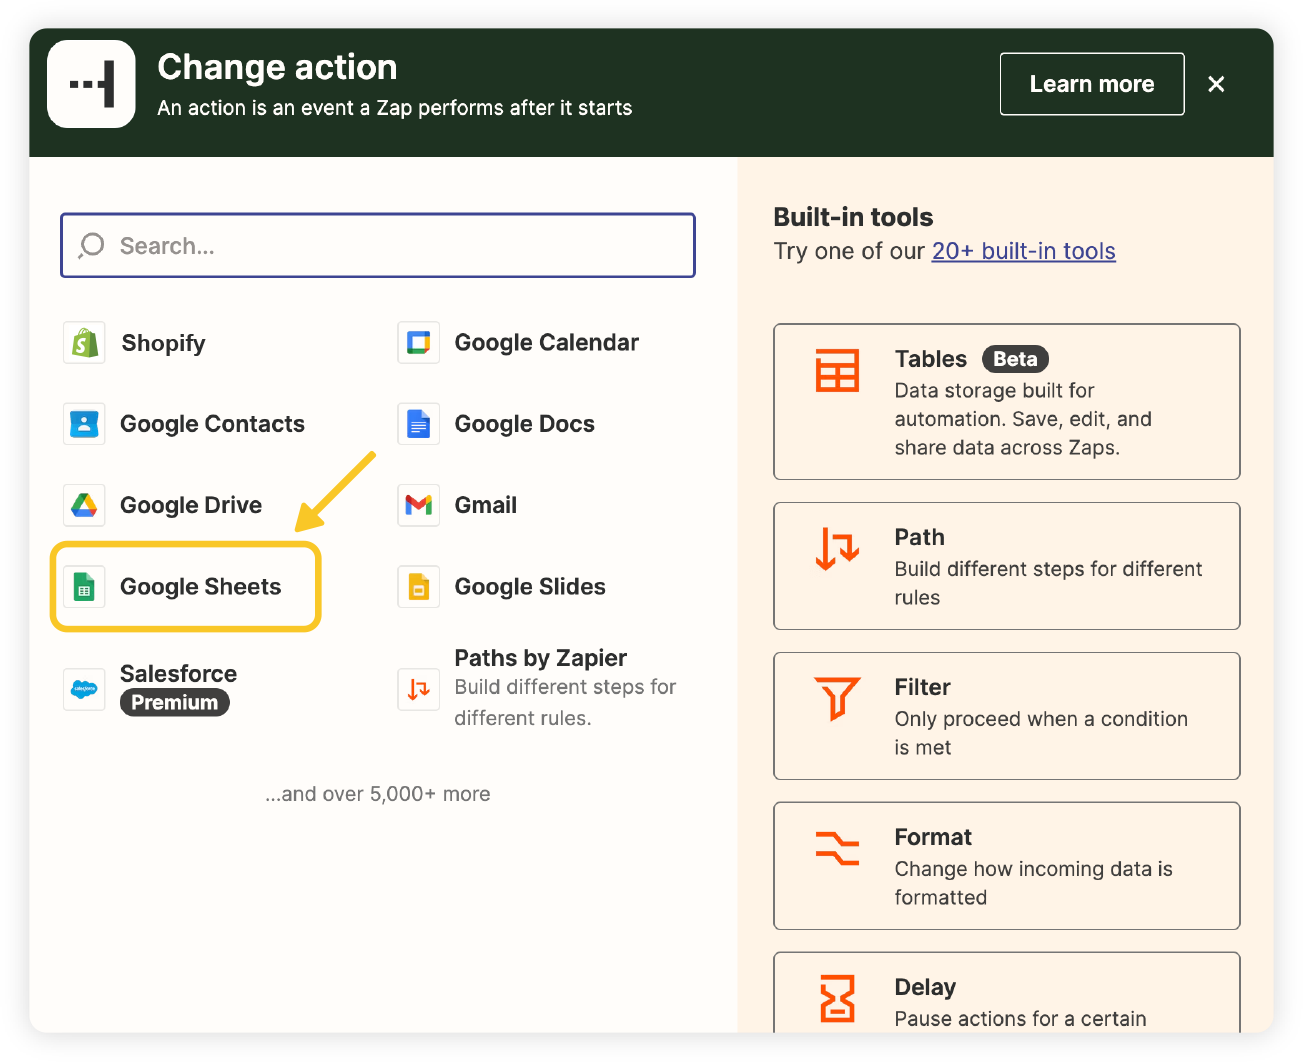
- After the final step above, you will automatically see a “Change action” overlay window in your Zapier tab. If you are returning to add an action to (or change an action on) an existing Zap, the overlay will appear when you click “2. Action” on the desired Zap in Zapier.
- Use the search bar to find for the app you’d like to act upon (for example, Google Sheets) whenever Give Lively donations are received:
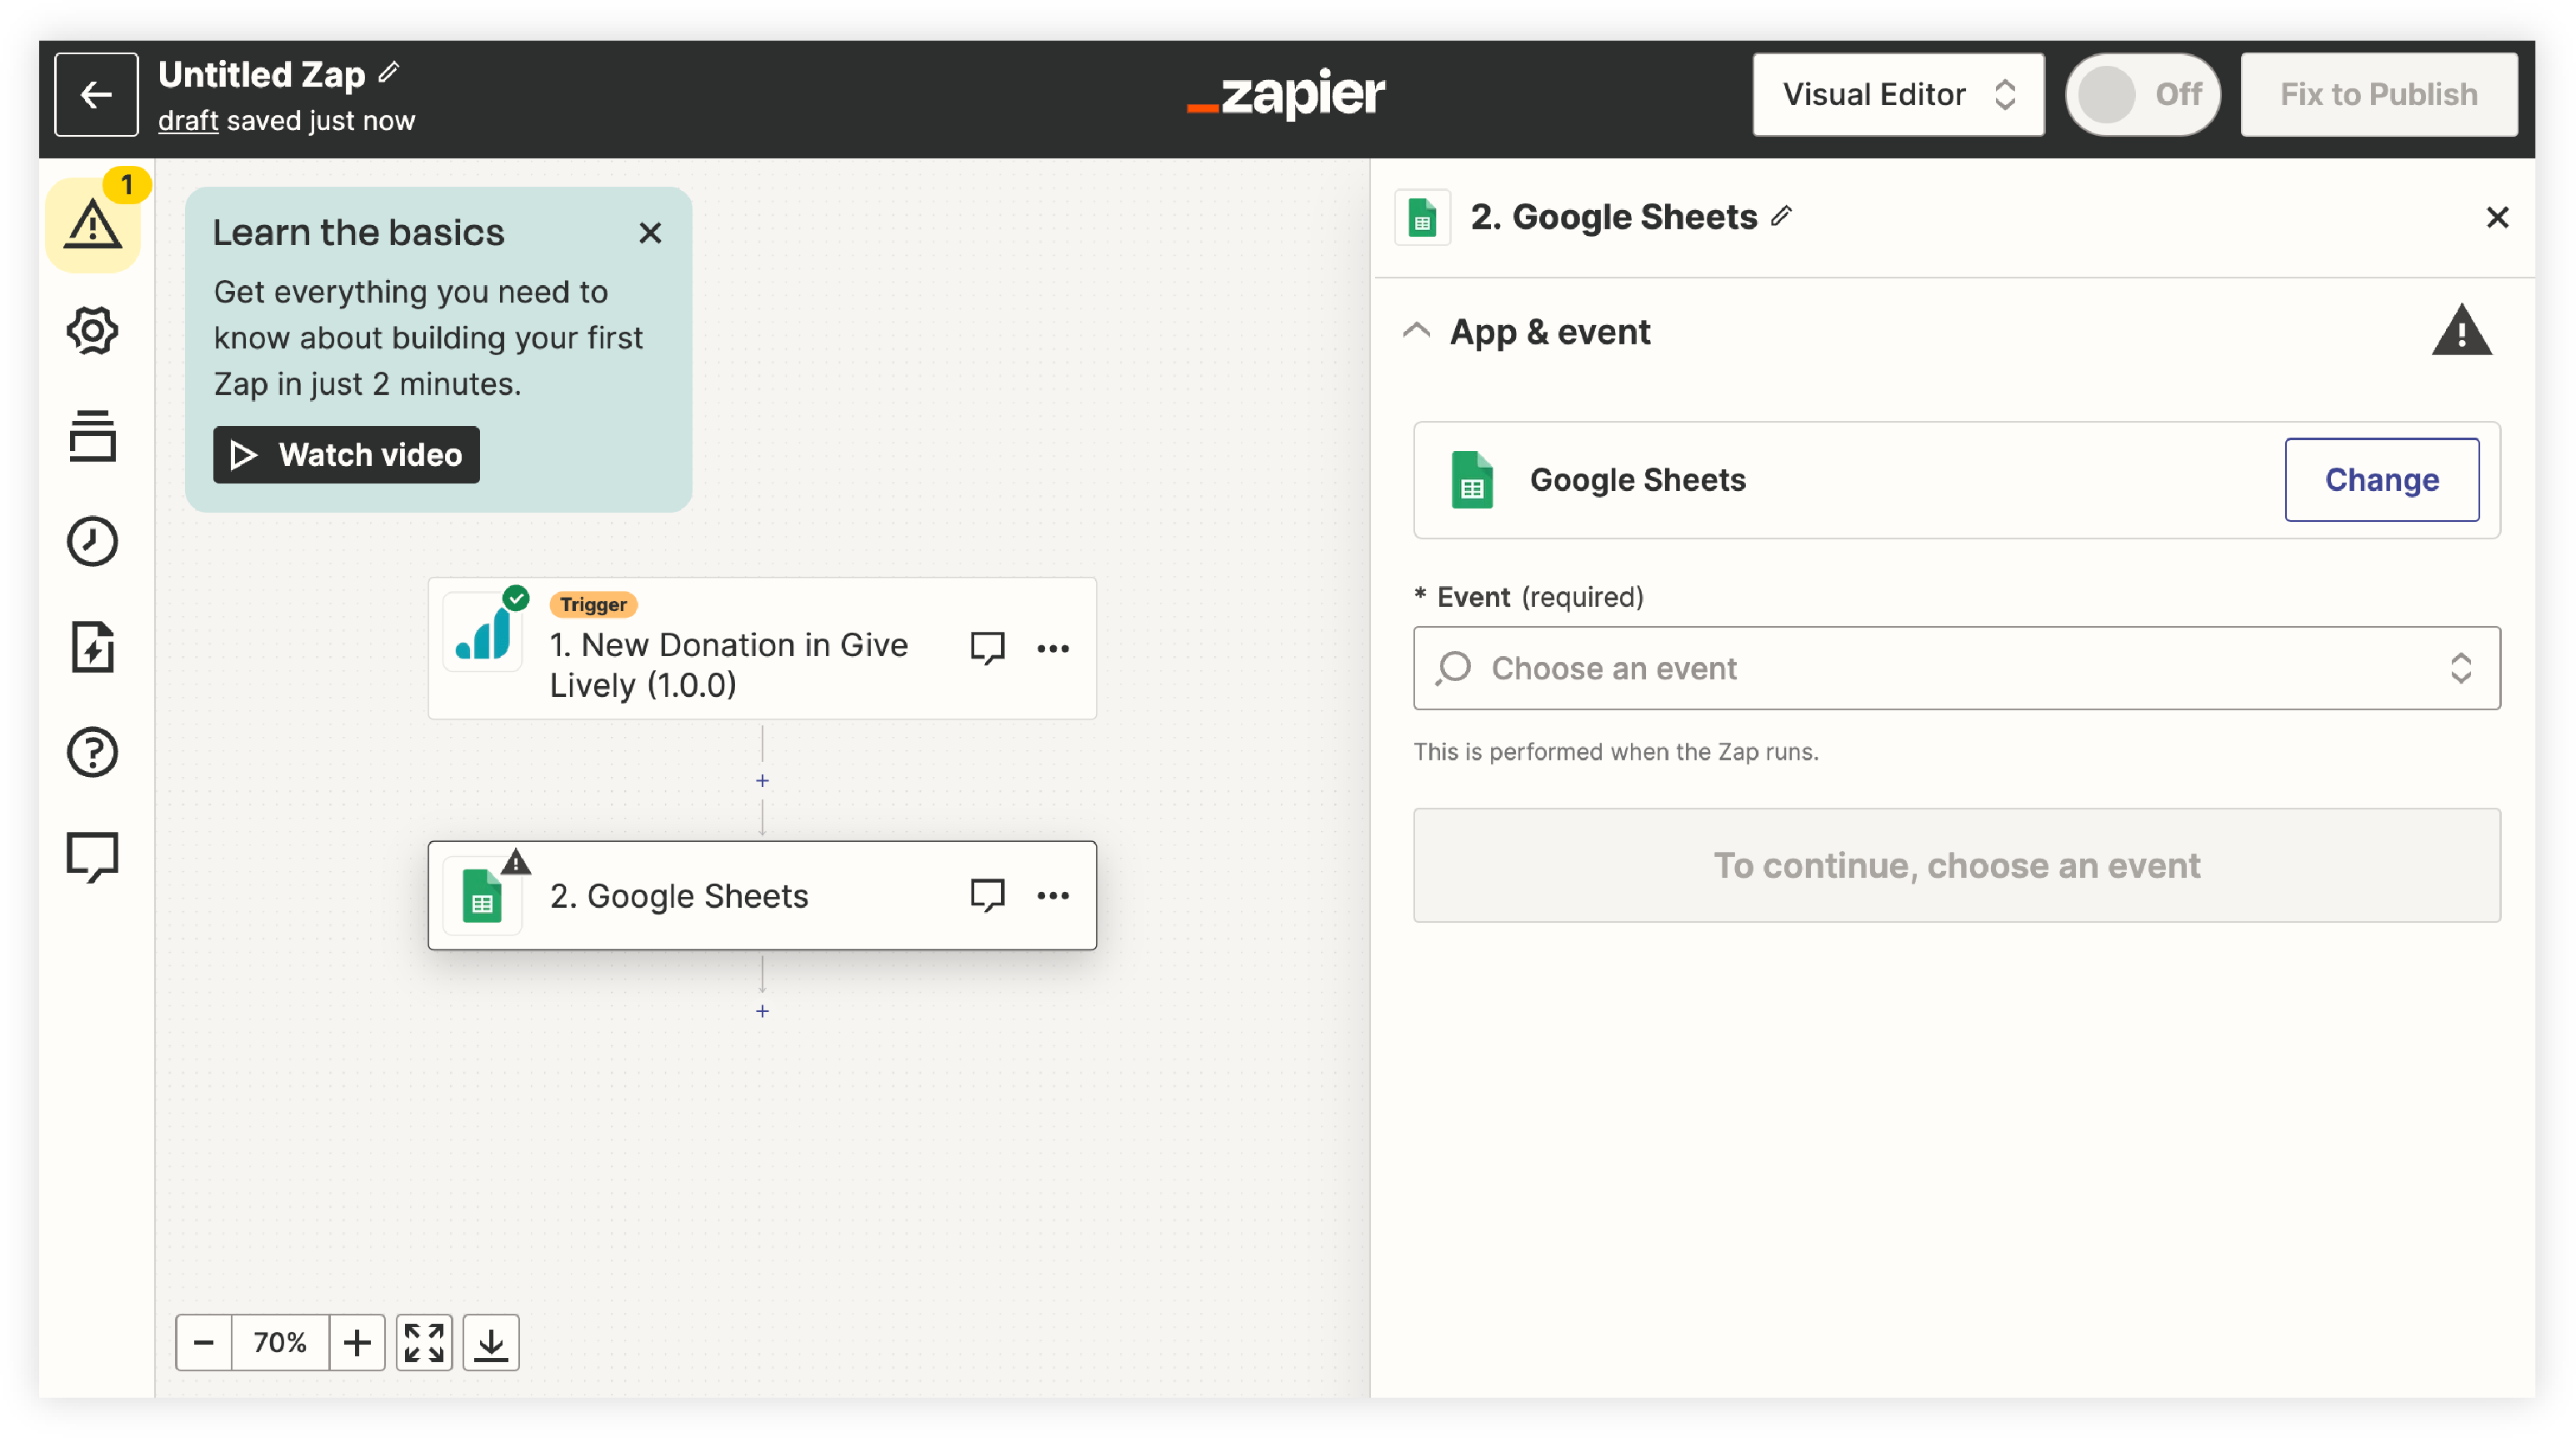
- The steps from here will differ based on the app you select. Please refer to Zapier’s documentation if you need assistance setting up the Zap action.
Understand what can be synced to Zapier
- See our list of Give Lively’s Zap triggers.
- Visit our growing list of approved Zapier Zap templates.
- See a list of data fields available to the Zapier integration. It provides a comprehensive overview of available Give Lively data, as well as useful details about data formats and more.
Technical information
Please refer to this article about JSON endpoints for architectural details on the API interactions between Give Lively and Zapier.
Review the Zapier integration's Zap triggers and templates
Before you get started
Before you can begin using Zapier with Give Lively, you must set up a Zapier account.
Video Overview
Walkthrough
As described in the introduction to our Zapier integration, Zapier allows for the creation of automated connections, called Zaps. Zaps consist of a trigger and one or more actions; the trigger automatically initiates the action(s) through Zapier. Zaps can be set up in minutes with no coding.
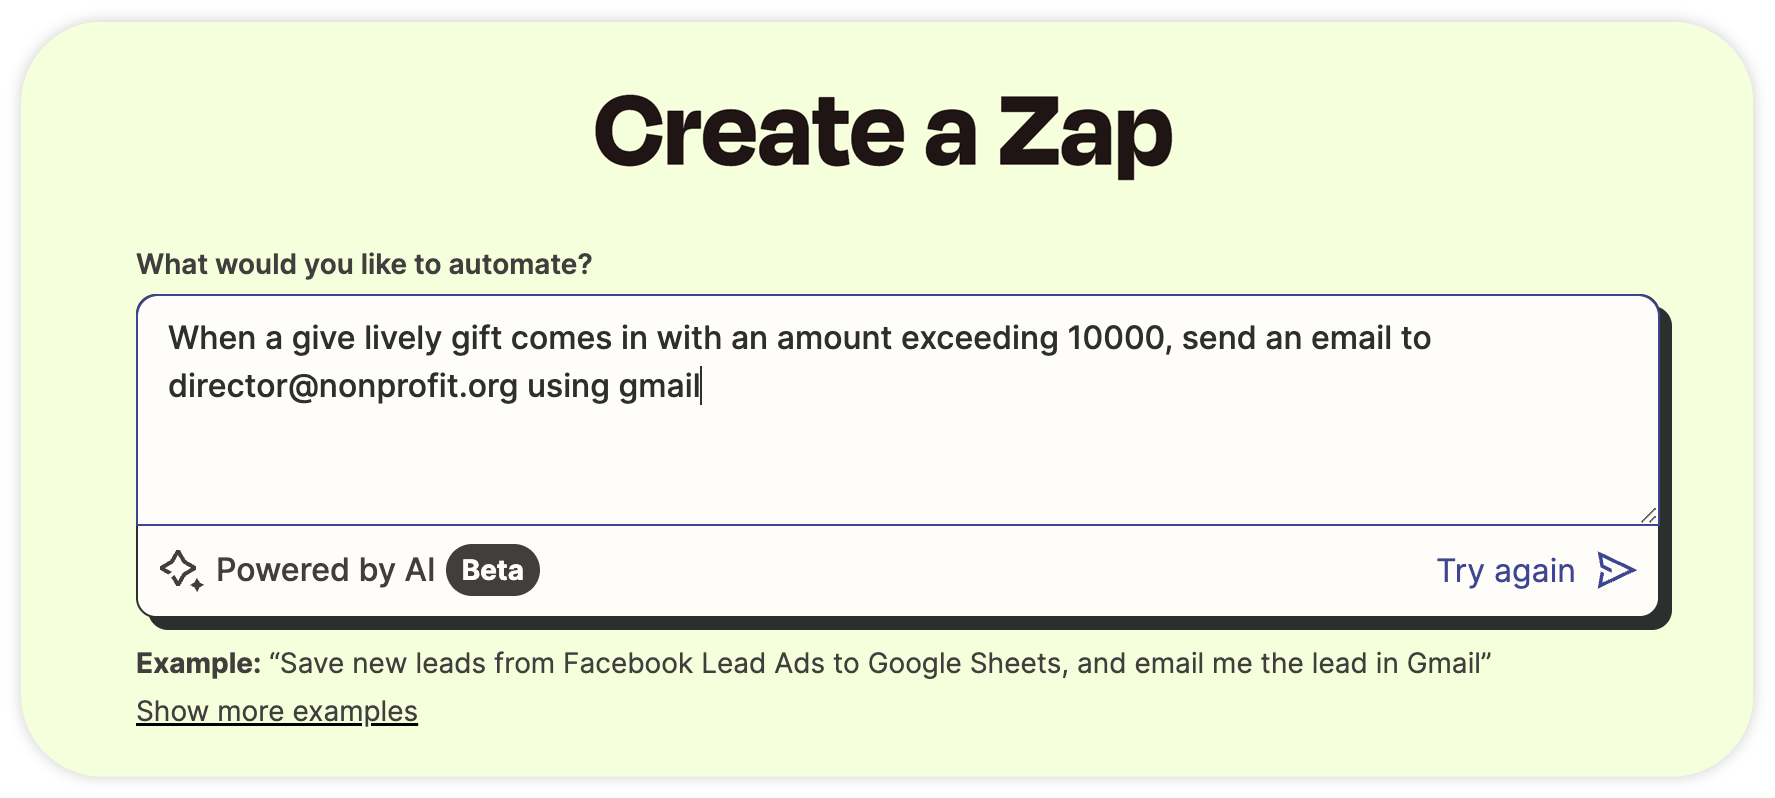
Keep in mind that, in edition to the existing Zap templates listed below, you can always custom-build your own Zaps – on your own or using Zapier’s AI-powered Zap builder – using the triggers identified below to prompt an action involving any of the 6,000+ web services connected to Zapier.
Zap triggers
At present, Give Lively’s Zapier integration includes three triggers:
- new donations
- updated donations
- updated donation status

Every time this Give Lively data changes, it can be used to trigger an action involving any of the 6,000+ web services connected to Zapier. These actions can be configured to utilize your Give Lively donation data (see a list of Give Lively data fields).
Zap templates
Zap templates are basically pre-set Zaps. Both the trigger and the action(s) are already identified, but the user’s specific account information is needed. Templates are the fastest way to set up Zaps.
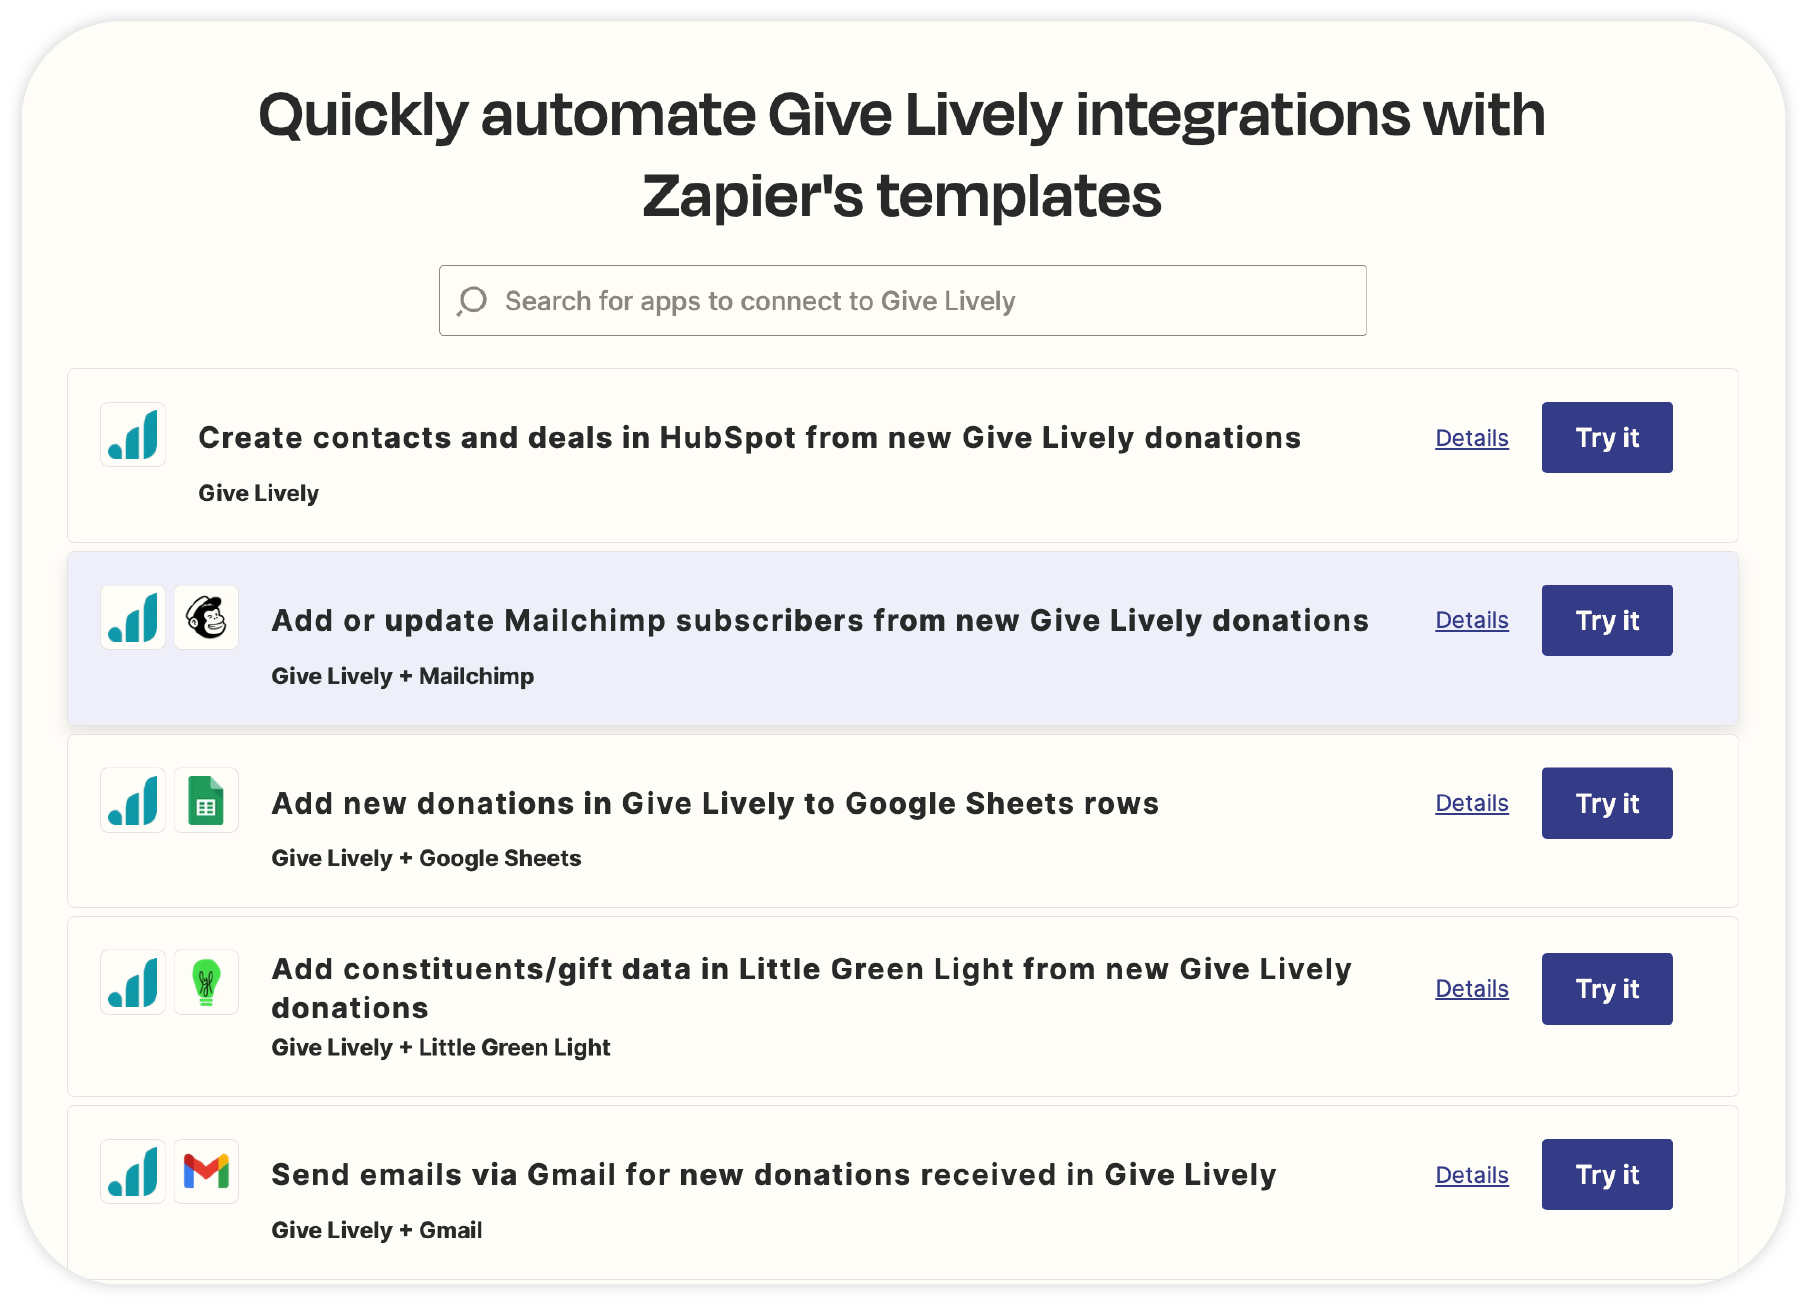
Give Lively has set up the following approved templates:
CRMs & marketing automation tools
- Give Lively + Salesforce (premium) – create a lead in Salesforce when a new donation is made via Give Lively
- Give Lively + HubSpot – create a new contact in HubSpot when a new donation is made via Give Lively
- Give Lively + Little Green Light – add constituents/gift data in Little Green Light when a new donation is made via Give Lively
- Give Lively + Zoho CRM (premium) – create a new Zoho CRM module when a new donation is made via Give Lively
- Give Lively + Bloomerang – create a new donation in Bloomerang when a new donation is made via Give Lively
- Give Lively + LeadConnector:
+ create or update a contact in LeadConnector when a new donation is made via Give Lively
+ update a contact in LeadConnector when a donation is updated - Give Lively + ActiveCampaign – create or update a contact in ActiveCampaign when a new donation is made via Give Lively
- Give Lively + Virtuous CRM – create a new contact and gift in Virtuous CRM when a new donation is made via Give Lively
- Give Lively + Ontraport – create or update a contact in Ontraport when a new donation is made via Give Lively
- Give Lively + DonorDock – create a new gift in DonorDock when a new donation is made via Give Lively
- Give Lively + Levitate – create a donation record in Levitate when a new donation is made via Give Lively
- Give Lively + Pipedrive – create a new person in Pipedrive when a new donation is made via Give Lively
- Give Lively + Brevo – create or update a contact in Brevo when a new donation is made via Give Lively
Donation alerts
- Give Lively + Gmail – send an email through Gmail for each new or updated donation received via Give Lively
- Give Lively + Microsoft Outlook – send an email through Microsoft Outlook for each new donation received via Give Lively
- Give Lively + Slack – send a channel message or direct message through Slack for each new donation made via Give Lively
- Give Lively + Email by Zapier – send an email through Email by Zapier for each new donation received via Give Lively
Email marketing platforms
- Give Lively + Mailchimp:
+ update or add a new subscriber in Mailchimp when a new donation is made via Give Lively
+ tag a new Give Lively donor as a subscriber in Mailchimp when a new donation is made via Give Lively - Give Lively + Constant Contact – create a new contact in Constant Contact when a new donation is made via Give Lively
- Give Lively + Flodesk – create or update a new contact in Flodesk when a new donation is made via Give Lively
- Give Lively + EmailOctopus – create or update a contact in EmailOctopus when a new donation is made via Give Lively
- Give Lively + MailerLite – create or update a contact in MailerLite when a new donation is made via Give Lively
Project management & collaboration tools
- Give Lively + monday.com – create a new item in monday.com when a new donation is made via Give Lively
- Give Lively + Airtable – create or update a record in Airtable when a new donation is made via Give Lively
- Give Lively + Notion – create a new database item in Notion when a new donation is made via Give Lively
Donation data spreadsheets
- Give Lively + Google Sheets:
+ add a new row to a specified Google Sheets spreadsheet for data about new donations made via Give Lively
+ add multiple new rows to a specified Google Sheets spreadsheet for data about new donations made via Give Lively
+ create a new spreadsheet for data from new donations made via Give Lively - Give Lively + Zapier Tables – create a new contact in Zapier Tables when a new donation is made via Give Lively
Accounting & reporting tools
- Give Lively + QuickBooks Online (premium) – create a sales receipt in QuickBooks Online when a new donation is made via Give Lively
- Give Lively + WordPress – update a WordPress website through an API request when a new donation is made via Give Lively
Advertising & conversion tracking
- Give Lively + Google Ads – record a new donation in Google Ads (to fine-tune your ads) when a new donation is made via Give Lively
- Give Lively + LinkedIn Conversions: prompt LinkedIn Conversions to mark/track or send a conversion event when a new donation is made via Give Lively
- Give Lively + Facebook Conversions:
+ initiate a Send Lead Event in Facebook Conversions when a new donation is made via Give Lively
+ Initiate more events (Send Purchase Event, send Funnel Event, Send Other Event) in Facebook Conversions when a new donation is made via Give Lively
Keep an eye on the latest Give Lively templates approved by Zapier.
Understand Zapier’s JSON endpoints
Before you get started
Before you can begin using Zapier with Give Lively, you must set up a Zapier account.
Video Overview
Walkthrough
Our integration with Zapier is powered by two JSON endpoints that are enabled when a Zapier API key is created in our platform.
JSON endpoint 1
https://secure.givelively.org/nonprofits/[ORGANIZATION_ID]/json_dataclips/validate/[API_KEY].json
- Responds with a 200 status and { success: true } if the credentials are valid.
- Responds with 404 otherwise.
JSON endpoint 2
https://secure.givelively.org/nonprofits/[ORGANIZATION_ID]/json_dataclips/[API_KEY].json
- Responds with a JSON array of all donations received on the platform if the credentials are valid.
- Responds with 404 otherwise.
- Records are sorted in reverse chronological order of when they were most recently modified.
- This endpoint takes an optional URL parameter ?start_time_ms=TIME. If specified, then results are limited to donations that have been created/updated since the specified time represented as milliseconds from midnight January 1, 1970.
