Is this article for you? It covers information for donors giving through Give Lively pages/forms.
Is this article for you? It covers information for individual/team fundraisers who collect donations on behalf of Give Lively member nonprofits.
Is this article for you? It addresses donating through Charity Navigator’s Giving Basket.
Is this article for you? It covers information for nonprofits learning about Give Lively.

What and where is the Give Lively User Portal?

What is the Give Lively User Portal?

The Give Lively User Portal is for everyone who has contributed to a nonprofit through digital fundraising technology powered by Give Lively.

The User Portal is an important and secure online feature that presently allows donors to do the following:

How do I access the Give Lively User Portal and, if needed, set up a user account?

For donors, secure access to the portal is only possible using a working email address that was submitted at the time of a donation. Any email address with no associated donations will have no information in the User Portal, so access is restricted. 

Several ways a donor can access the User Portal

  • Go directly to the User Portal.
  • Follow the link at the bottom of any email receipt from Give Lively confirming a donation.
  • If you, as the donor, are also a Give Lively member nonprofit admin, access to the User Portal is possible directly from the Nonprofit Admin Portal. The link is located in the dropdown from your login email located at the far right of the top nav bar. Conversely, you can also access the Nonprofit Admin Portal directly from the User Portal by clicking the link from the User Portal to the associated nonprofit account(s) located in the “My Nonprofits” section on the main User Portal welcome screen after login.
  • If you have access to the Reports Portal, the User Portal can be reached from there by clicking on your login email address in the upper right-hand corner of the screen and then selecting “User Portal”.

How to create a User Portal user account

Create a User Portal account
  1. From the User Portal login page, select the “Donated with us before? Create an account” link near the bottom of the page.
  2. Enter the email address submitted at the time of a payment (or payments). 
  3. Click the “Send email” button.
Create a password
  1. If we have a record of your email address in our system (as a result of a payment):
    + You will be returned to the login page where you will see the following message: “If your email address exists in our database, we’ll send you a password recovery link. This could take a few minutes.”
    + You will receive an email with instructions about how to set your password.
    + Note that, for security reasons, we won’t advise if your email is NOT in our system, but if it isn't you won’t receive a password email. If you donated via Give Lively technology, verify the email address associated with that payment.
  2. Once you have submitted your new password, you will be returned to the login page where you will see that “Your password has been changed successfully.”
Confirm your email address
  1. After setting your password, you may need to confirm your email address. You will know this is the case if the login page displays a yellow box with the following message: “You have to confirm your email address before continuing.” While this confirmation may seem redundant, it is an important and required security step to ensure that your email address belongs to you.
  2. Click on the “Confirm my email address” link in that yellow box.
  3. On the “Confirm your email address” page, fill in your email and click the “Resend confirmation instructions” button.
  4. If we have a record of your email address in our system:
    + You will be returned to the login page where you will see the following message: “If your email address exists in our database, we’ll send you confirmation instructions. This could take a few minutes.”
    + You will receive an email with instructions about how to confirm your email address.
    + Note that, for security reasons, we won’t disclose if your email is NOT in our system, but if it isn't you won’t receive a confirmation email. If you donated via Give Lively technology, verify the email address associated with that payment.
  5. If you do not receive an email and you are certain that you are using the correct email address, click the “Didn’t receive confirmation instructions” link at the bottom of the login page to try again. Also check your junk and spam email, just in case.
  6. If you still do not receive an email, contact our customer support Team.
  7. When you receive the email, follow the instructions to confirm your email address.
  8. Log in to the User Portal.

How to log in to the User Portal if you forgot your password

If you don't have your password, there are two login options. You can either reset your password by clicking the “Forgot your password?” link or you can log in using the “Password-Free Login” tool.

Password-Free Login

To log in to the User Portal or Nonprofit Admin Portal without a password, utilize the “Password-Free Login” tool. (Your account must already have been created and your email address confirmed.)

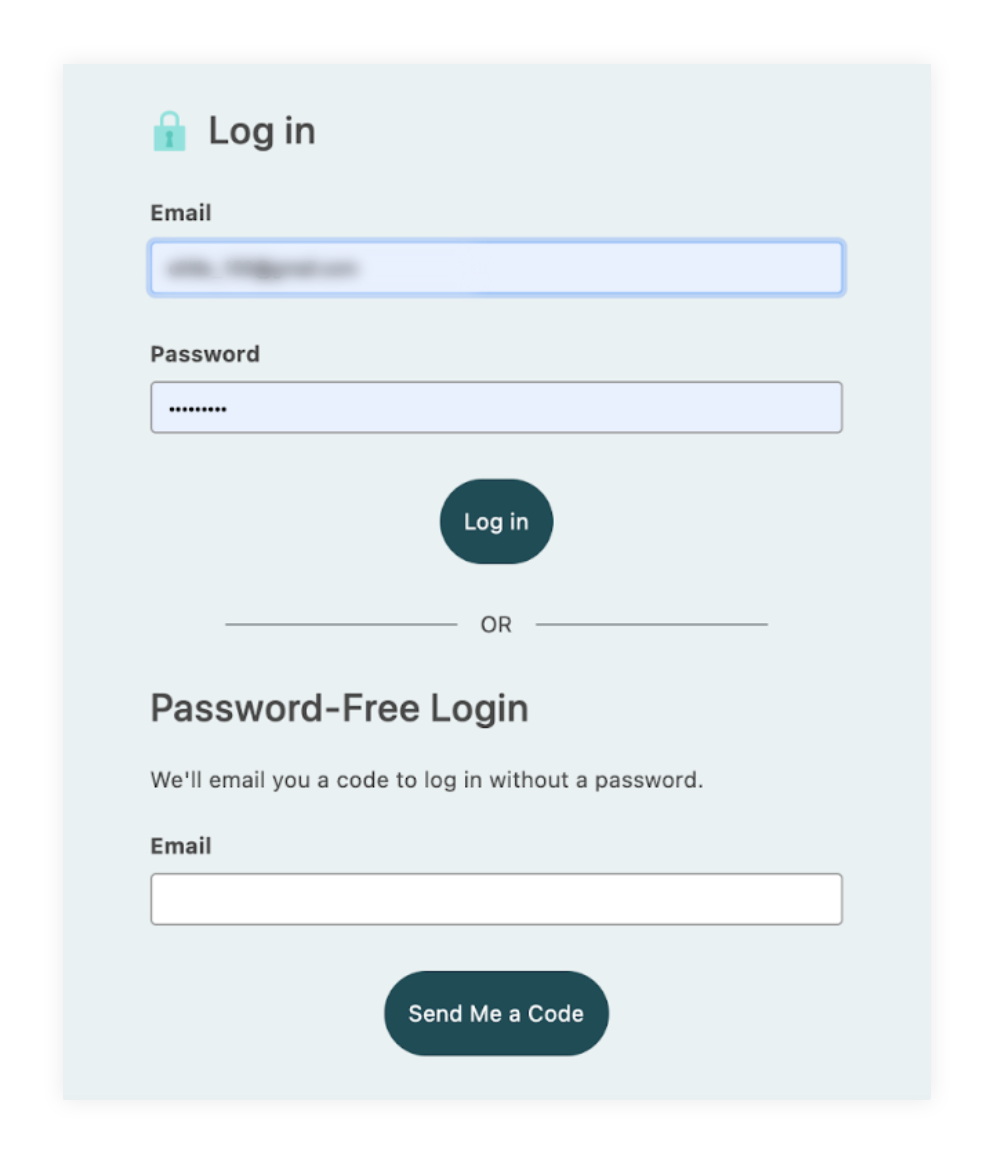
  1. Under the “Password-Free Login” title, submit the email address associated with your account and click “Send Me a Code”.
  2. On the next “Check your email!” page, you’ll find a place to enter the login code.
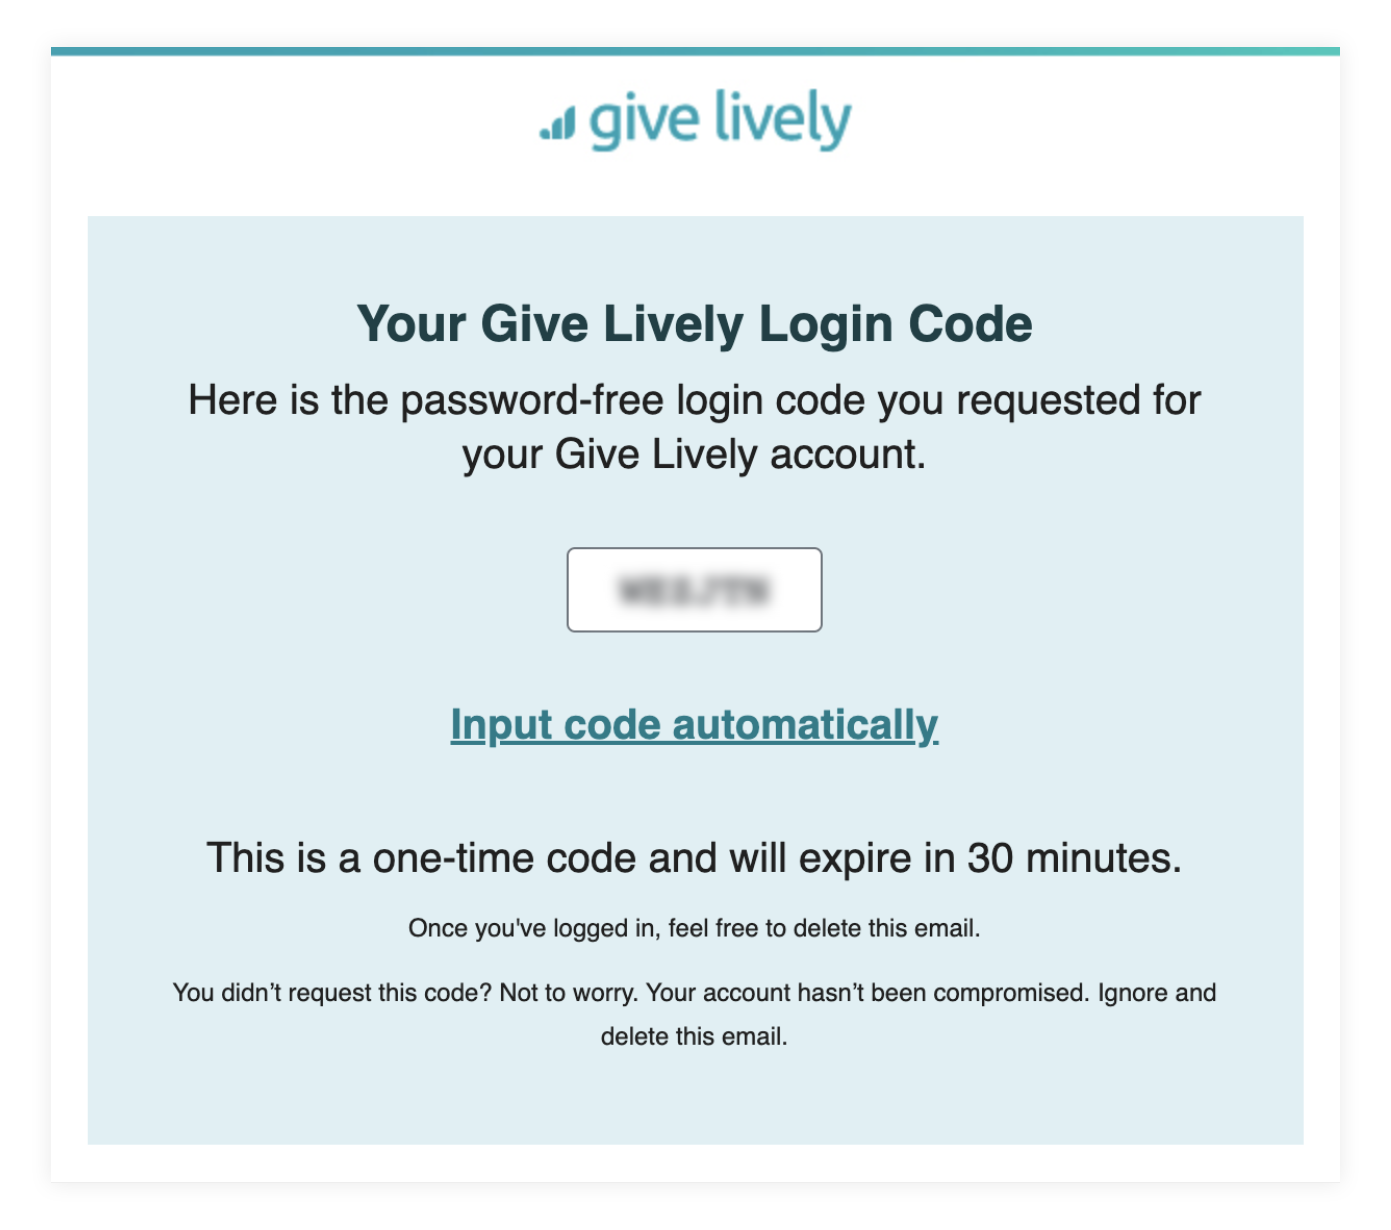
  3. Check your email inbox for an email titled “Your Give Lively Login Code”. If it is not in your inbox, check your spam, junk, promotions or other folders/tabs. Keep in mind that the one-time code expires 30 minutes after the email arrives in your inbox. On the “Check your email!” webpage, you can resend the email if you did not use the one-time code within the 30-minute time limit.
  4. Enter your code and click the “Log in” button. Alternatively, click “Input code automatically” in the email to autofill your login code in a new webpage.

How to view and edit account details

View the name and email address associated with a user account

  1. Log in to the User Portal. 
  2. Select "General Information" in the left-hand navigation. 

Change the name or email address

  1. Edit the name or email address directly in the appropriate field.
  2. Enter the password. 
  3. Click the "Save" button.
  4. If you are changing your name, then “Your account has been updated successfully” will appear in green at the top of the page when the edits have been recorded.
  5. If you are changing your email address, then an email will be sent to the new email address requesting confirmation of the change. Once the link in this email has been confirmed, the new email address must be used to log in. As a measure of security, an email alert is sent to the old email address advising of this change.

Change the local timezone

  1. Choose the desired timezone from the dropdown menu.
  2. Enter the password. 
  3. Click the "Save" button.
  4. “Your account has been updated successfully” will appear in green at the top of the page when the edits have been recorded.

Change the password

  1. On the User Portal login page, select "Forgot your password?"
  2. On the next screen, enter your login email address and select the "Send Password Reset Email" button.
  3. When you receive the email, follow the instructions to reset your password.

How to view and edit payment methods

All payment methods in our system are only associated with recurring payments. Saved payment methods cannot be used with one-time payments.

Add a payment method

  1. Follow the first five steps outlined here.
  2. Select “Add new payment method” and then click the “Add Payment Method” button.
  3. On the “Add New Method” screen, select the type of payment method you wish to add. (See important notes about this below.) 
  4. On the following screen, fill out the requested information and click the button to proceed.
  5. You will return to the “Change Payment Method” screen with an acknowledgement that your “Payment method updated” and your added payment method selected as your new choice. 
  6. If you wish, click “Update Method” to confirm it as your choice. You will see a green “Payment method successfully updated” note. 
  7. Click the “X” at the top right of the popup or anywhere outside the popup to return to the main screen.

Important notes about adding a payment method

This functionality is evolving. At present, please be aware of the following when choosing to add new payment methods:
+ new credit/debit cards – can be added to recurring donations when the current payment method is another card or bank/ACH transfer, but not PayPal
+ new bank/ACH transfer accounts – cannot, at present, be added as a new payment method
+ new PayPal accounts – cannot, at present, be added as a new payment method, though keep in mind that you can add and change payment methods within PayPal itself.

If you wish to switch to an existing payment method, view notes here.

Delete a payment method

Click here to learn how to delete a saved payment method.

How to view donation history

View three years of donation history

To view three years of donation history starting from the current year, including the amounts donated:

  1. Log in to the User Portal.
  2. Select “Payment History” in the left-hand navigation. By default, payments from all three years are listed by date, with the most recent payment at the top. (To change how they are listed, see directly below about how to sort payments by date.)
  3. To view the payments made in a specific year only, select that year from the options listed directly above “DATE” or “View All” to see them all.

Sort donations by date and year

  • Click on the word “Date”.
  • To change the order of information, click on the small green arrow next to “Date”. If the arrow is pointing down (this is the default), the newest payment will appear at the top of the list. 
  • To view the payments made only in one year, select that year from the options listed directly below “Payment history” or “View All” to see them all.

How to view an annual tax summary

To see an annual summary of the tax-deductible donations you made to nonprofits through the Give Lively fundraising platform:

  1. Log in to the User Portal.
  2. Follow the link from the two easy-to-see "Now Available: Your [year] Tax Summary" call-outs (see example below). The first is on the main landing page after you log in; the second is at the top of the "Payment History" page. Learn more about the annual tax summary.

How to view receipts for past donations

  1. Log in to the User Portal.
  2. Select “Payment History” in the left-hand navigation. This will pull up a full history of payments, sorted by date. Each payment includes the amount donated.
  3. Select “View Receipt” of the desired donation to open a receipt for that donation.

What each receipt contains

Each viewable receipt includes the following information:

  • date - the day, month, year and time the payment was processed. The time is in UTC, unless you have set a local timezone on the “General Information” page.
  • “Order ID#” - a unique identifying number assigned to a payment
  • your name
  • your email address
  • status - a confirmation that the payment is “Pending” (yellow), “Complete” (light gray), “Refunded” (light gray) or “Failed” (red).
    + Bank transactions may be listed as “Pending” while the bank approves the transaction. Additionally, if a donation refund is requested but not complete, the status will be “Pending” and the requested refund will show in the refund section on the receipt. Once the refund is complete, the order payment status will once again show as “Complete” for partial refunds and “Refunded” for full refunds.
    + To enquire about a “Failed” status, please contact our customer support team
  • “Item” column - an explanation of the payment(s), including the donation/contribution details (see more below) and, when purchasing tickets, the unit price of each ticket and the number of tickets purchased at that price. 
  • “Beneficiary” column - the nonprofit that the donation was made to and its EIN. This includes refund information, if applicable, in the format of “Refunded on [date].”
  • “Amount” column - the amount of the donation, event transaction and/or voluntary contribution. Includes refund amount, if applicable. 
  • “Voluntary Contribution” - if there was a voluntary contribution made alongside the donation, it will be listed here. Donors can make a voluntary tip (not tax-deductible) to Give Lively and join forces with our founder-funders in supporting the nonprofit community 
  • “Total” - the total paid
  • Payment method - identifies which payment method you used

Additional sections:

  • “Refunds” - the information for any part of the donation that has been refunded, mirroring the “Item,” “Beneficiary” and “Amount” columns described above.
  • “Adjusted Total” - the total paid, after any refunds.
  • “Tax Deduction” - some items, such as ticket purchases and contributions to Give Lively, are not tax-exempt. This receipt section shows the tax-deductible total.

Detailed note about the ITEM section

This may include several descriptive lines, depending on the transaction types:

  • For events, under the “Event Transaction” heading:
    + purchases at each ticket tier are listed separately
    + “Additional Donation” includes any extra donation made in the “Make a Donation” field on the event form. The “Additional Donation” will be included in the “Total”.
    + “Covered Fee” shows the amount you added to cover payment processing fees.
  • For all other donations, under the donation heading
    + either “Monthly Donation” or “One-Time Donation” is detailed
    + additional optional selections made during the checkout process are also indicated, if applicable, including (1) dedication information (“In Honor Of…” or “In Memory of…”) if the donation was in memory/honor of someone and (2) “Your name will not be displayed in public” if donation was made anonymously
    + “Covered Fee” shows the amount you added to cover payment processing fees.
  • “Voluntary Contribution” - if selected at checkout, the amount of the tip given in support of Give Lively

About saving receipts

At this time, there is no option to download the receipt, but we are actively working on adding this feature. If a copy is urgently needed, it can be printed out.

How to view a list of recurring donations

To find a full list of recurring donations:

  1. Log in to the User Portal.
  2. Select “Recurring Donations” in the left-hand navigation. 
  3. Select from four tabs. Each tab displays recurring donations by their “Started” date (newest at the top).

+ "Active" – recurring donations that will be processed on the “Next charge” date shown on each item
+ "Paused" – recurring donations that can’t be processed but are reactivated automatically when a nonprofit is back in good standing with federal and/or state authorities
+ "Disconnected" – details about these recurring donations are unavailable because the nonprofit has decoupled its payment processor
+ "Canceled" – recurring donations that have been discontinued and will not be processed

Each recurring donation item in any list includes the following:

  • the total amount of the recurring payment (this will be $0 for anything listed in the "Paused", "Disconnected" and "Canceled" tabs)
  • the payment method with its expiration date, if relevant (this will be “No payment method” under the Disconnected tab)
  • the date the recurring donation was created (“Started”)
  • the date the next donation will be processed (“Next charge” under the Active tab) or was halted (“Paused” under the Paused, Disconnected and Canceled tabs)
  • a “View History” button that links to a summary of past recurring donations to that organization
  • a “Manage” button that opens a dropdown menu with options for changing, adding or deleting payment methods or canceling all donation(s) in a payment (if there is more than one beneficiary nonprofit)
  • the name(s) of the beneficiary organization(s) and the amount(s) of the recurring donation(s)
  • three dots to the right of each named beneficiary nonprofit with a tool to cancel the recurring donation just to that nonprofit if there is more than one beneficiary in the recurring payment (versus canceling them all together).

How to view the history of a recurring payment

  1. Log in to the User Portal.
  2. Follow the instructions for navigating to a desired recurring donation.
  3. Select “View History” of the desired recurring payment to open a full list of completed payments.
  4. Choose “View Receipt” of the desired payment to open a receipt for that payment.
  5. To learn more about receipts, go to the How do I view receipts for past donations? section above.

How to edit the payment method for recurring donations

At present, this is only possible with credit/debit, ACH/bank transfer and digital wallet payments processed by Stripe. There is no way to edit the payment method on recurring donations made with PayPal (only cancel it), and no way to switch between payment methods (Stripe and PayPal).

Add a new payment method

Follow the instructions here.

Change to a different existing payment method

  1. Follow the first three steps outlined here.
  2. Choose the payment for which you would like to change the payment method and click the “Manage” button associated with it. This will only be possible with donations listed in the Active and Paused tabs.
  3. Select the “Payment Method” option. This opens a “Change Payment Method” popup.
  4. Select the payment method you wish to charge and click the “Update Method” button.
  5. Once you see a green “Payment method successfully updated” note, click the “X” at the top right of the popup or anywhere outside the popup to return to the main screen.

Important notes about changing to a different existing payment method

This functionality is evolving. At present, please be aware of the following when choosing to change to an existing payment method:
+ credit/debit cards – are an option when the current payment is another card or bank/ACH transfer used by the same payment processor, but not PayPal
+ bank/ACH transfer accounts – are an option when the current payment is another card or bank/ACH transfer used by the same payment processor, but not PayPal
+ new PayPal accounts – are not presently an option, though keep in mind that you can add and change payment methods within PayPal itself. If you wish to add and switch to a new payment method, view notes here.

If you wish to add and switch to a new payment method, view notes here.

How to cancel a recurring donation

  1. Follow the first three steps outlined here.
  2. To cancel an entire recurring payment (which may contain one or more donations), identify the payment and click the “Manage”.
  3. Select the “Cancel” option in the dropdown. A popup will ask for confirmation of the desire to cancel the recurring donation. 
  4. Click “Cancel Recurring Donation” to proceed, keeping in mind that the request may take a few minutes to process.
  5. To cancel one recurring donation that is part of a recurring payment with more than one donation, identify the payment and click the three dots to the right of the selected beneficiary nonprofit. This will only be possible with donations listed in the Active and Paused tabs.
  6. Select the “Cancel” option in the dropdown. A popup prompt will ask for confirmation of the desire to cancel the recurring donation. 
  7. Click “Cancel Recurring Donation” to proceed, keeping in mind that the request may take a few minutes to process.
  8. When a recurring donation is canceled, it is moved to the “Canceled” tab of recurring donations.

How to connect to Peer-to-Peer Fundraising and Team Fundraising pages

The User Portal has direct links to a user’s Peer-to-Peer Fundraising and Team Fundraising pages. This allows for easy cross-connection by Give Lively members who use the same login email address for the User Portal and their fundraising pages.

  1. Log in to the User Portal.
  2. Click on the “Fundraising pages” tab in the left-hand navigation bar.
Related Articles