
Is this article for you? It covers services only available to Give Lively member nonprofits.
Is this article for you? It covers Salesforce integration services only available to Give Lively member nonprofits.
Build an Event Ticketing page
Event Ticketing pages let you host in-person and virtual fundraising events. You can use these pages to sell tickets and sponsorships for your events or use them for non-ticketed events. Learn how to set Event Ticketing up, including how to add basic event details, logos and images, information about tickets (categories and price tiers), additional donor information requests and thank you messages.
Before you get started
Video Overview
Walkthrough
Before you get started
Video Overview
Walkthrough
Before you get started
Video Overview
Walkthrough
Before You Get Started
- Have you set up a Core Profile? It's a critical first step.
- If the event is in support of a Digital Fundraising campaign, you should create create a Campaign Page.
Video Overview
Video Transcript
Walkthrough
Getting started
- Log in to the Nonprofit Admin Portal dashboard, click the “Event Ticketing” link in the left-hand navigation bar and then "+ Create Event" to the right of the "Event Pages" page title.
- On the "Give Your Event a Name" page, name your event for internal purposes and click the "Next" button.
- On the next "Event Details" page, confirm the internal "Event Name" and then enter the name you want to appear on the event page in the "Display Event Page Title As" field.
- Lower on the same page, under “Event Location,” you can choose between one or both of the following:
+ (1) If you’re planning a face-to-face event, check the “In-person event location” box. (This will place a Google Maps widget on your event page to help your attendees get to the event.) If you don’t yet know the venue, select the button for “I don’t have an address yet” and return to this section when you do. If you do know the venue, be sure the “Search for an address or venue” button is selected and then start typing the venue’s name or address in the “Search by venue name or address” box. Choose a result to autofill the location details. Use the Google Maps widget to verify the address. You can also enter the address manually in the open fields. If you wish to clear the address, selecting the "Clear Address" button will do so in one click rather than having to delete details field by field.
+ (2) If you’re planning a virtual or livestreamed event, check the “Virtual event location” box. If you don’t yet have a link, select the button for “I don’t have a link yet” and return to this section when you do. If you do know the link, be sure the “Add a link” button is selected and then add both the web address of the virtual event and the title of the livestreamed or recorded event. The “Clear Website” button clears both fields in one click. If you would like the web address of the event to appear on your Event Ticketing page for all to see, make sure the "Public Link" button is selected; however, if you prefer to keep the web address private for donors and ticket purchasers only, select "Private Link" for it to appear only in the receipt email automatically sent to them. - Still on the same "Event Details" page, add the "Event Starts" and "Event Ends" date and time for your event. Ticket sales will end when the event starts.
- Enter an "Event Description" that will appear on your public page. For best results, we recommend typing and formatting your description directly in the text-editing window, not copy-pasting it from another document. Text copied from other word processing software sometimes includes unseen code that interferes with our text-editing tool.
- Associate your event's new Event Page either with an existing campaign or your core profile. Donation data will roll up to your selection. Keep in mind that you will not be able to change this selection after your first ticket is purchased.
- Click the "Save" button.
Logos and images
- From the "Edit Event Information" page, click on "Logos and Images" and then choose a file to upload as your logo (minimum of 640x640 pixels, no larger than 1MB and in JPG format). Click the "Save" button. This logo will appear in the top center of your Event Page, either above your event name ("vertically stacked") or alongside it ("banner").
- Next, upload your primary media. The primary image or video does not appear on mobile screens. Choose any of the following and then select “Save” to feature it prominently on your event page:
(a) Image - Select “Upload new image” and then navigate to the image you want from files on your computer. A large, high-quality image is best: recommended size 2000 x 1200 pixels. Images should be a JPG, JPEG or PNG. - Use the image cropper to frame your image: slide the gray ball along the scale to zoom in or out; click and drag on the image to center it as desired and your image will be cropped to a 5:3 aspect ratio. Then click the “Save” button.
(b) Video - Select “Edit” and then paste in the direct link to a public video (only Vimeo and YouTube [but not YouTube Shorts]) that you wish to embed on your page. Paste the full URL (with “http://" or “https://“), not an “embed code.” Then click the “OK” button.
(c) No Media - No further action is required. - Use the color tool to input your chosen color as a brand color. Note that, to ensure the strong color contrasts conformant with accessibility standards, your brand color is used only on some buttons, default images, icons and other small color highlights. Click the "Save" button to lock it in.
- Upload an image (minimum of 1200x630 pixels, no larger than 1MB and in JPG format) that will appear when you share your page’s link on social media like Facebook, Twitter (now known as X) or other platforms.
- To view the result, click on "Visit Page" near the top right of the page. This will open a new browser tab with your Event Page, showing all the pieces in place. To make changes, go back to the "Logos, Images, and Color" tab and make edits.
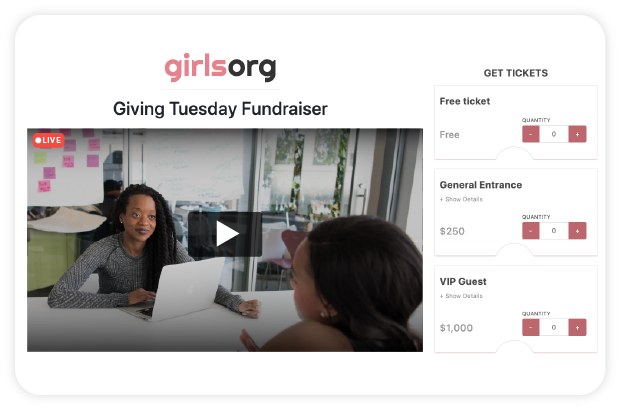
Ticket builder
- When you're ready, click “Ticket Builder” in the menu on the left side of the page.
- Follow the instructions to enter information about your tickets. Choose what category they fall under (click on "Category settings" to open a dropdown menu with options) and then add name, price, and total quantity. You also have the option to create a free ticket by leaving the price blank.
- Click on "Add Another Ticket" to include new ticket price tiers within a category, or click on "Add Another Category" to add a new category of tickets.
- Select whether ticket tiers will appear on your event page from "Lowest to Highest" or "Highest to Lowest" price.
- Click “Add More Ticket Details” if you would like to:
- Add a ticket description to appear alongside the ticket tier on your page and set sale dates for each ticket tier
- Create group and table tickets
- Designate a portion of each ticket as tax deductible
- Set a date range during which the ticket will be on sale (a feature useful for offering discounts and specials like Early Bird sales)
Additional questions and thank you message
- To collect additional information from attendees and donors, toggle the "Hide/Show" switch next to the question (Mailing Address, Custom Question etc.) to request that information after payment is made. Note that custom questions have a limit of 100 characters.
- Check the “Required Before Payment” box to make it obligatory before payment. To reduce friction during the purchase/donation process, we recommend only requiring questions essential to your event.
- Click the “Save” button.
- Customize a thank-you message for your Event Ticketing page.
Note that thank-you messages/receipts are automatically sent to every donor. Nonprofits cannot opt out of this feature. At present, thank-you messages/receipts can only be reissued by Give Lively’s customer support team.
Downloads
Get Inspired
No items found.
