
Set up free API integration users for Give Lively’s Salesforce integration
Learn how to connect a free API integration user with Give Lively’s Salesforce app.
Before you get started
Video Overview
Walkthrough
Before you get started
Video Overview
Walkthrough
Before you get started
Video Overview
Walkthrough
Before You Get Started
- Confirm you have an Enterprise Edition (or higher) Salesforce org. Salesforce includes five free Salesforce Integration user licenses per Enterprise Edition org.
- Confirm you have already requested a Give Lively Salesforce integration and that the Give Lively managed package is installed in your org.
- Confirm you have at least one available full Salesforce license to use temporarily during setup (you will downgrade it to a free Integration license at the end). If you have no spare full license, see the note in Step 2.
- You will need a Salesforce System Administrator to complete these steps.
Video Overview
Walkthrough
Step 1 — Build the Give Lively permission sets
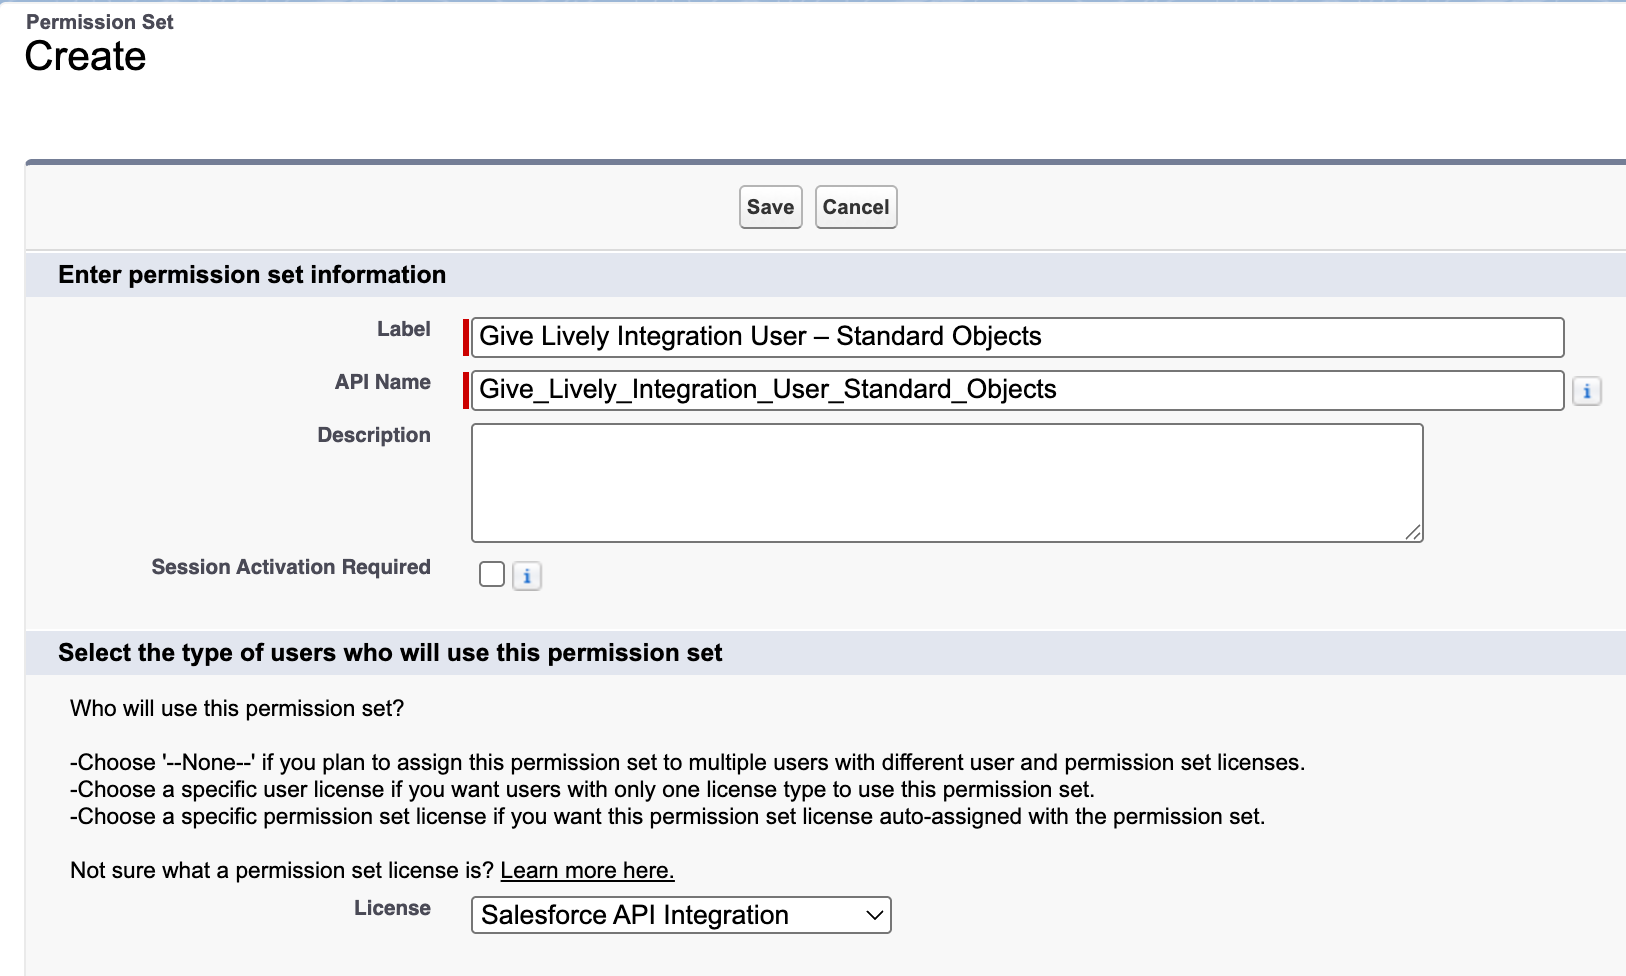
- In Setup, use Quick Find to open Permission Sets, then click New.
- Create a permission set — suggested Label: Give Lively Integration User – Standard Objects; License: Salesforce API Integration.
- Save your changes by clicking on Save.
- Check your email for a new message from Salesforce asking you to verify your account. Proceed through the steps to verify your newly created user.
- Grant access to any record types your org uses on these objects.
- We recommend Modify All and Create on each object, plus Read and Edit field-level access on the fields the integration writes. This must include the relevant standard fields (e.g. Opportunity.Amount, CloseDate, StageName; contact name and email) and the Give Lively package fields — not the package fields alone, or the sync will fail to populate standard fields. View a full field list in this article.
- Under System Permissions, grant: Assign Permission Sets, Download AppExchange Packages, Approve Uninstalled Connected Apps, Password Never Expires, and Manage Profiles and Permission Sets. Save.
- Create a second permission set — Label: Give Lively Integration User – Custom Objects; License: --None--. Save.
- Edit it to grant equivalent access to the Ticket Purchases and Ticket Tiers custom objects (only needed if you use Give Lively event ticketing).
- Click Save.
Step 2 — Create a full Salesforce admin user (temporary)
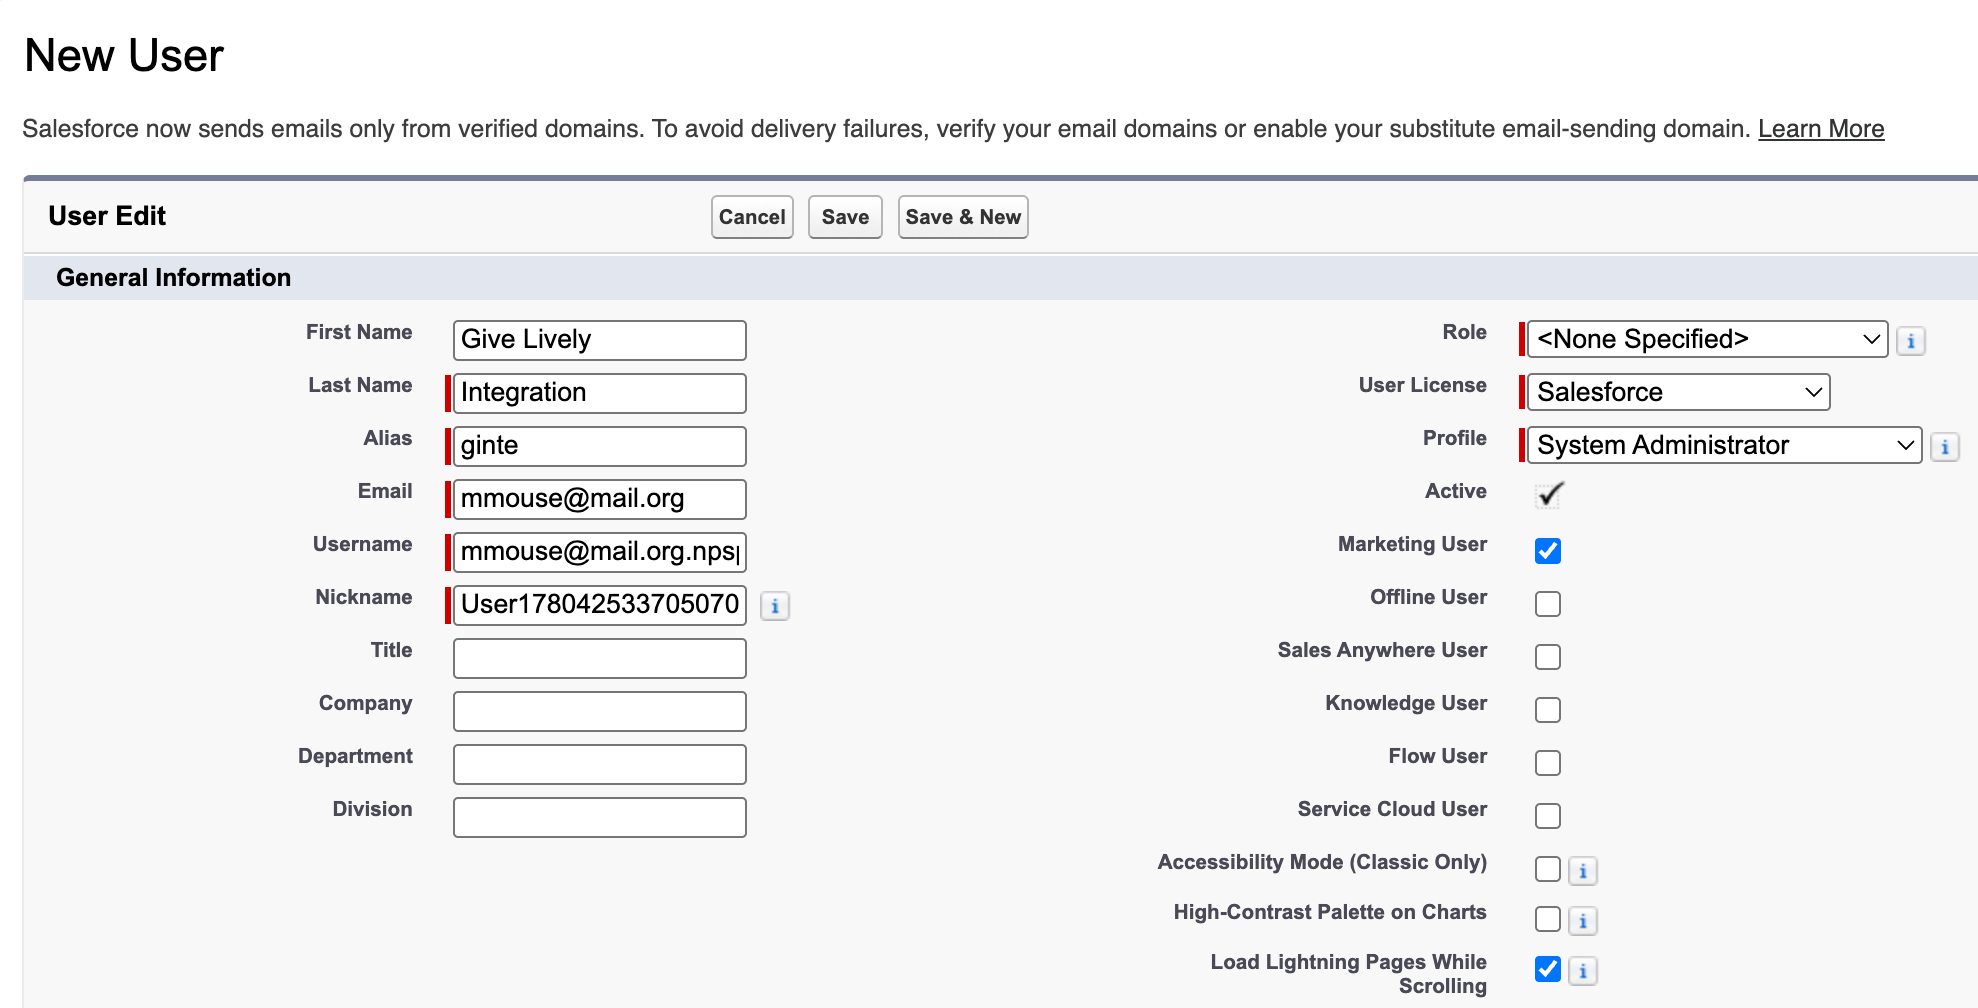
- In Setup, go to Users → New User.
- Enter a recognizable name, e.g. First Name Give Lively, Last Name Integration.
- Set the Email to an address you can access to receive the password-setup message. A monitored group/shared mailbox is a good choice so the credentials aren't tied to one person.
- Set User License to Salesforce (a full license) and Profile to System Administrator for now. This is temporary and makes it easy to verify the user can log in and connect.
- Check the "Marketing User" box. (Required — leave it checked through every later step.)
- Click Save.
Step 3 — Set the password and confirm login
- Open the account-verification email Salesforce sends to the address from Step 2.
- Follow the link, set a password, and save the password in a shared password manager so colleagues can reach it later.
- Confirm you can log into Salesforce as the Give Lively Integration user. This verifies the user and its profile work as expected.
Step 4 — Log fully out of Salesforce
Log out completely (or use a private/incognito window for the next step). If you remain logged in as yourself, the Give Lively connection in Step 5 may silently authorize as you instead of the integration user.
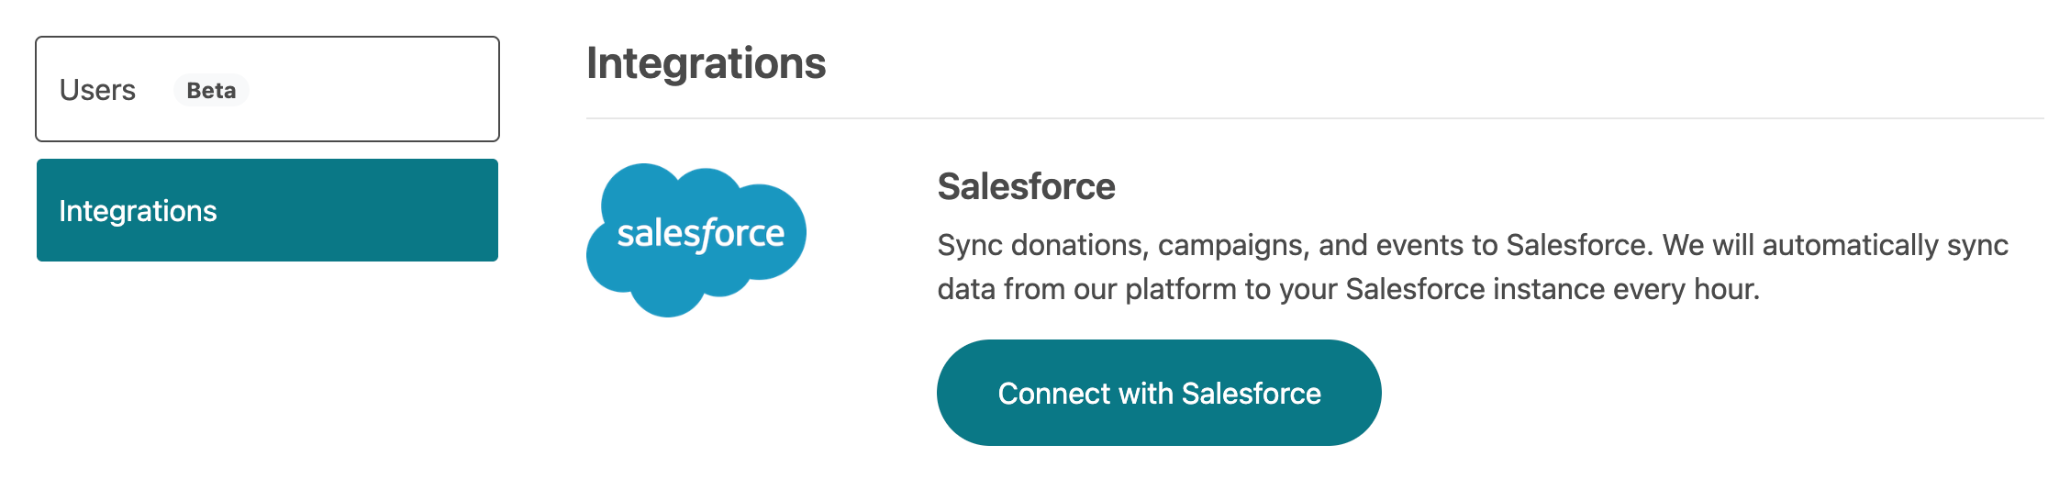
Step 5 — Connect Give Lively to Salesforce
- Log in to your Give Lively account and go to the Salesforce integration setup, then establish the connection.
- When prompted to authorize Salesforce, log in as the Give Lively Integration user — not as yourself. If you're already logged in as yourself, use the "Not you?" link first.
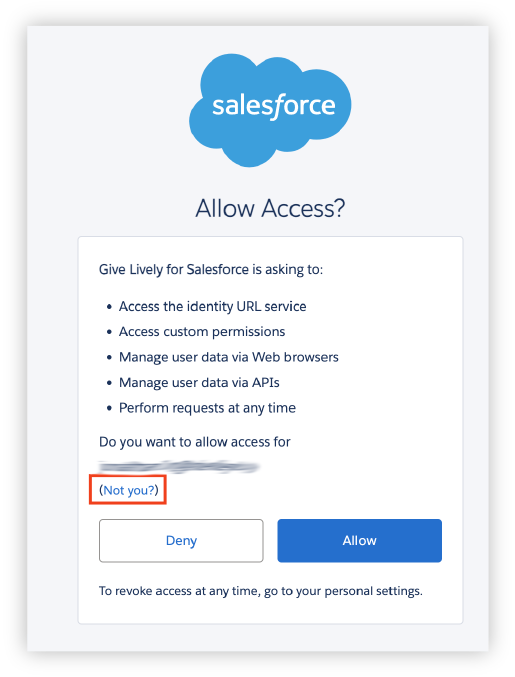
- Click Allow if prompted to grant access.
- After connecting, use Give Lively's button to apply the permission sets to the user, and run Sync Now to test.
- In Advanced Settings, set the Opportunity record type Give Lively should use (don't rely on the profile default — it may be wrong) and the Campaign, if any, that new opportunities should be added to.
If the connection won't establish: in the Salesforce Setup menu, open Connected Apps OAuth Usage, then use Quick Find to search for Give Lively for Salesforce, and click Install if available. Then retry connecting.
Step 6 — Confirm data flows to Salesforce
Make a small real donation (or use Give Lively's test card if you're in a sandbox - '4242 4242 4242 4242' alongside any name, valid future expiration date and security code). Use the Sync Now button in the Salesforce page on the Give Lively portal, then log back into Salesforce as yourself, find the contact, and confirm the opportunity appears and was created by the Give Lively Integration user. Syncs can take a few minutes.
Step 7 — Convert the user to the free Integration license
Now that the connection and sync are confirmed, downgrade the license.
- Log in as your own System Administrator user, not the newly created integration user.
- Access Salesforce Setup, then Users.
- Edit the Give Lively Integration user.
- Change User License to Salesforce Integration. You'll get a warning that assigned permission sets and permission set groups will be unassigned — this is expected; you'll reassign them in Step 8.
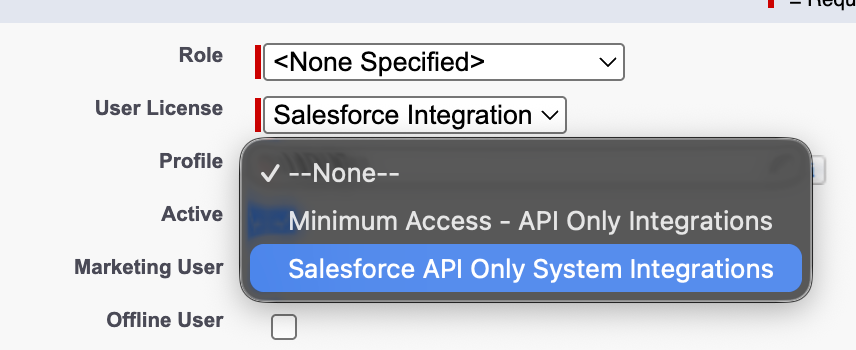
- Set Profile to Salesforce API Only System Integrations (or Minimum Access – API Only Integrations if that's what your org offers).
- Leave Marketing User checked.
Click Save.
Profile note: Some orgs have had success only with one of these two profiles and not the other. If the integration stops working after conversion, try the alternate profile.
Step 8 — Reassign permissions
Converting the license stripped the user's permissions, so reassign them:
- Assign your Give Lively Integration User – Standard Objects permission set, the Give Lively Integration User – Custom Objects permission set, and the package's Give Lively Additional Permissions permission set.

Step 9 — Re-validate and do a final test
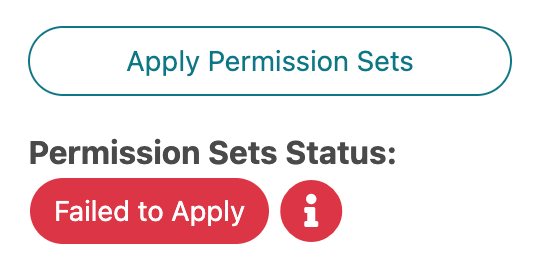
- In the Give Lively back end, confirm the integration still validates. Note: the "Apply Permission Sets" button will fail for an API-Only user — this red error is expected and safe to ignore, because you assigned the permissions manually.
- Put one more real donation through and confirm it syncs to Salesforce.
You've now connected Give Lively using a free API-only Integration user instead of a paid full license.
