
Use embeddable widgets to collect donations on your website
Learn how to embed a widget on a site you host, or one built using Squarespace, Wix or WordPress.
Before you get started
Video Overview
Walkthrough
Before you get started
Video Overview
Walkthrough
Before you get started
Video Overview
Walkthrough
Before You Get Started
- Have you set up a Core Profile? It's a critical first step.
- IMPORTANT: Donation Widgets can only be associated with Campaign pages or the Core Profile. Widgets do not work with Event Ticketing pages. When a Campaign Page is closed, any associated widget will no longer accept donations and will display the alert “This campaign has ended.” To ensure uninterrupted giving, select an alternate Campaign Page (or the Core Profile) from the list of available fundraising pages.
- IMPORTANT: You can only place one Donation Widget per web page. You may have more than one Donation Widget on your website as long as the widgets are placed on different pages.
Video Overview
Walkthrough
Two types of donation widgets
There are two types of widgets: Simple Donation Widget and Branded Donation Widget.
Simple Donation Widget
The Simple Donation Widget has a streamlined design. It's useful when you don't want the donation form to take up a lot of space.
Learn how to embed a Simple Donation Widget on a website you host, on a Squarespace site, on a Wix site or on a WordPress site.

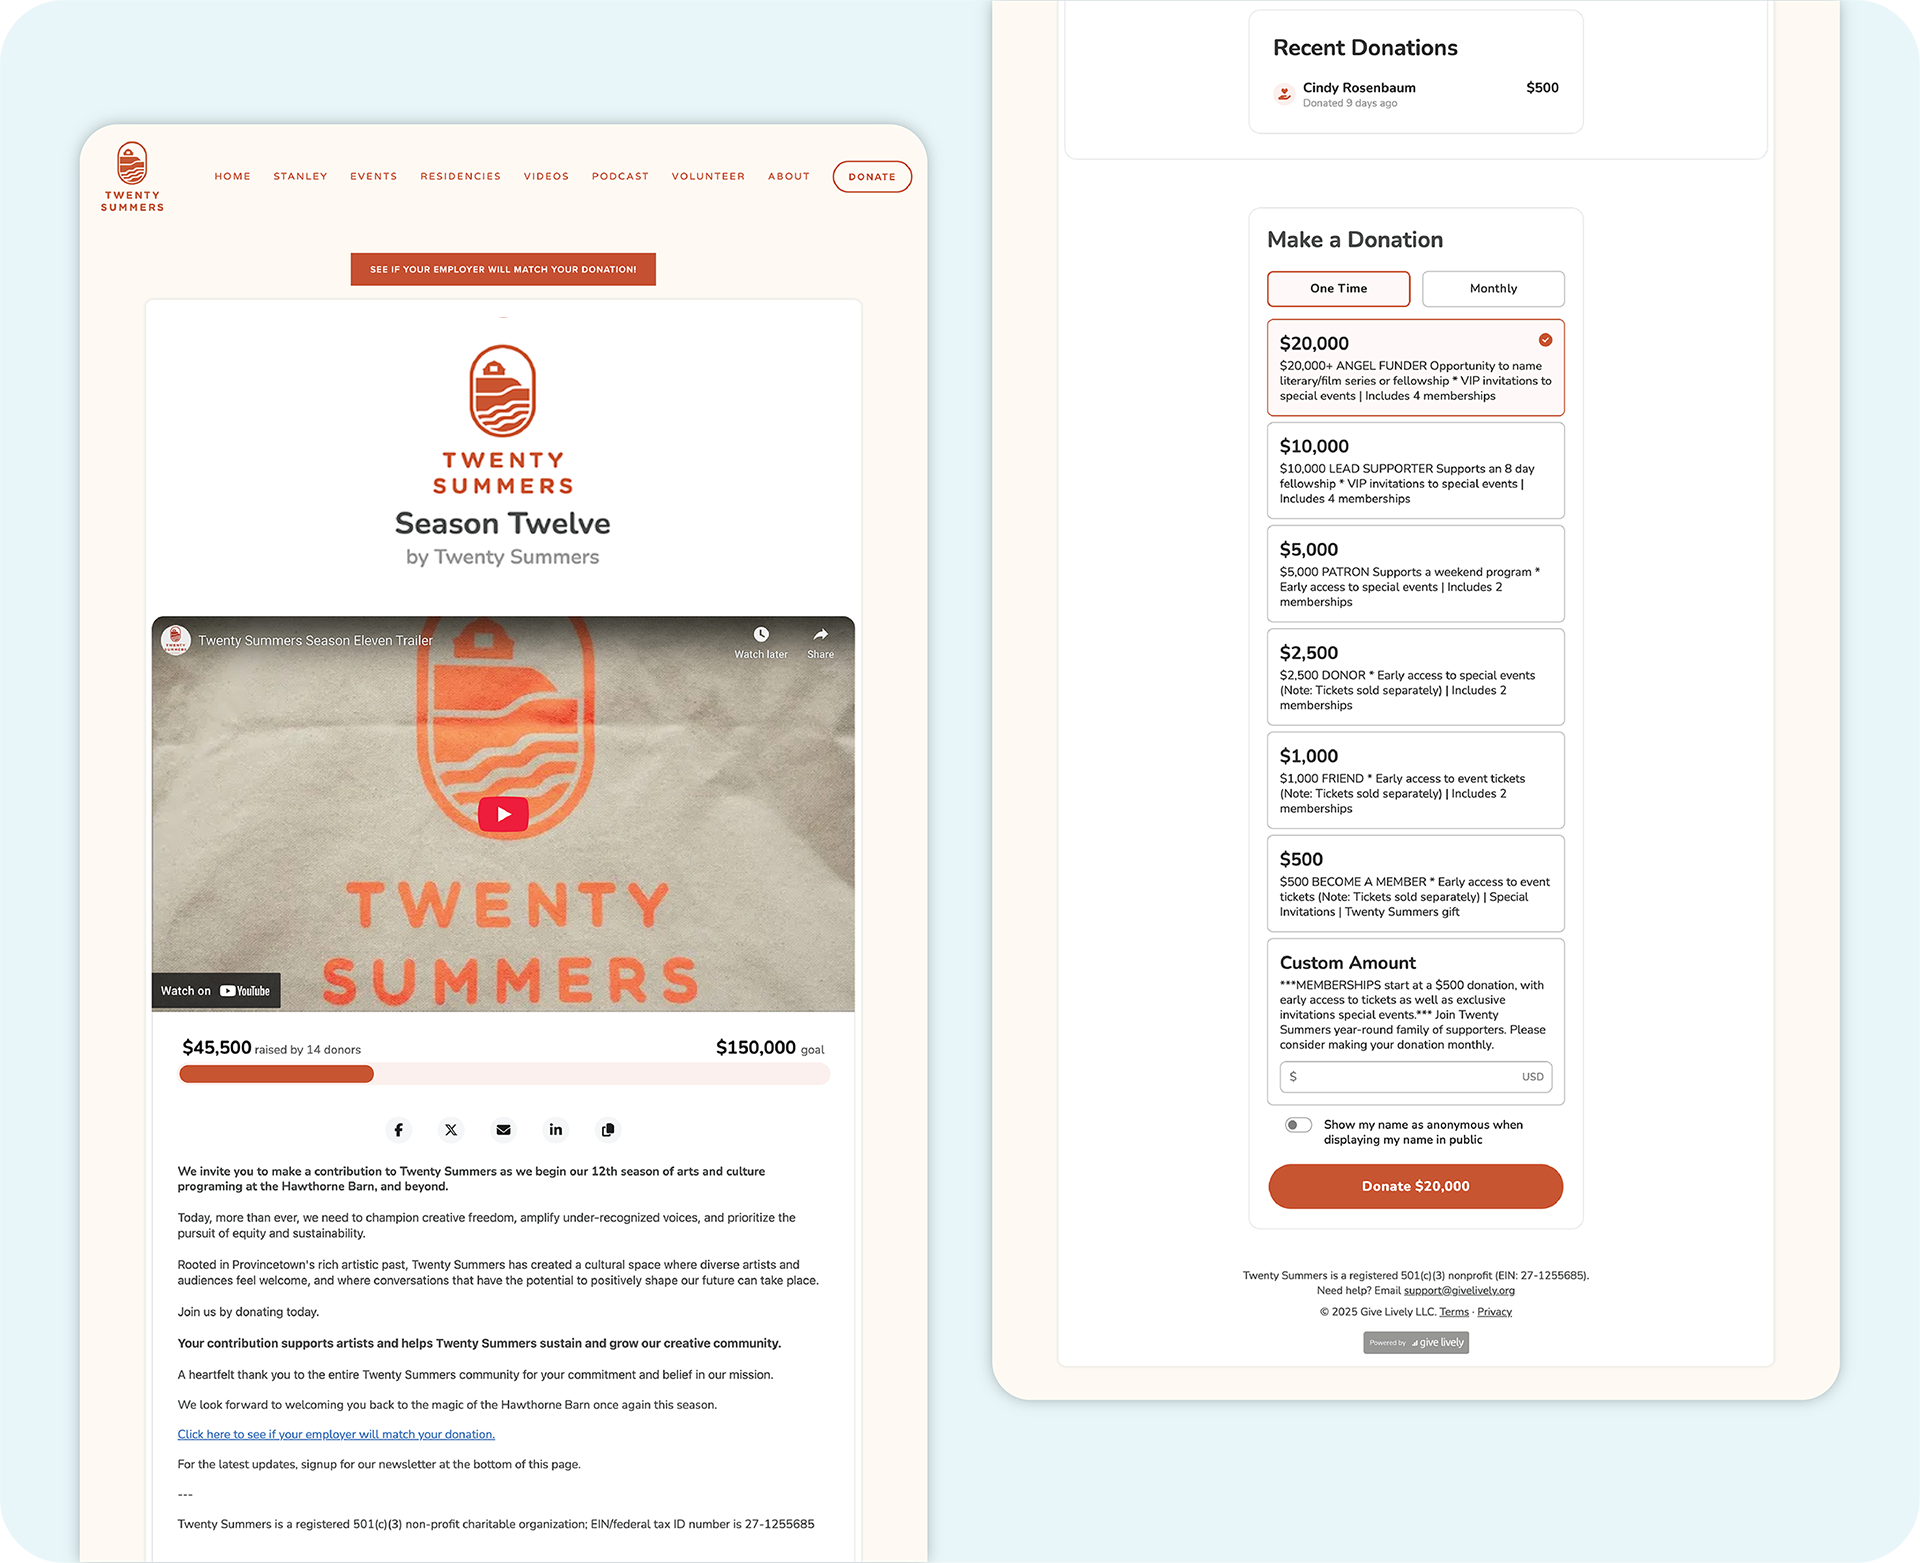
Branded Donation Widget
A Branded Donation Widget allows for the use of branding, imagery, videos and stories, as well as built-in social sharing to strengthen any fundraising appeal.
Learn how to embed a Branded Donation Widget on a website you host, on a Squarespace site, on a Wix site or on a WordPress site.
A note about digital wallets
When donation widgets support digital wallets, Give Lively widgets detect if a donor's device/browser has Apple Pay, Google Pay or Venmo enabled as a payment method. Learn how to enable and disable digital wallets.
In all cases, contact support@givelively.org if you have any problems setting up your widget.
Embed a Donation Widget on a website you host
Embed a Simple Donation Widget on a website you host
- Log in to the Nonprofit Admin Portal and click the "Donation Widgets" link in the left-hand navigation bar.
- Take a good look at the Widget Preview, which shows the widget filling the width of the container in which you embed it, with a recommended container height of 272 pixels.
- Below the Widget Preview is the option to "Customize Your Widget." Click the "Core Profile" box to reveal a menu of fundraising pages that can be associated with the widget. Choose the fundraising page you prefer. The widget will automatically adopt that campaign’s styling and donation frequency. In addition, donations made through the widget will be associated with the chosen fundraising page in the reports you get from our platform.
- Under "Donation Amounts," select from the options presented. You can choose to include the four default suggested donation amount buttons ($25, $50, $100 and $250) or come up with your own four suggested amount options and write them in. Alternatively, you can set one pre-filled amount for the custom donation field (which hides all other suggested amounts). Look back at the preview to see what these options look like as you change them.
- If you wish to include an option for donors to give in honor or in memory of someone, click the box next to "Allow donors to dedicate their donations."
- Once done tailoring your widget, click the "Get Embed Code" button, and then select and copy the code in its entirety.
- Paste the embed code into your website's code wherever you would like the widget to appear. The widget is responsive so it will fill the container you place it in.
See above for an important note about digital wallets and widgets.
Embed a Branded Donation widget on a website you host
- Log in to the Nonprofit Admin Portal and click the "Donation Widgets" link in the left-hand navigation bar.
- Click "Branded Donation Widget" in the left-hand menu.
- Wait a moment for a preview of the widget to load using information pulled from your Core Profile.
- If you wish, associate your widget with one of your Campaign Pages instead of your Core Profile. The widget will reload and adopt that campaign’s styling and donation frequency. In addition, donations through the widget will be associated with the chosen fundraising page in the reports you get from our platform.
- Click "Get Embed Code" and then select and copy the code in its entirety.
- Paste the code into your website's code wherever you would like the widget to appear. The widget is responsive so it will fill the container you place it in.
- IMPORTANT: For your Branded Donation widget to work, it must be served over HTTPS, meaning your website must begin with HTTPS, not HTTP.
See above for an important note about digital wallets and widgets.
Embed a Simple or Branded Donation Widget on a Squarespace site

To add a Simple Donation Widget, follow steps 1-5 in the Embed a Simple Donation Widget on a website you host section above before turning to the steps below.
To add a Branded Donation Widget, follow steps 1-4 in the Embed a Branded Donation Widget on a website you host section above before turning to the steps below.
See above for an important note about digital wallets and widgets.
Embed a Simple or Branded Donation Widget on a Wix site

To add a Simple Donation Widget, follow steps 1-5 in the Embed a Simple Donation Widget on a website you host section above before turning to the steps below.
To add a Branded Donation Widget, follow steps 1-4 in the Embed a Branded Donation Widget on a website you host section above before turning to the steps below.
- Click "Get Embed Code" and then select and copy the code in its entirety.
- Click here and follow the instructions provided by Wix.
- When editing your page, click the "Home Page Code" footer, which will bring up an HTML code editor. You should, by default, see the following code (if you have never edited this section before):
$w.onReady(function () {
//TODO: write your page related code here...
- Delete that code and paste in the following (if you've already embedded one widget on your Wix site, you will need to replace "html1" -- highlighted in bold in the first line below):
const GL_WIDGET_ID = "#html1";
import wixWindow from 'wix-window';
$w.onReady(function () {
const glWidget = $w(GL_WIDGET_ID);
glWidget.postMessage("is_wix");
glWidget.onMessage((event) => {
if (event.data === "is_wix") {
glWidget.postMessage("is_wix");
} else {
const matches = event.data.match(/^wix:open_modal:(.*)$/);
if (matches) {
wixWindow.openModal(`${matches[1]}&show_close_button=false`, {
"width": 500,
"height": 650
});
}
}
});
});
Embed a Simple or Branded Donation Widget on a WordPress Site

To add a Simple Donation Widget, follow steps 1-5 in the Embed a Simple Donation Widget on a website you host section above before turning to the steps below.
To add a Branded Donation Widget, follow steps 1-4 above in the Embed a Branded Donation Widget on a website you host section above before turning to the steps below.
- Click "Get Embed Code" and then select and copy the code in its entirety.
- Click here and follow WordPress's widget instructions.
See above for an important note about digital wallets and widgets.
