
Install or upgrade the Give Lively for Salesforce application
Make the most of the new features in Give Lively's next-generation Salesforce integration. In keeping with Give Lively's commitment to be free for nonprofits, there is no charge for this upgrade.
Before you get started
Video Overview
Walkthrough
Before you get started
Video Overview
Walkthrough
Before you get started
Video Overview
Walkthrough
Before You Get Started
Administrators may wish to review our technical outline to see what kind of Give Lively data, fields and objects will be added to the org.
Video Overview
Walkthrough
Requesting assistance
To take advantage of the new features of the Give Lively Salesforce integration, submit a request for assistance. A member of the Give Lively support team will be in contact and provide you with an installation link for the app, as well as any necessary help with the process.
Remember to configure Salesforce settings in the Give Lively Nonprofit Admin Portal after installing or upgrading the app.
Installation process
- Once you have received an installation link from the Give Lively support team, click to open it in your browser.
- If you are prompted to log into Salesforce, follow normal steps to do so. Note: You will need administrative rights to install or upgrade the Give Lively app.
- Click the "Get It Now" button in the upper right-hand corner of the listing.
- Enter your Salesforce credentials.
- Select whether you want to install it in production or a sandbox environment.
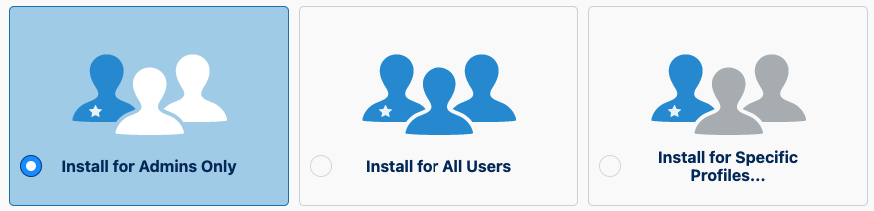
- When prompted during installation, we recommend choosing to Install for Admins Only, and then using permission sets to grant access to anyone who will be administering the app or making use of its data (see next section for additional details).
Permission sets
Two permission sets are included in the Give Lively app:
- Give Lively Integration User: a broad permission set intended to be assigned to the user in your Salesforce org that connects to Give Lively to synchronize data.
- Give Lively General User: a narrower permission set intended for any Salesforce users who will need to view or interact with synced Give Lively-specific data.
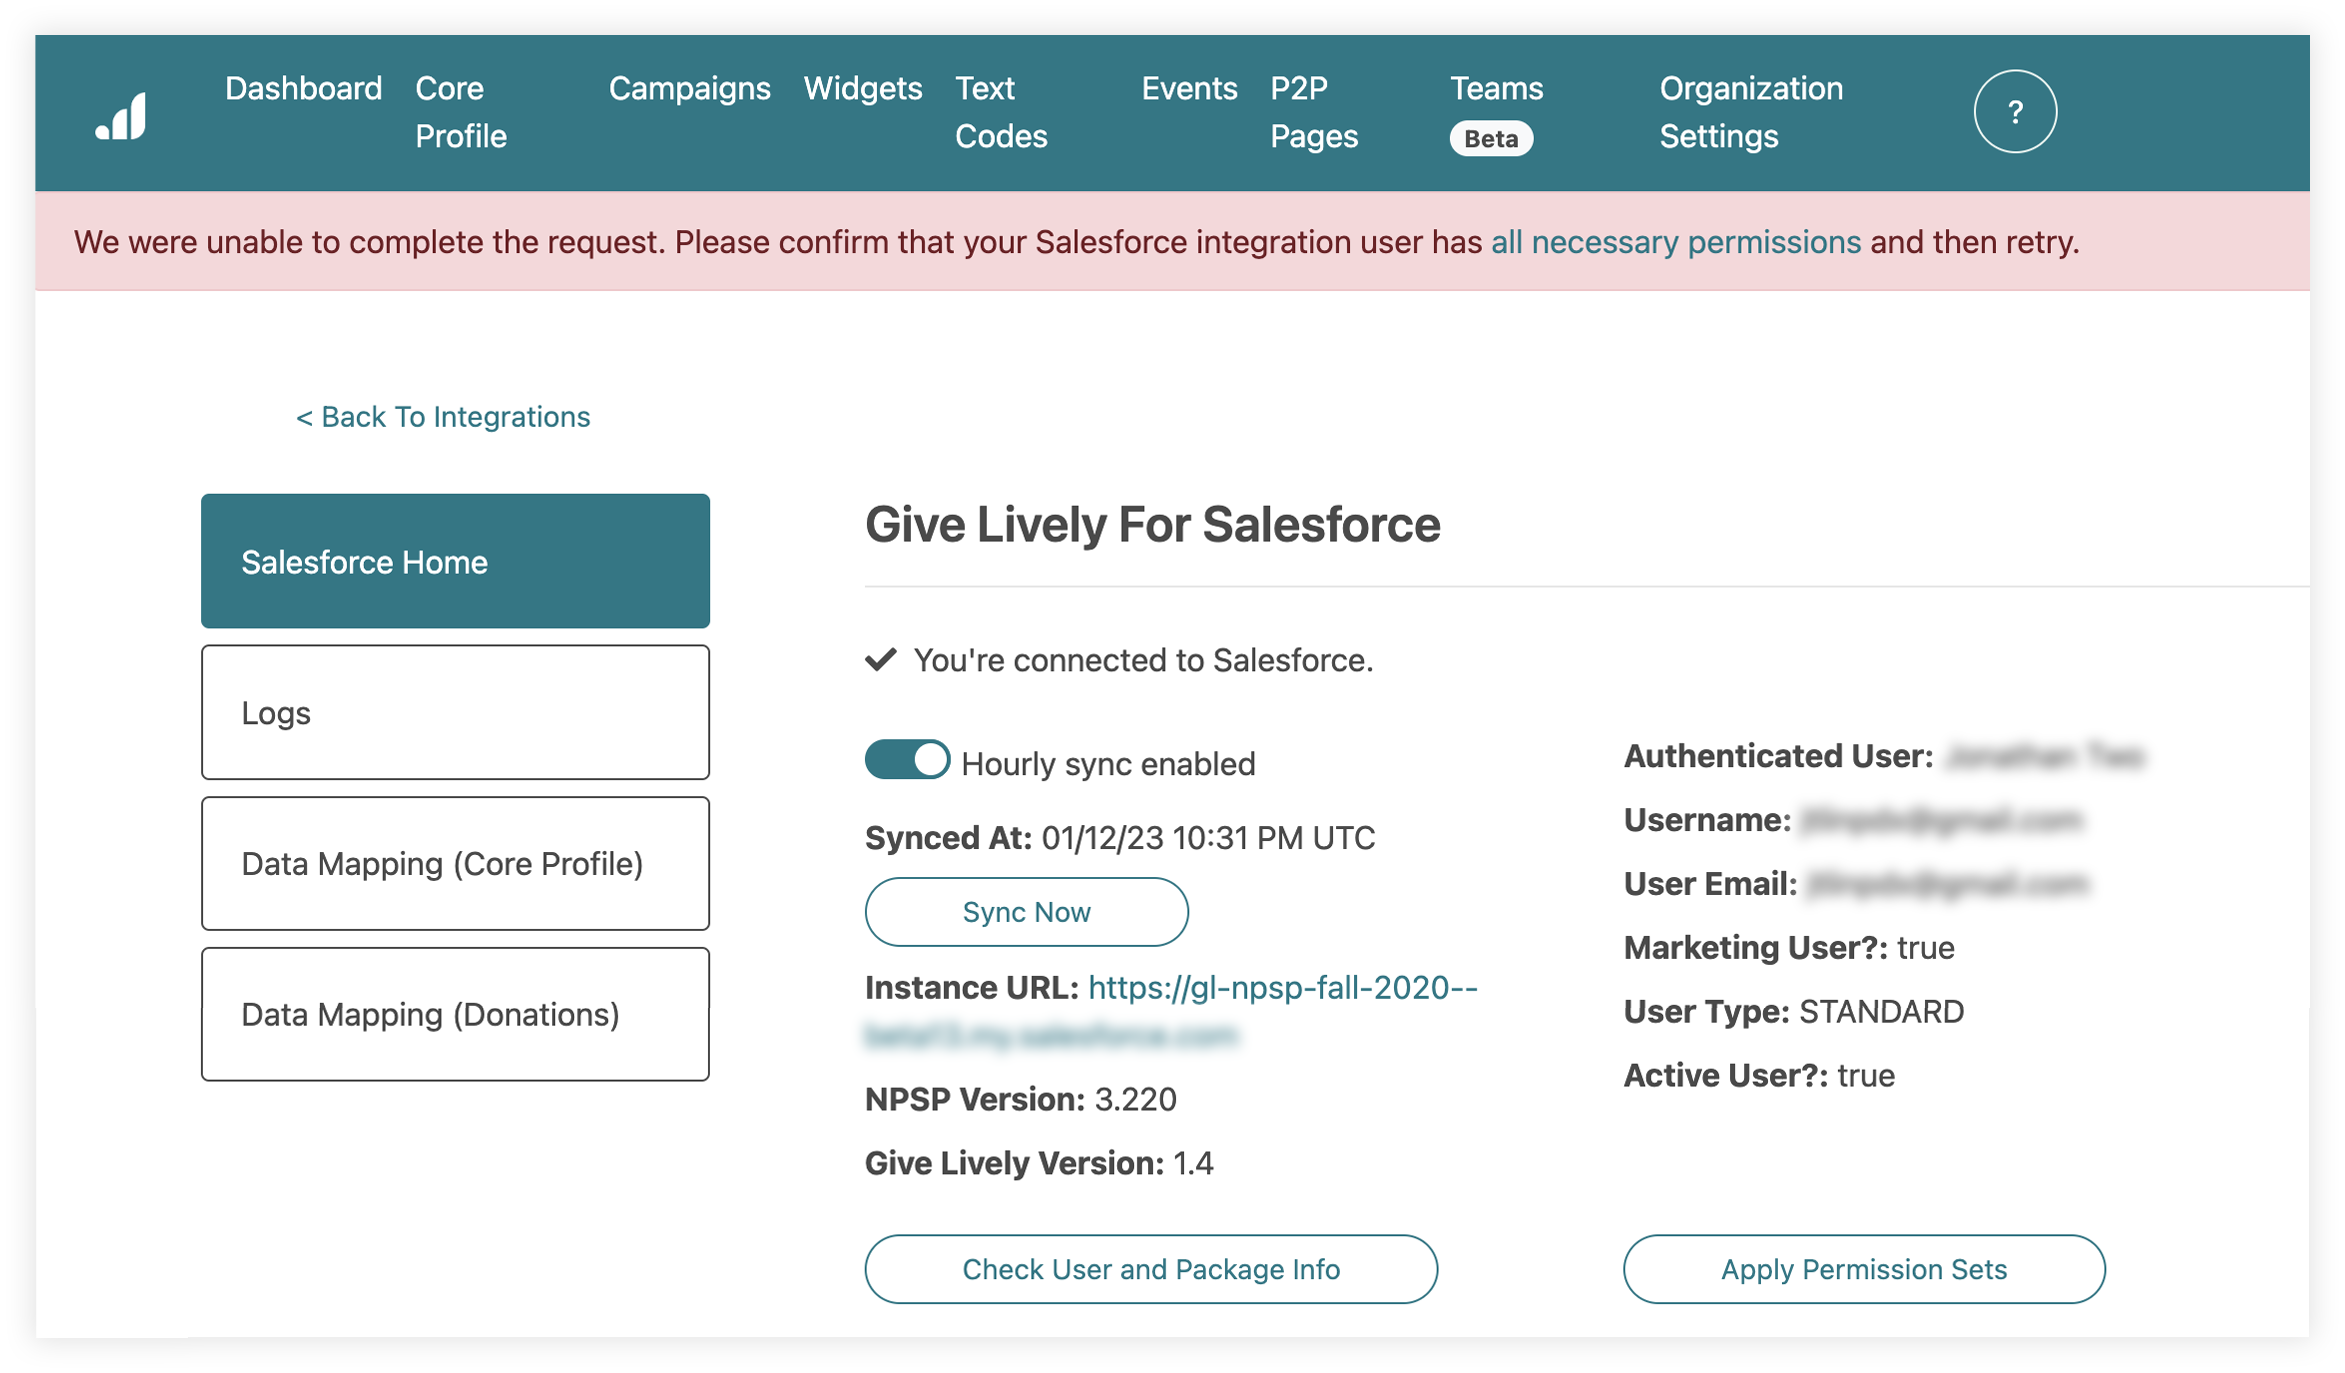
Note: A warning will be displayed if the Salesforce integration user lacks the necessary Salesforce permissions to refresh information or create/assign Give Lively custom permission sets.
Give Lively Integration User
- The Give Lively Integration User permission set includes permissions for all custom fields, objects and other metadata included in the app.
To assign the Give Lively Integration User permission set to the connected user responsible for syncing:
- Navigate to https://secure.givelively.org/salesforce (or https://secure-staging.givelively.org/salesforce for staging)
- Click the Apply Permission Sets button
- Wait until the status updates to “Succeeded”
- Note for orgs with the Nonprofit Success Pack (NPSP) installed: In addition to applying the Give Lively Integration User permission set to the integration user, this button will also create and apply a second permission set called Give Lively Additional Permissions. This includes access to several fields unable to be included in the packaged permission set, but necessary for syncing data.
Give Lively General User
- The Give Lively General User permission set is a subset of the permissions included in the Give Lively Integration User permission set. It provides users access to Give Lively app fields, but omits the broad permissions that are necessary to ensure successful synchronization of data.
To assign the Give Lively General User Permission set:
- Click the setup gear icon on the top-right of the screen. From the list that appears, select “Setup”.
- In the left-hand menu, go to Administration -> Permission Sets.
- Click on the Give Lively General User permission set.
- Click the Manage Assignments button.
- Click the Add Assignments button.
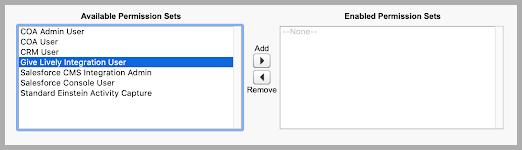
- Check the boxes corresponding to any of your users that will need access to Give Lively data, then click the Assign button.
- Click Done.
Custom Opportunity fields
Give Lively’s app syncs donation information to both standard and packaged custom fields at the Opportunity level. Custom fields will need to be added to your Opportunity Page Layout(s) to become visible to users.
Modifying the Opportunity page layout
Here’s how to change the Opportunity Page Layout:
- Click the gear icon in the upper-right corner of the screen. From the list that appears, select “Setup”.
- Switch to the Object Manager tab.
- Use Quick Find or scroll to click on the Opportunity object.
- Select Page Layouts in the left-hand menu.
- Click the page layout name used for Opportunity type(s) associated with donations, e.g. “Donation Layout”.
If you have multiple page layouts, determine which one (or ones) applies to donations and needs to be updated by reviewing the Page Layout Assignment from the button on upper right. - From the toolbar at the top of the page, click and drag the fields you wish to display onto the page below. We recommend at least adding the following:
+ Anonymous to Public
+ Net Amount
+ Payment Platform Transaction Fee
+ Text Code Used
+ Transaction Fee Covered by Donor - Once finished, click Quick Save in the toolbar at the top of the page.
- As needed, repeat the above steps for other page layouts.
Users will now be able to see additional donation information from Give Lively when viewing synced Opportunities.
Ticket tiers
With the new release, the ticket tiers you create on a Give Lively Event Ticketing page will now be synced to a new custom object in your Salesforce org. When a Give Lively event syncs into Salesforce as a Campaign, corresponding Ticket Tiers will automatically be associated. To view Ticket Tiers, you will need to include them as a related list on your Campaign Layout(s).
Modifying the Campaign page layout
- Click the setup gear icon on the top-right of the screen. From the list that appears, select "Setup".
- Switch to the Object Manager tab.
- Use Quick Find or scroll to click on the Campaign object.
- Select "Page Layouts" in the left-hand menu.
- Click the page layout name used for Campaigns type(s) associated with events. (Please note: There is no standard Campaign record type and/or page layout for events, but many organizations choose to create one manually.)
If you have multiple page layouts, determine which one (or ones) applies to events and needs to be updated by reviewing the Page Layout Assignment from the button on upper right. - From the toolbar at the top of the page, select "Related Lists".

- From the Related Lists options, click and drag Ticket Tiers onto the page layout where you’d like it to display.
- Click the wrench icon in the Ticket Tiers list to add fields to display.

- Add the Ticket Tier fields you would like to see on Salesforce campaigns syncing with Give Lively events. We recommend including Tier Title, Price, Total Available Tickets, Start Availability and End Availability.

- Click the "+" to expand the Buttons section, then uncheck the box next to New.
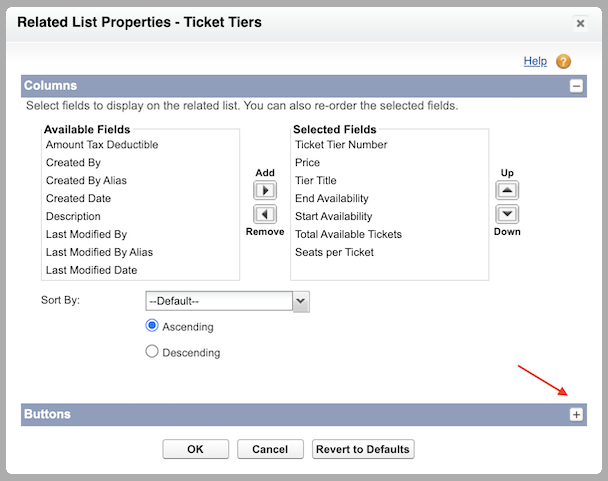
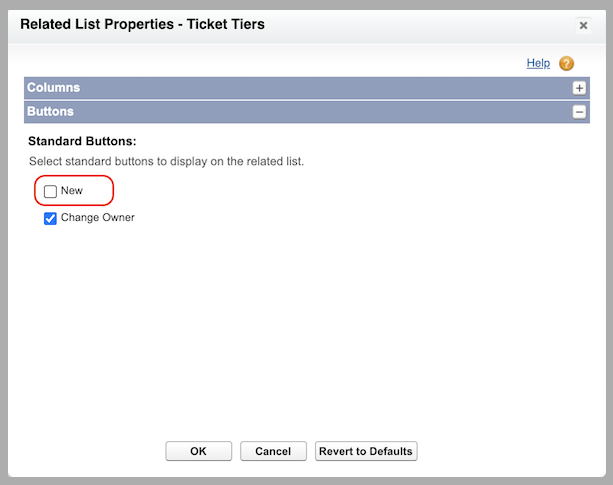
- Click the "OK" button to close the window, then click "Save" in the toolbar at the top of the page.
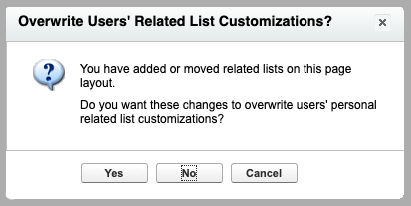
- Click the "No" button to save changes:
You will now be able to see Ticket Tier information when viewing Salesforce Campaigns synced with Give Lively Event Ticketing pages.
Ticket purchases
In addition to the Ticket Tiers, Ticket Purchases made through Give Lively are now stored in Salesforce. Ticket Purchases can be viewed in the related list on Ticket Tier records as well as on Opportunity records synced from Give Lively events.
To view Ticket Purchases related to an Opportunity, you’ll need to add the Ticket Purchases related list to the Opportunity page layout(s).
Modifying the Opportunity layout
Here’s how to change the page layout:
- Click the setup gear icon on the top-right of the screen. Select "Setup" in the list that appears.
- Switch to the Object Manager tab.
- Quick Find or scroll to click on the "Opportunity" object.
- Select "Page Layouts" in the left-hand menu.
- Click the page layout name used for event Opportunity.
If you have multiple page layouts, determine which one(s) apply to events and need to be updated by reviewing the Page Layout Assignment from the button on upper-right. - From the toolbar at the top of the page, select "Related Lists".
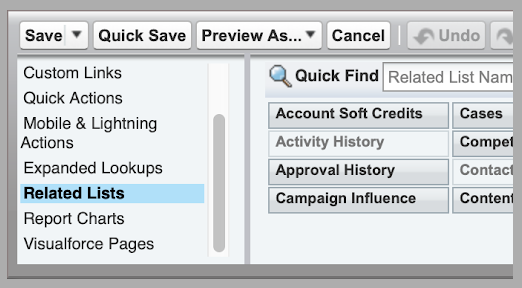
- From the Related Lists options, click and drag Ticket Purchases onto the page layout where you’d like it to display.
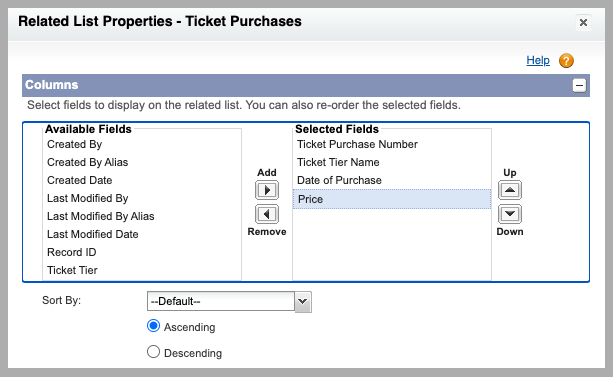
- Click the wrench icon in the Ticket Purchases list to add fields to display.
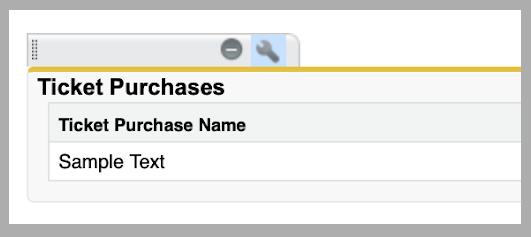
- Add the Ticket Purchases fields you would like to see on the Opportunities. We recommend adding Ticket Tier Name, Date of Purchase and Price.
- Click the "+" to expand the Buttons section, then uncheck the box next to New.
- Click "OK" to close the window, then click "Save" in the toolbar at the top of the page.
- Click the "No" button to save changes:

The related ticket purchases will now be displayed on Opportunities.
Give Lively IDs in Salesforce
In order to better relate the data between the two systems, the Give Lively record IDs are now being synchronized to Salesforce in the following fields:
- Contact - Give Lively User ID: Give Lively identifier for donors.
- Opportunity - Give Lively Donation Id: Give Lively identifier for charges.
- Campaign - Give Lively ID: Give Lively identifier for campaigns (distinct from, but related to Salesforce campaigns).
- Opportunity - Give Lively Event Id: Give Lively identifier for events.
- Opportunity - Give Lively Subscription ID: Give Lively identifier for subscriptions. Appears only for recurring donations.
